Create a simulation scenario (preview)
[This article is prerelease documentation and is subject to change.]
A simulation scenario is a named set of modifications over an existing process model. By default, a simulation scenario creates the scenario based on actual process view data. You don’t need to define the entire scenario from the scratch. The simulation scenario creates only modifications to an existing statistical process model snapshot.
The modifications applied in the simulation scenario have no effect on process data. They don't change the output of process model or process analysis.
Important
- This is a preview feature.
- Preview features aren’t meant for production use and may have restricted functionality. These features are available before an official release so that customers can get early access and provide feedback.
To run simulation, you need to create a simulation scenario first. To create a simulation scenario, follow these steps:
On the Power Automate Process Mining desktop app navigation bar, select Process simulation.
Select Add simulation.
The Process simulation screen displays with three tabs:
- General settings
- Activities
- Result Details
Define scenario settings
This section explains some of the settings for your simulation scenario in the General settings tab. For example, general settings include name, description, currency, arrival time settings, and timetables/work schedules.

In the Name field, enter a name for the simulation scenario.
In the Description field, enter a description for the simulation scenario.
In the Currency dropdown menu, select the currency used for financial KPIs.
In the Arrival time section, define the settings that determine the arrival of cases in simulation.
- In the Instances field, select the instance number.
- In the Scenario start at field, select the date on the calendar to represent when the simulation scenario starts.
- In the Exclude at the start and Exclude from the end fields, select the up or down arrow to exclude cases from the start and end of simulation when there's increasing and decreasing inflow of new cases. Exclusions filter out periods when there's no full workload or inflow from the simulated cases.
(Optional) In the Timetables/Work schedules section, select Add new timetable to add new timetables for working hours. These timetables can be assigned to Resources used in the simulation.
In the Resources group, add resources to the simulation scenario by following the instructions in the Manage the workforce section.
Manage the workforce
A table resource allows you to manage the workforce for a simulation scenario. You can add, modify, or remove resources from the pool.
- To define a new resource, select Add new resource.
- To modify an existing resource, select a resource name.
- To remove resource, select the x in the fifth column of the resource.

To create and edit the workforce, enter the properties in the Resource edit screen.
The following table list the fields and a description or example:
| Field | Description or example |
|---|---|
| Name | Name of the resource. |
| Finance attribute | Attribute used to calculate hourly cost. When no such financial attribute exists, select the Simulation value and enter hourly cost in Cost per hour field. The value in this field can't be empty. Either select the Simulation value or any finance per hour attribute. If you use the Simulation value, the value from the Cost per hour field is used. Also, when you select a finance attribute but you updated a preloaded value in the field, that value for Finance attribute is changed to Simulation. |
| Cost per hour | Hourly cost for a resource when there’s no financial attribute. The value from the field is used when you select the Simulation value in the Finance attribute field. |
| Parallel tasks amount | The maximum number of parallel tasks a given resource can handle. |
| Task processing efficiency | How much more or less efficient the resource is compared to the default resource. A value above 1.0 means more efficient. A value below 1.0 means less efficient. |
| Timetables/Work schedules | Which working hours apply for a given resource. |
Modify activities
To modify activities in a simulation scenario, select the Activities tab on the Process simulation screen. The Activities tab displays a list of activities in the process model.

To display the screen for a specific activity, select the activity from the Name column.
The Activity screen contains three tabs:
- General settings
- Resources
- Sequence flows
Learn more about the tabs in the following sections.
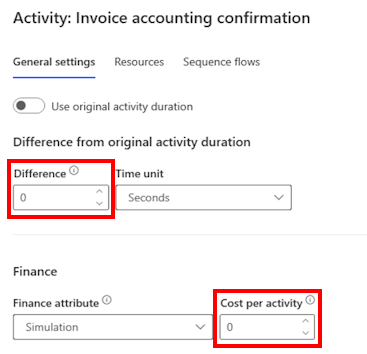
General settings
In the General settings tab, you can set the following items:
- Modification (difference) for activity duration: Activity duration is modeled based on original process. This setting allows you to change duration of each occurrence by defined difference.
- Cost per activity: To simulate cost of activity, it's possible to specify a process attribute that defines base cost of activity. Total cost per activity is base cost per activity plus cost of resource (duration multiplied by cost per hour).

Resources
The Resources tab lists all resources and their work distribution on the activity for a given resource.
To add a resource for a given activity, select Add.
To remove a resource for a given activity, select the x at the end of the resource's row.
To change work distribution for a selected resource, type the distribution number directly in the field, or use the up and down arrows.
Important
The sum of all work distributions (probabilities) must be 100 percent.

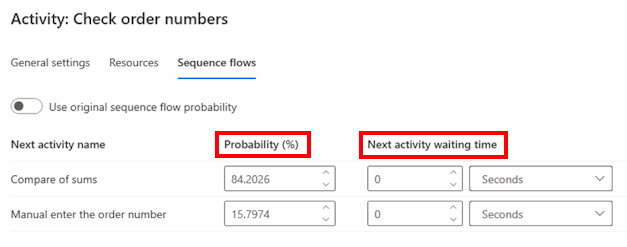
Sequence flows
Use the Sequence flows tab to modify probabilities for the next activities and their waiting times.
For each activity in the Next activity name column, enter the following fields:
Probability (%): The probability of the next activity in terns of percentage.
Next activity waiting time: The time between the end of the current activity and the start of the next activity.

Start a simulation
Start the simulation and get an estimation of its duration in the Process simulation screen.
- Return to the Process simulation screen.
- To start the simulation, select Simulate.
- View the expected estimation of the simulation duration next to Simulate.
The status of the simulation scenario is indicated below the scenario’s tile. Examples of the status are Queued for start and Completed.