Install and set up the SAP Supplier Self Service template
Enterprise templates for Power Platform are solutions designed to digitally transform broad, complex business scenarios for specific lines of business or enterprise wide.
The SAP solutions are enterprise-ready and therefore need to be customized, deployed, and managed by a centralized team to maintain governance and security.
Prerequisites
Before you install and set up the SAP Supplier Self Service template, you need to ensure that SAP is integrated with Power Platform and that the SAP Procurement template is installed and set up in its own environment.
Take these steps to integrate SAP with Power Platform:
- Review requirements to integrate SAP with Power Platform.
- Set up environments and DLP policies.
- Set up an on-premises data gateway.
- Configure authentication.
Take these steps to install and set up the SAP Procurement template:
- Install and set up the SAP Procurement solution.
- Configure environment variables.
- Set up connections for SAP and Dataverse.
- Set up SAP List of Values. The SAP List of Values must be populated, otherwise the SAP Procurement and SAP Supplier Self Service solutions will not work properly.
- Enable Javascript (JS) files as attachments in your environment. Follow steps for Setting blocked file extensions for attachments to ensure Supplier Self Service Portal solutions do not fail during import
More information
- Power Platform adoption best practices
- Administer Microsoft Power Platform
- Working with enterprise systems
Download and install
This section provides links to the SAP Supplier Self Service solution files and the guidance to manually install them into the same developer environment that contains the SAP Procurement solutions.
You have the option to download either managed or unmanaged solution files.
Whichever option you choose, be sure to download both SAP Supplier Self Service and SAP Supplier Self Service Portal solution files and then install SAP Supplier Self Service first.
- Managed
- Unmanaged
Once you install both solutions, select Publish all customizations. Be sure to set up connections for SAP and Dataverse.
Note
For the connector setup, use an SAP service-user account that is supported with the appropriate SAP licenses and permissions. All interactions corresponding to the operations done on the supplier website are done under this service-user context.
Tip
Go to the Templates-for-Power-Platform GitHub project site to log your questions or issues and get support for the SAP Procurement template.
More information: Managed and unmanaged solutions
Activate the Supplier Self Service site
Once you have successfully installed the SAP Supplier template, take these steps to set up the SAP Supplier Self Service solution in the same environment as SAP Procurement:
- Open Power Pages design studio and select the appropriate environment.
- Go to Inactive sites.
- Reactivate Supplier Self Service site.
- Choose desired URL for the site and wait for the activation phase to complete.
Activate and configure cloud flow steps
Take these steps to ensure that flows are turned on and added to the site.
Go to Power Automate and open solution Supplier Self Service and ensure all the flows are turned on.
Go to Power Pages design studio > Setup.
- Remove any flows that already appear to be added to the site.
- Add these Power Automate flows to your Supplier Self Service site:
- Power Pages CreateVendorInvoice
- Power Pages ReadPurchaseOrder
- Power Pages ReadPurchaseOrderList
- Power Pages Read Vendor
- Power Pages Read Vendor Invoice List
- Power Pages Update Vendor
Go to Power Platform admin center to restart the Power Pages site.
- Select Resources, and then select Power Pages sites to manage your sites.
- Select the site and then select Manage.
- Select Restart site from the Site Actions menu.
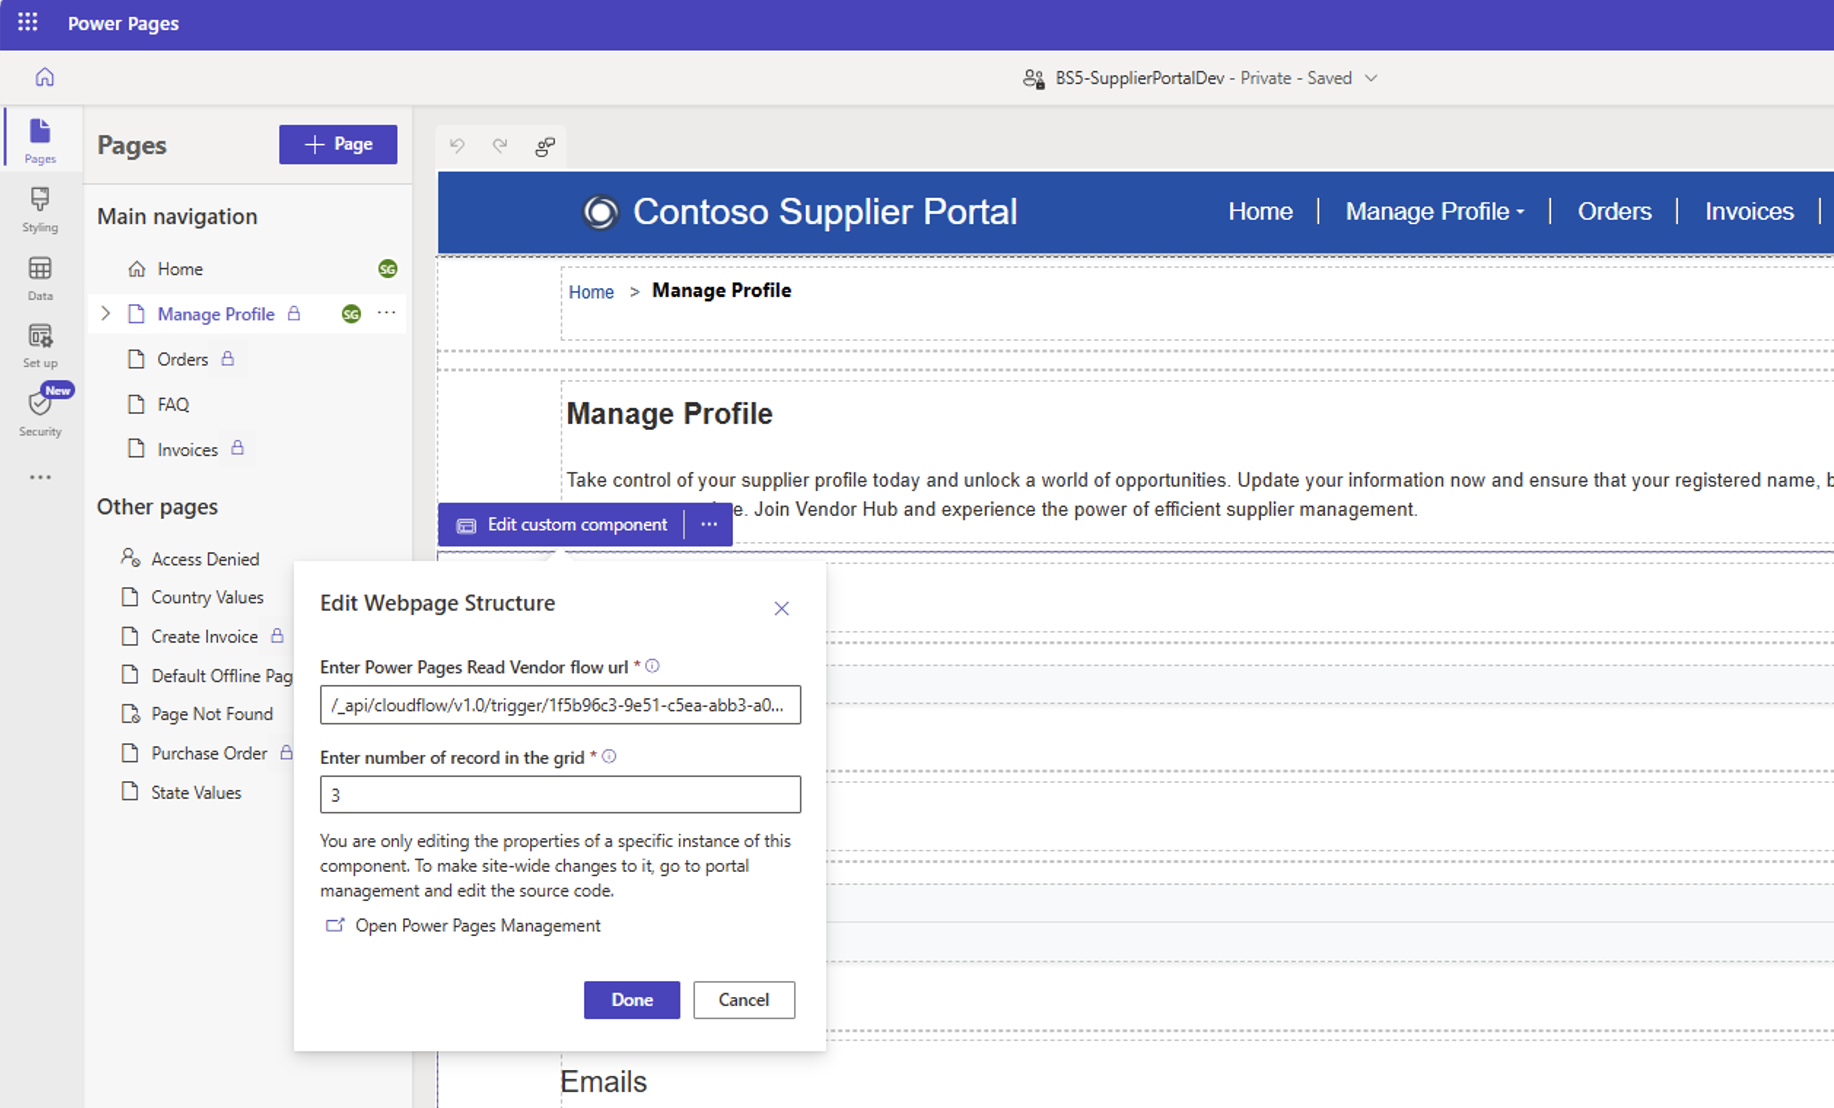
- Update the flow URL in each of the custom components on the respective web pages. Refer to the table and examples for more guidance.
Learn more:
- Reactivate sites
- Add a flow to your site
- Power Platform admin center site actions
- Roles required for website administration
Component inputs and cloud flow URLs table
Refer to this table for high-level guidance for updating component inputs and cloud flow URLs.
| Web Page | Component Inputs | Cloud Flow URLs |
|---|---|---|
| Manage Profile | Enter Power Pages Read Vendor flow URL | Select Edit Custom Component and update the URL. Add the partial URL in this format: /_api/cloudflow/v1.0/trigger/xxxxxxxxx-xxxxxx-xxxxxxxx-xxxxxxxxxxxx. Select Done |
| Edit Profile | Enter Power Pages Read Vendor flow URL; Enter Power Pages Update Vendor flow URL | Select Edit Custom Component and update the URL. Add the partial URL in this format: /_api/cloudflow/v1.0/trigger/xxxxxxxxx-xxxxxx-xxxxxxxx-xxxxxxxxxxxx. Select Done |
| Orders | Enter Power Pages Read Vendor flow URL; Enter Power Pages ReadPurchaseOrderList flow URL | Select Edit Custom Component and update the URL. Add the partial URL in this format: /_api/cloudflow/v1.0/trigger/xxxxxxxxx-xxxxxx-xxxxxxxx-xxxxxxxxxxxx. Select Done |
| Invoice | Enter Power Pages Read Vendor flow URL; Enter Power Pages Read Vendor Invoice List flow URL | Select Edit Custom Component and update the URL. Add the partial URL in this format: /_api/cloudflow/v1.0/trigger/xxxxxxxxx-xxxxxx-xxxxxxxx-xxxxxxxxxxxx. Select Done |
| Create | Enter Power Pages Read Vendor flow URL; Enter Power Pages Read Purchase Order flow URL; Enter Power Pages CreateVendorInvoice flow URL | Select Edit Custom Component and update the URL. Add the partial URL in this format: /_api/cloudflow/v1.0/trigger/xxxxxxxxx-xxxxxx-xxxxxxxx-xxxxxxxxxxxx. Select Done |
Page component and cloud flow URL update example
Take these steps to update the Manage Profile page:
- Copy flow URL for Power Pages Read Vendor.
- Go to Power Pages design studio > Pages.
- Select Manage Profile page.
- Select Edit Custom Component and update the URL. Add the partial URL in this format:
/_api/cloudflow/v1.0/trigger/xxxxxxxxx-xxxxxx-xxxxxxxx-xxxxxxxxxxxx - Select Done.
