Aggiungere un livello a poligoni alla mappa (Android SDK)
Questo articolo illustra come eseguire il rendering delle aree delle geometrie delle caratteristiche Polygon e MultiPolygon sulla mappa usando un livello poligono.
Nota
Ritiro di Android SDK di Mappe di Azure
Azure Maps Native SDK per Android è ora deprecato e verrà ritirato il 3/31/25. Per evitare interruzioni del servizio, eseguire la migrazione al Web SDK di Mappe di Azure entro il 31/3/25. Per altre informazioni, vedere La guida alla migrazione di Android SDK di Mappe di Azure.
Prerequisiti
Assicurarsi di completare la procedura descritta nel documento Guida introduttiva: creare un’app Android. I blocchi di codice in questo articolo possono essere inseriti nel gestore eventi onReady delle mappe.
Aggiungere un livello poligono
Quando un livello poligono viene connesso a un'origine dati e caricato sulla mappa, esegue il rendering dell'area con le caratteristiche Polygon e MultiPolygon. Per creare un poligono, aggiungerlo a un’origine dati ed eseguirne il rendering con un livello a poligoni usando la classe PolygonLayer.
//Create a data source and add it to the map.
DataSource source = new DataSource();
map.sources.add(source);

//Create a rectangular polygon.
source.add(Polygon.fromLngLats(
    Arrays.asList(
        Arrays.asList(
            Point.fromLngLat(-73.98235, 40.76799),
            Point.fromLngLat(-73.95785, 40.80044),
            Point.fromLngLat(-73.94928, 40.79680),
            Point.fromLngLat(-73.97317, 40.76437),
            Point.fromLngLat(-73.98235, 40.76799)
        )
    )
));

//Create and add a polygon layer to render the polygon on the map, below the label layer.
map.layers.add(new PolygonLayer(source,
    fillColor("red"),
    fillOpacity(0.7f)
), "labels");
//Create a data source and add it to the map.
val source = DataSource()
map.sources.add(source)

//Create a rectangular polygon.
source.add(
    Polygon.fromLngLats(
        Arrays.asList(
            Arrays.asList(
                Point.fromLngLat(-73.98235, 40.76799),
                Point.fromLngLat(-73.95785, 40.80044),
                Point.fromLngLat(-73.94928, 40.79680),
                Point.fromLngLat(-73.97317, 40.76437),
                Point.fromLngLat(-73.98235, 40.76799)
            )
        )
    )
)

//Create and add a polygon layer to render the polygon on the map, below the label layer.
map.layers.add(
    PolygonLayer(
        source,
        fillColor("red"),
        fillOpacity(0.7f)
    ), "labels"
)
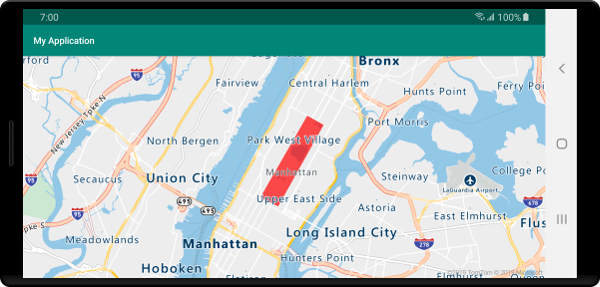
Lo screenshot seguente mostra il codice precedente che esegue il rendering dell’area di un poligono usando un livello a poligoni.

Usare insieme un poligono e un livello linea
Per eseguire il rendering del contorno dei poligoni viene usato un livello linea. L'esempio di codice seguente esegue il rendering di un poligono come nell'esempio precedente, ma con l'aggiunta di un livello linea. Questo livello linea è un secondo livello connesso all'origine dati.
//Create a data source and add it to the map.
DataSource source = new DataSource();
map.sources.add(source);

//Create a rectangular polygon.
source.add(Polygon.fromLngLats(
    Arrays.asList(
        Arrays.asList(
            Point.fromLngLat(-73.98235, 40.76799),
            Point.fromLngLat(-73.95785, 40.80044),
            Point.fromLngLat(-73.94928, 40.79680),
            Point.fromLngLat(-73.97317, 40.76437),
            Point.fromLngLat(-73.98235, 40.76799)
        )
    )
));

//Create and add a polygon layer to render the polygon on the map, below the label layer.
map.layers.add(new PolygonLayer(source,
    fillColor("rgba(0, 200, 200, 0.5)")
), "labels");

//Create and add a line layer to render the outline of the polygon.
map.layers.add(new LineLayer(source,
    strokeColor("red"),
    strokeWidth(2f)
));
//Create a data source and add it to the map.
val source = DataSource()
map.sources.add(source)

//Create a rectangular polygon.
source.add(
    Polygon.fromLngLats(
        Arrays.asList(
            Arrays.asList(
                Point.fromLngLat(-73.98235, 40.76799),
                Point.fromLngLat(-73.95785, 40.80044),
                Point.fromLngLat(-73.94928, 40.79680),
                Point.fromLngLat(-73.97317, 40.76437),
                Point.fromLngLat(-73.98235, 40.76799)
            )
        )
    )
)

//Create and add a polygon layer to render the polygon on the map, below the label layer.
map.layers.add(
    PolygonLayer(
        source,
        fillColor("rgba(0, 200, 200, 0.5)")
    ), "labels"
)

//Create and add a line layer to render the outline of the polygon.
map.layers.add(
    LineLayer(
        source,
        strokeColor("red"),
        strokeWidth(2f)
    )
)
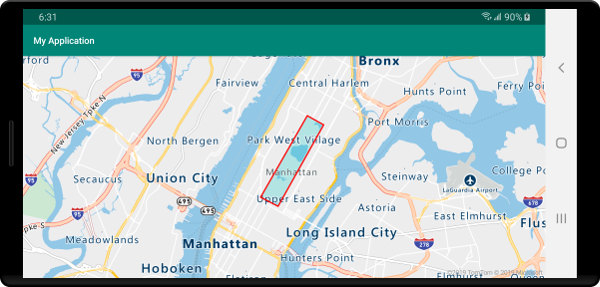
Lo screenshot seguente mostra il codice precedente che esegue il rendering di un poligono, con il relativo contorno sottoposto a rendering, usando un livello a linee.

Suggerimento
Quando si delinea un poligono con un livello a linee, assicurarsi di chiudere tutti gli anelli nei poligoni in modo che ogni matrice di punti abbia lo stesso punto iniziale e finale. Se questa operazione non viene completata, il livello a linee potrebbe non connettere l’ultimo punto del poligono con il primo.
Riempire un poligono con un motivo
Oltre che con un colore, è possibile riempire un poligono usando un motivo immagine. Caricare un modello di immagine nelle risorse sprite dell’immagine delle mappe e quindi fare riferimento a questa immagine con l’opzione fillPattern del livello a poligoni.
//Load an image pattern into the map image sprite.
map.images.add("fill-checker-red", R.drawable.fill_checker_red);

//Create a data source and add it to the map.
DataSource source = new DataSource();
map.sources.add(source);

//Create a polygon.
source.add(Polygon.fromLngLats(
    Arrays.asList(
        Arrays.asList(
            Point.fromLngLat(-50, -20),
            Point.fromLngLat(0, 40),
            Point.fromLngLat(50, -20),
            Point.fromLngLat(-50, -20)
        )
    )
));

//Create and add a polygon layer to render the polygon on the map, below the label layer.
map.layers.add(new PolygonLayer(source,
        fillPattern("fill-checker-red"),
        fillOpacity(0.5f)
), "labels");
//Load an image pattern into the map image sprite.
map.images.add("fill-checker-red", R.drawable.fill_checker_red)

//Create a data source and add it to the map.
val source = DataSource()
map.sources.add(source)

//Create a polygon.
source.add(
    Polygon.fromLngLats(
        Arrays.asList(
            Arrays.asList(
                Point.fromLngLat(-50, -20),
                Point.fromLngLat(0, 40),
                Point.fromLngLat(50, -20),
                Point.fromLngLat(-50, -20)
            )
        )
    )
)

//Create and add a polygon layer to render the polygon on the map, below the label layer.
map.layers.add(
    PolygonLayer(
        source,
        fillPattern("fill-checker-red"),
        fillOpacity(0.5f)
    ), "labels"
)
Per questo esempio, l’immagine seguente è stata caricata nella cartella drawable dell’app.
 |
|---|
| fill-checker-red.png |
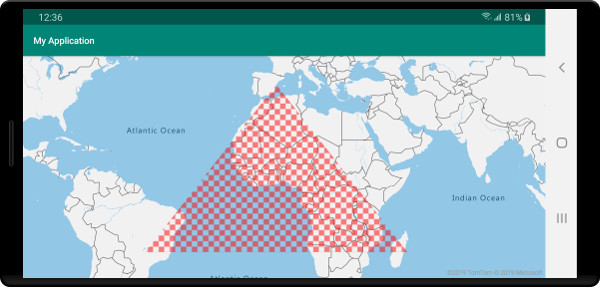
L’immagine seguente è uno screenshot del codice precedente che esegue il rendering di un poligono con un motivo di riempimento sulla mappa.

Passaggi successivi
Per altri esempi di codice da aggiungere alle mappe, vedere gli articoli seguenti: