Azure Blob Storage와 Azure Communication Services Chat에서 UI 라이브러리를 사용하여 파일 공유 사용
Important
Azure Communication Services의 이 기능은 현재 미리 보기 상태입니다.
미리 보기 API 및 SDK는 서비스 수준 계약 없이 제공됩니다. 프로덕션 워크로드에는 사용하지 않는 것이 좋습니다. 일부 기능은 지원되지 않거나 기능이 제한될 수 있습니다.
자세한 내용은 Microsoft Azure 미리 보기에 대한 보충 사용 약관을 검토하세요.
Azure Communication Services Chat에서 통신 사용자 간에 파일 공유를 사용할 수 있습니다. Azure Communication Services Chat은 Teams 상호 운영성 채팅("Interop 채팅")과 다릅니다. Interop 채팅에서 파일 공유를 사용하려면 Teams 상호 운영성 채팅에서 UI 라이브러리를 사용하여 파일 공유 추가를 참조하세요.
이 자습서에서는 파일 공유를 사용하도록 Azure Communication Services 라이브러리 채팅 복합을 구성합니다. UI 라이브러리 채팅 복합은 파일 공유를 사용하도록 설정하는 데 사용할 수 있는 다양한 구성 요소 및 UI 컨트롤 세트를 제공합니다. Azure Blob Storage를 활용하여 채팅 스레드를 통해 공유되는 파일의 스토리지를 사용합니다.
Important
Azure Communication Services는 파일 스토리지 서비스를 제공하지 않습니다. 파일을 공유하려면 사용자 고유의 파일 스토리지 서비스를 사용해야 합니다. 이 자습서에서는 Azure Blob Storage를 사용합니다.**
코드 다운로드
GitHub에서 이 자습서의 전체 코드에 액세스합니다. UI 구성 요소를 사용하여 파일 공유를 활용하려면 이 샘플을 참조하세요.
필수 조건
- 활성 구독이 있는 Azure 계정. 자세한 내용은 체험 계정 만들기를 참조하세요.
- 지원되는 플랫폼 중 하나인 Visual Studio Code.
- Node.js, 활성 LTS 및 유지 관리 LTS 버전(10.14.1 권장).
node --version명령을 사용하여 버전을 확인합니다. - 활성 Communication Services 리소스 및 연결 문자열 Communication Services 리소스 만들기
이 자습서에서는 채팅 복합을 설정하고 실행하는 방법을 이미 알고 있다고 가정합니다. 채팅 복합 자습서에 따라 채팅 복합을 설정하고 실행하는 방법을 알아볼 수 있습니다.
개요
UI 라이브러리 채팅 복합은 개발자가 Azure Communication Services 채팅 서비스를 통해 보내는 호스트된 파일에 URL을 전달할 수 있도록 하여 파일 공유를 지원합니다. UI 라이브러리는 연결된 파일을 렌더링하고, 여러 확장을 지원하여 보낸 파일의 모양과 느낌을 구성합니다. 더 구체적으로 다음 기능을 지원합니다.
- OS 파일 선택기를 통해 파일을 선택하기 위한 파일 첨부 단추
- 허용되는 파일 확장명을 구성합니다.
- 여러 업로드를 사용하거나 사용하지 않도록 설정합니다.
- 다양한 파일 형식에 대한 파일 아이콘
- 진행률 표시기가 있는 파일 업로드/다운로드 카드
- 각 파일 업로드의 유효성을 동적으로 검사하고 UI에 오류를 표시하는 기능
- 업로드를 취소하고 업로드된 파일을 보내기 전에 제거하는 기능
- MessageThread에서 업로드된 파일을 보고 다운로드합니다. 비동기 다운로드를 허용합니다.
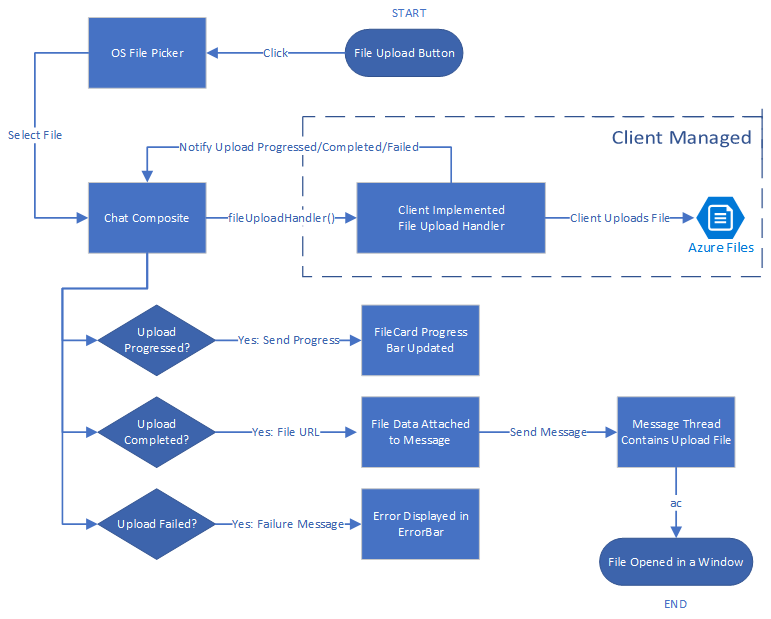
아래 다이어그램에서는 업로드 및 다운로드 모두에 대한 파일 공유 시나리오의 일반적인 흐름을 보여줍니다. Client Managed로 표시된 섹션은 개발자가 구현해야 하는 구성 요소를 보여 줍니다.

Azure Blob을 사용하여 파일 스토리지 설정
Azure Function을 사용하여 Azure Blob Storage에 파일 업로드 자습서에 따라 파일 공유에 필요한 백 엔드 코드를 작성할 수 있습니다.
구현되면 handleAttachmentSelection 함수 내에서 이 Azure Function을 호출하여 파일을 Azure Blob Storage에 업로드할 수 있습니다. 자습서의 나머지 부분에서는 위에서 연결된 Azure Blob Storage에 대한 자습서를 사용하여 함수를 생성했다고 가정합니다.
Azure Blob Storage 컨테이너 보안
이 자습서에서는 Azure Blob Storage 컨테이너에서 업로드한 파일에 대한 퍼블릭 액세스를 허용한다고 가정합니다. 실제 프로덕션 애플리케이션에는 Azure Storage 컨테이너를 공개하는 것이 권장되지 않습니다.
Azure Blob Storage에 업로드하는 파일을 다운로드하기 위해 SAS(공유 액세스 서명)를 사용할 수 있습니다. SAS(공유 액세스 서명)는 스토리지 계정의 리소스에 대한 안전하고 위임된 권한을 제공합니다. SAS를 사용하면 클라이언트가 데이터에 액세스하는 방법을 세부적으로 제어할 수 있습니다.
다운로드 가능한 GitHub 샘플은 SAS를 사용하여 Azure Storage 콘텐츠에 대한 SAS URL을 만드는 방법을 보여줍니다. 또한 SAS에 대해 자세히 알아볼 수 있습니다.
UI 라이브러리를 사용하려면 React 환경을 설정해야 합니다. 다음으로 이 작업을 진행합니다. React 앱이 이미 있으면 이 섹션을 건너뛰어도 됩니다.
React 앱 설정
이 빠른 시작에서는 create-react-app 템플릿을 사용합니다. 자세한 내용은 React 시작을 참조하세요.
npx create-react-app ui-library-quickstart-composites --template typescript

cd ui-library-quickstart-composites
이 프로세스가 완료되면 ui-library-quickstart-composites 폴더 내에 전체 애플리케이션이 있어야 합니다.
이 빠른 시작에서는 src 폴더 내의 파일을 수정합니다.
패키지 설치
npm install 명령을 사용하여 JavaScript용 Azure Communication Services UI 라이브러리 베타 버전을 설치합니다.
npm install @azure/communication-react@1.16.0-beta.1
@azure/communication-react는 애플리케이션의 핵심 라이브러리에서 API를 가장 일관되게 사용할 수 있도록 핵심 Azure Communication Services를 peerDependencies로 지정합니다. 해당 라이브러리도 설치해야 합니다.
npm install @azure/communication-calling@1.24.1-beta.2
npm install @azure/communication-chat@1.6.0-beta.1
React App 만들기
다음을 실행하여 Create React App 설치를 테스트해 보겠습니다.
npm run start
파일 공유를 사용하도록 채팅 복합 구성
채팅 복합을 초기화하는 데 필요한 두 공통 변수의 변수 값을 바꿔야 합니다.
App.tsx
import { initializeFileTypeIcons } from '@fluentui/react-file-type-icons';
import {
  ChatComposite,
  AttachmentUploadTask,
  AttachmentUploadOptions,
  AttachmentSelectionHandler,
  fromFlatCommunicationIdentifier,
  useAzureCommunicationChatAdapter
} from '@azure/communication-react';
import React, { useMemo } from 'react';

initializeFileTypeIcons();

function App(): JSX.Element {
  // Common variables
  const endpointUrl = 'INSERT_ENDPOINT_URL';
  const userId = ' INSERT_USER_ID';
  const displayName = 'INSERT_DISPLAY_NAME';
  const token = 'INSERT_ACCESS_TOKEN';
  const threadId = 'INSERT_THREAD_ID';

  // We can't even initialize the Chat and Call adapters without a well-formed token.
  const credential = useMemo(() => {
    try {
      return new AzureCommunicationTokenCredential(token);
    } catch {
      console.error('Failed to construct token credential');
      return undefined;
    }
  }, [token]);

  // Memoize arguments to `useAzureCommunicationChatAdapter` so that
  // a new adapter is only created when an argument changes.
  const chatAdapterArgs = useMemo(
    () => ({
      endpoint: endpointUrl,
      userId: fromFlatCommunicationIdentifier(userId) as CommunicationUserIdentifier,
      displayName,
      credential,
      threadId
    }),
    [userId, displayName, credential, threadId]
  );
  const chatAdapter = useAzureCommunicationChatAdapter(chatAdapterArgs);

  if (!!chatAdapter) {
    return (
      <>
        <div style={containerStyle}>
          <ChatComposite
            adapter={chatAdapter}
            options={{
              attachmentOptions: {
                uploadOptions: uploadOptions,
                downloadOptions: downloadOptions,
              }
            }} />
        </div>
      </>
    );
  }
  if (credential === undefined) {
    return <h3>Failed to construct credential. Provided token is malformed.</h3>;
  }
  return <h3>Initializing...</h3>;
}

const uploadOptions: AttachmentUploadOptions = {
  // default is false
  disableMultipleUploads: false,
  // define mime types
  supportedMediaTypes: ["image/jpg", "image/jpeg"]
  handleAttachmentSelection: attachmentSelectionHandler,
}

const attachmentSelectionHandler: AttachmentSelectionHandler = async (uploadTasks) => {
  for (const task of uploadTasks) {
    try {
      const uniqueFileName = `${v4()}-${task.file?.name}`;
      const url = await uploadFileToAzureBlob(task);
      task.notifyUploadCompleted(uniqueFileName, url);
    } catch (error) {
      if (error instanceof Error) {
        task.notifyUploadFailed(error.message);
      }
    }
  }
}

const uploadFileToAzureBlob = async (uploadTask: AttachmentUploadTask) => {
  // You need to handle the file upload here and upload it to Azure Blob Storage.
  // This is how you can configure the upload
  // Optionally, you can also update the file upload progress.
  uploadTask.notifyUploadProgressChanged(0.2);
  return {
    url: 'https://sample.com/sample.jpg', // Download URL of the file.
  };
Azure Blob Storage를 사용하도록 업로드 메서드 구성
Azure Blob Storage 업로드를 사용하려면 다음 코드를 사용하여 앞에서 선언한 uploadFileToAzureBlob 메서드를 수정합니다. 파일을 업로드하려면 Azure Function 정보를 바꿔야 합니다.
App.tsx
const uploadFileToAzureBlob = async (uploadTask: AttachmentUploadTask) => {
  const file = uploadTask.file;
  if (!file) {
    throw new Error("uploadTask.file is undefined");
  }

  const filename = file.name;
  const fileExtension = file.name.split(".").pop();

  // Following is an example of calling an Azure Function to handle file upload
  // The https://learn.microsoft.com/azure/developer/javascript/how-to/with-web-app/azure-function-file-upload
  // tutorial uses 'username' parameter to specify the storage container name.
  // the container in the tutorial is private by default. To get default downloads working in
  // this sample, you need to change the container's access level to Public via Azure Portal.
  const username = "ui-library";

  // You can get function url from the Azure Portal:
  const azFunctionBaseUri = "<YOUR_AZURE_FUNCTION_URL>";
  const uri = `${azFunctionBaseUri}&username=${username}&filename=${filename}`;

  const formData = new FormData();
  formData.append(file.name, file);

  const response = await axios.request({
    method: "post",
    url: uri,
    data: formData,
    onUploadProgress: (p) => {
      // Optionally, you can update the file upload progress.
      uploadTask.notifyUploadProgressChanged(p.loaded / p.total);
    },
  });

  const storageBaseUrl = "https://<YOUR_STORAGE_ACCOUNT>.blob.core.windows.net";

  return {
    url: `${storageBaseUrl}/${username}/${filename}`,
  };
};
오류 처리
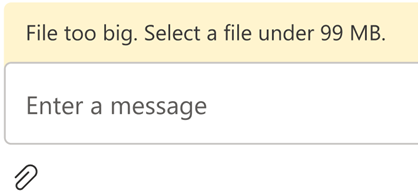
업로드가 실패하면 오류 메시지가 UI 라이브러리 채팅 복합에 표시됩니다.

다음은 크기 유효성 검사 오류로 인해 업로드가 실패할 수 있는 방법을 보여 주는 샘플 코드입니다.
App.tsx
import { AttachmentSelectionHandler } from from '@azure/communication-react';

const attachmentSelectionHandler: AttachmentSelectionHandler = async (uploadTasks) => {
  for (const task of uploadTasks) {
    if (task.file && task.file.size > 99 * 1024 * 1024) {
      // Notify ChatComposite about upload failure.
      // Allows you to provide a custom error message.
      task.notifyUploadFailed('File too big. Select a file under 99 MB.');
    }
  }
}

export const attachmentUploadOptions: AttachmentUploadOptions = {
  handleAttachmentSelection: attachmentSelectionHandler
};
파일 다운로드 - 고급 사용
기본적으로 UI 라이브러리는 notifyUploadCompleted 시 설정한 URL을 가리키는 새 탭을 엽니다. 또는 actionsForAttachment를 통해 첨부 파일 다운로드를 처리하는 사용자 지정 논리를 가질 수 있습니다. 예를 살펴보겠습니다.
App.tsx
import { AttachmentDownloadOptions } from "communication-react";

const downloadOptions: AttachmentDownloadOptions = {
  actionsForAttachment: handler
}

const handler = async (attachment: AttachmentMetadata, message?: ChatMessage) => {
   // here we are returning a static action for all attachments and all messages
   // alternately, you can provide custom menu actions based on properties in `attachment` or `message`
   return [defaultAttachmentMenuAction];
};

const customHandler = = async (attachment: AttachmentMetadata, message?: ChatMessage) => {
   if (attachment.extension === "pdf") {
    return [
      {
        title: "Custom button",
        icon: (<i className="custom-icon"></i>),
        onClick: () => {
          return new Promise((resolve, reject) => {
              // custom logic here
              window.alert("custom button clicked");
              resolve();
              // or to reject("xxxxx") with a custom message
          })
        }
      },
      defaultAttachmentMenuAction
    ];
  } else if (message?.senderId === "user1") {
    return [
      {
        title: "Custom button 2",
        icon: (<i className="custom-icon-2"></i>),
        onClick: () => {
          return new Promise((resolve, reject) => {
            window.alert("custom button 2 clicked");
            resolve();
          })
        }
      },
      // you can also override the default action partially
      {
        ...defaultAttachmentMenuAction,
        onClick: () => {
          return new Promise((resolve, reject) => {
            window.alert("default button clicked");
            resolve();
          })
        }
      }
    ];
  }
}
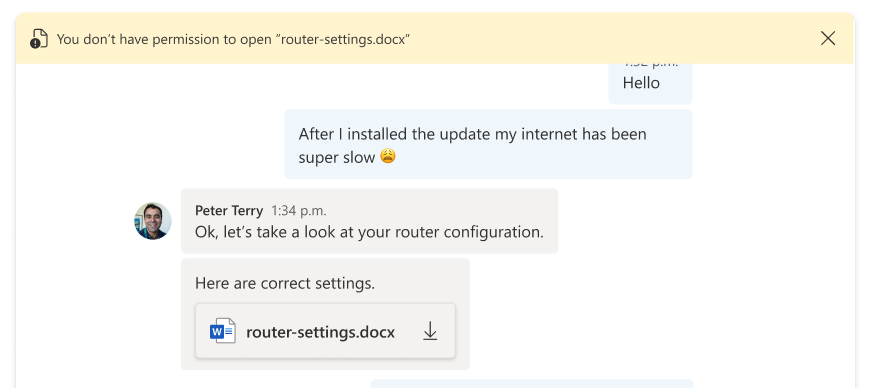
다운로드 중에 문제가 발생하여 사용자에게 알려야 하는 경우 onClick 함수의 메시지와 함께 오류를 throw하면 해당 메시지가 채팅 복합 상단의 오차 막대에 표시됩니다.

리소스 정리
Communication Services 구독을 정리하고 제거하려면 리소스 또는 리소스 그룹을 삭제하면 됩니다. 리소스 그룹을 삭제하면 해당 리소스 그룹에 연결된 다른 모든 리소스가 함께 삭제됩니다. Azure Communication Services 리소스 정리 및 Azure Functions 리소스 정리에 대해 자세히 알아볼 수 있습니다.
다음 단계
다음을 수행할 수도 있습니다.