Geometry 개요
이 개요에서는 WPF(Windows Presentation Foundation) Geometry 클래스를 사용하여 도형을 설명하는 방법을 설명합니다. 이 항목에서는 Geometry 개체와 Shape 요소 간의 차이점도 비교해서 설명합니다.
기하 도형이란?
Geometry 클래스 및 클래스에서 파생되는 클래스(예: EllipseGeometry, PathGeometry 및 CombinedGeometry)를 사용하면 2D 셰이프의 기하 도형을 설명할 수 있습니다. 이러한 기하학적 설명은 화면에 그릴 도형 정의 또는 적중 테스트 및 클립 영역을 정의와 같은 다양한 용도로 사용됩니다. 애니메이션 경로를 정의하는 데도 기하 도형을 사용할 수 있습니다.
Geometry 개체는 사각형 및 원과 같은 단순 영역 또는 둘 이상의 기하 도형 개체에서 만들어진 복합 영역이 될 수 있습니다. 호와 곡선을 설명할 수 있는 PathGeometry 및 StreamGeometry 클래스를 사용해서 좀 더 복잡한 기하 도형을 만들 수도 있습니다.
Geometry는 Freezable 형식이기 때문에 Geometry 개체는 리소스로 선언되고 여러 개체 간에 공유되며 성능 향상을 위해 읽기 전용으로 지정되고 복제되며 스레드로부터 안전하게 지정되는 등 몇 가지 특별한 기능을 제공할 수 있습니다. 제공 하는 다른 기능에 대 한 자세한 Freezable 개체를 참조 합니다 Freezable 개체 개요합니다.
기하 도형 및 도형
Geometry 및 Shape 클래스는 둘 다 2D 도형을 설명한다는 점(예: EllipseGeometry 및 Ellipse 비교)에서 비슷해 보이지만 중요한 차이점이 있습니다.
예를 들면 Geometry 클래스는 Freezable 클래스에서 상속되는 반면 Shape 클래스는 FrameworkElement 클래스에서 상속됩니다. Shape 개체는 요소에 해당하므로 자신을 렌더링할 수 있고 레이아웃 시스템에 참여할 수 있지만 Geometry 개체는 그럴 수 없습니다.
Shape 개체는 Geometry 개체보다 더 쉽게 사용할 수 있지만 Geometry 개체가 융통성이 더 뛰어납니다. Shape 개체는 2D 그래픽을 렌더링하는 데 사용되지만 Geometry 개체는 2D 그래픽에 대한 기하학적 영역을 정의하거나, 클립 영역을 정의하거나, 적중 테스트 영역을 정의하는 데 사용할 수 있습니다.
경로 도형
한 Shape인 Path 클래스에서 실제로 해당 내용을 설명하기 위해 Geometry를 사용됩니다. Path의 Data 속성을 Geometry로 설정하고 Fill 및 Stroke 속성을 설정하여 Geometry를 렌더링할 수 있습니다.
Geometry를 사용하는 공용 속성
이전 섹션에서는 Geometry 개체를 도형 그리기, 애니메이션 효과 적용, 클리핑 등의 다양한 용도로 다른 개체와 함께 사용할 수 있다는 사실을 설명했습니다. 다음 표에서는 Geometry 개체를 사용하는 속성을 갖는 몇 가지 클래스를 설명합니다.
| 형식 | 속성 |
|---|---|
| DoubleAnimationUsingPath | PathGeometry |
| DrawingGroup | ClipGeometry |
| GeometryDrawing | Geometry |
| Path | Data |
| UIElement | Clip |
단순 기하 도형 형식
모든 기하 도형의 기본 클래스는 추상 클래스 Geometry입니다. Geometry 클래스에서 파생되는 클래스는 대략적으로 단순 기하 도형, 경로 기하 도형 및 복합 기하 도형의 세 가지 범주로 그룹화할 수 있습니다.
단순 기하 도형 클래스는 LineGeometry, RectangleGeometry 및 EllipseGeometry를 포함하며 선, 사각형, 원 등의 기본 도형을 만드는 데 사용됩니다.
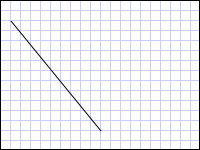
LineGeometry는 선의 시작점과 끝점을 지정하여 정의합니다.
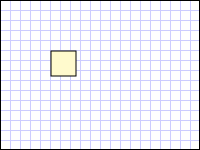
RectangleGeometry는 상대적 위치와 해당 높이 및 너비를 지정하는 Rect로 정의됩니다. RadiusX 및 RadiusY 속성을 설정하여 둥근 사각형을 만들 수 있습니다.
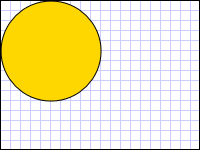
EllipseGeometry는 중심점, x 반지름 및 y 반지름으로 정의됩니다. 다음 예제에서는 렌더링 및 클리핑을 위한 단순 기하 도형을 만드는 방법을 보여 줍니다.
이러한 동일한 도형과 좀 더 복잡한 도형은 PathGeometry를 사용하거나 기하 도형 개체를 함께 결합하여 만들 수 있지만 이러한 클래스는 이러한 기본적인 기하 도형을 생성하는 좀 더 간단한 방법을 제공합니다.
다음 예제에서는 LineGeometry를 만들어 렌더링하는 방법을 보여줍니다. 앞서 설명한 것처럼 Geometry 개체는 자신을 그릴 수 없으므로 이 예제에서는 Path 도형을 사용하여 선을 렌더링합니다. 선에는 영역이 없으므로 Path의 Fill 속성을 설정해도 효과가 없습니다. 대신 Stroke 및 StrokeThickness 속성만 지정됩니다. 다음 그림에서는 예제의 출력을 보여 줍니다.
 LineGeometrygraphicsmm_line
(10,20)부터 (100,130)까지 그린 LineGeometry
<Path Stroke="Black" StrokeThickness="1" >
  <Path.Data>
    <LineGeometry StartPoint="10,20" EndPoint="100,130" />
  </Path.Data>
</Path>
LineGeometry myLineGeometry = new LineGeometry();
myLineGeometry.StartPoint = new Point(10,20);
myLineGeometry.EndPoint = new Point(100,130);

Path myPath = new Path();
myPath.Stroke = Brushes.Black;
myPath.StrokeThickness = 1;
myPath.Data = myLineGeometry;
Dim myLineGeometry As New LineGeometry()
myLineGeometry.StartPoint = New Point(10,20)
myLineGeometry.EndPoint = New Point(100,130)

Dim myPath As New Path()
myPath.Stroke = Brushes.Black
myPath.StrokeThickness = 1
myPath.Data = myLineGeometry
다음 예제에서는 EllipseGeometry를 만들어 렌더링하는 방법을 보여줍니다. 이 예제에서는 EllipseGeometry의 Center를 점 50,50로 설정하며 x 반지름 및 y 반지름 둘 다 50로 설정되어 지름이 100인 원을 만듭니다. 타원의 내부는 Path 요소의 Fill 속성에 값(이 경우 Gold)을 할당하여 칠해집니다. 다음 그림에서는 예제의 출력을 보여 줍니다.
 EllipseGeometrygraphicsmm_ellipse
(50,50)에 그린 EllipseGeometry
<Path Fill="Gold" Stroke="Black" StrokeThickness="1">
  <Path.Data>
    <EllipseGeometry Center="50,50" RadiusX="50" RadiusY="50" />
  </Path.Data>
</Path>
EllipseGeometry myEllipseGeometry = new EllipseGeometry();
myEllipseGeometry.Center = new Point(50, 50);
myEllipseGeometry.RadiusX = 50;
myEllipseGeometry.RadiusY = 50;

Path myPath = new Path();
myPath.Fill = Brushes.Gold;
myPath.Stroke = Brushes.Black;
myPath.StrokeThickness = 1;
myPath.Data = myEllipseGeometry;
Dim myEllipseGeometry As New EllipseGeometry()
myEllipseGeometry.Center = New Point(50, 50)
myEllipseGeometry.RadiusX = 50
myEllipseGeometry.RadiusY = 50

Dim myPath As New Path()
myPath.Fill = Brushes.Gold
myPath.Stroke = Brushes.Black
myPath.StrokeThickness = 1
myPath.Data = myEllipseGeometry
다음 예제에서는 LineGeometry를 만들어 렌더링하는 방법을 보여줍니다. 사각형의 위치 및 크기는 Rect 구조체로 정의됩니다. 위치는 50,50이고 높이 및 너비 둘 다 25이므로 정사각형을 만듭니다. 다음 그림에서는 예제의 출력을 보여 줍니다.
 RectangleGeometrygraphicsmm_rectangle
50,50에 그린 RectangleGeometry
<Path Fill="LemonChiffon" Stroke="Black" StrokeThickness="1">
  <Path.Data>
    <RectangleGeometry Rect="50,50,25,25" />
  </Path.Data>
</Path>
RectangleGeometry myRectangleGeometry = new RectangleGeometry();
myRectangleGeometry.Rect = new Rect(50,50,25,25);

Path myPath = new Path();
myPath.Fill = Brushes.LemonChiffon;
myPath.Stroke = Brushes.Black;
myPath.StrokeThickness = 1;
myPath.Data = myRectangleGeometry;
Dim myRectangleGeometry As New RectangleGeometry()
myRectangleGeometry.Rect = New Rect(50,50,25,25)

Dim myPath As New Path()
myPath.Fill = Brushes.LemonChiffon
myPath.Stroke = Brushes.Black
myPath.StrokeThickness = 1
myPath.Data = myRectangleGeometry
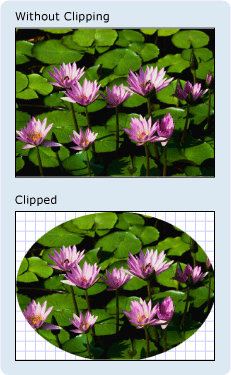
다음 예제에서는 EllipseGeometry를 이미지의 클립 영역으로 사용하는 방법을 보여 줍니다. Image 개체는 Width가 200이고 Height가 150으로 정의됩니다. RadiusX 값이 100이고 RadiusY 값이 75이고 Center 값이 100,75인 EllipseGeometry는 이미지의 Clip 속성으로 설정됩니다. 타원 영역 내의 이미지 부분만 표시됩니다. 다음 그림에서는 예제의 출력을 보여 줍니다.
 클리핑이 있거나 없는 이미지graphicsmm_clipexample
Image 컨트롤 클리핑에 사용되는 EllipseGeometry
<Image
  Source="sampleImages\Waterlilies.jpg"
  Width="200" Height="150" HorizontalAlignment="Left">
  <Image.Clip>
    <EllipseGeometry
      RadiusX="100"
      RadiusY="75"
      Center="100,75"/>
  </Image.Clip>
</Image>
// Create the image to clip.
Image myImage = new Image();
Uri imageUri =
    new Uri(@"C:\\Documents and Settings\\All Users\\Documents\My Pictures\\Sample Pictures\\Water lilies.jpg", UriKind.Relative);
myImage.Source = new BitmapImage(imageUri);
myImage.Width = 200;
myImage.Height = 150;
myImage.HorizontalAlignment = HorizontalAlignment.Left;

// Use an EllipseGeometry to define the clip region.
EllipseGeometry myEllipseGeometry = new EllipseGeometry();
myEllipseGeometry.Center = new Point(100, 75);
myEllipseGeometry.RadiusX = 100;
myEllipseGeometry.RadiusY = 75;
myImage.Clip = myEllipseGeometry;
' Create the image to clip.
Dim myImage As New Image()
Dim imageUri As New Uri("C:\\Documents and Settings\\All Users\\Documents\My Pictures\\Sample Pictures\\Water lilies.jpg", UriKind.Relative)
myImage.Source = New BitmapImage(imageUri)
myImage.Width = 200
myImage.Height = 150
myImage.HorizontalAlignment = HorizontalAlignment.Left

' Use an EllipseGeometry to define the clip region.
Dim myEllipseGeometry As New EllipseGeometry()
myEllipseGeometry.Center = New Point(100, 75)
myEllipseGeometry.RadiusX = 100
myEllipseGeometry.RadiusY = 75
myImage.Clip = myEllipseGeometry
경로 기하 도형
PathGeometry 클래스 및 간단한 동급 StreamGeometry 클래스는 호, 곡선 및 선으로 구성된 여러 복잡한 그림을 설명하는 수단을 제공합니다.
PathGeometry의 중심에는 PathFigure 개체 컬렉션이 있으며 각 그림이 PathGeometry의 개별 도형을 설명하기 때문에 이와 같이 명명됩니다. 각 PathFigure는 그 자체가 하나 이상의 PathSegment 개체로 구성되며 각각은 그림의 세그먼트를 설명합니다.
세그먼트 형식은 다양합니다.
| 세그먼트 형식 | Description | 예제 |
|---|---|---|
| ArcSegment | 두 점 사이에 타원형 호를 만듭니다. | 타원형 원호 만들기. |
| BezierSegment | 두 점 사이에 입방형 3차원 곡선을 만듭니다. | 입방형 3차원 곡선 만들기. |
| LineSegment | 두 점 사이에 선을 만듭니다. | PathGeometry에 LineSegment 만들기 |
| PolyBezierSegment | 일련의 입방형 3차원 곡선을 만듭니다. | PolyBezierSegment 형식 페이지를 참조하세요. |
| PolyLineSegment | 일련의 줄을 만듭니다. | PolyBezierSegment 형식 페이지를 참조하세요. |
| PolyQuadraticBezierSegment | 일련의 정방형 3차원 곡선을 만듭니다. | PolyQuadraticBezierSegment 페이지를 참조하세요. |
| QuadraticBezierSegment | 정방형 3차원 곡선을 만듭니다. | 정방형 3차원 곡선 만들기. |
PathFigure 내의 세그먼트는 단일 기하 도형으로 결합되며 각 세그먼트의 끝점이 다음 세그먼트의 시작점이 됩니다. PathFigure의 StartPoint 속성은 첫 번째 세그먼트를 그릴 점을 지정합니다. 각 후속 세그먼트는 이전 세그먼트의 끝점에서 시작합니다. 예를 들어, 10,50에서 10,150 사이의 세로 선은 StartPoint 속성을 10,50으로 설정하고 Point 속성 설정이 10,150인 LineSegment를 만들어 정의할 수 있습니다.
다음 예제에서는 LineSegment가 있는 단일 PathFigure로 구성된 간단한 PathGeometry를 만들고 Path 요소를 사용하여 표시합니다. PathFigure 개체의 StartPoint는 10,20으로 설정되고 LineSegment는 100,130의 끝점으로 정의됩니다. 다음 그림은 이 예제에서 생성된 PathGeometry를 보여 줍니다.
 LineGeometrygraphicsmm_line
단일 LineSegment를 포함하는 PathGeometry
<Path Stroke="Black" StrokeThickness="1">
  <Path.Data>
    <PathGeometry>
      <PathGeometry.Figures>
        <PathFigure StartPoint="10,20">
          <PathFigure.Segments>
            <LineSegment Point="100,130"/>
          </PathFigure.Segments>
        </PathFigure>
      </PathGeometry.Figures>
    </PathGeometry>
  </Path.Data>
</Path>
// Create a figure that describes a
// line from (10,20) to (100,130).
PathFigure myPathFigure = new PathFigure();
myPathFigure.StartPoint = new Point(10,20);
myPathFigure.Segments.Add(
    new LineSegment(new Point(100,130),
    true /* IsStroked */ ));

/// Create a PathGeometry to contain the figure.
PathGeometry myPathGeometry = new PathGeometry();
myPathGeometry.Figures.Add(myPathFigure);

// Display the PathGeometry.
Path myPath = new Path();
myPath.Stroke = Brushes.Black;
myPath.StrokeThickness = 1;
myPath.Data = myPathGeometry;
' Create a figure that describes a
' line from (10,20) to (100,130).
Dim myPathFigure As New PathFigure()
myPathFigure.StartPoint = New Point(10,20)
myPathFigure.Segments.Add(New LineSegment(New Point(100,130), True)) ' IsStroked

''' Create a PathGeometry to contain the figure.
Dim myPathGeometry As New PathGeometry()
myPathGeometry.Figures.Add(myPathFigure)

' Display the PathGeometry.
Dim myPath As New Path()
myPath.Stroke = Brushes.Black
myPath.StrokeThickness = 1
myPath.Data = myPathGeometry
이 예제를 앞의 LineGeometry 예제와 대조하면 유용한 결과를 얻을 수 있습니다. PathGeometry에 사용되는 구문은 간단한 LineGeometry에 사용되는 구문보다 훨씬 더 자세하므로 이 경우에는 LineGeometry 클래스를 사용하는 것이 좀 더 적절할 수 있지만 PathGeometry의 구문을 사용하면 매우 정교하고 복잡한 기하학적 영역을 만들 수 있습니다.
PathSegment 개체를 조합해서 좀 더 복잡한 기하 도형을 만들 수 있습니다.
다음 예제에서는 BezierSegment, LineSegment 및 ArcSegment를 사용하여 도형을 만듭니다. 이 예제에서는 먼저 이전 세그먼트의 끝점인 시작점, 끝점(Point3) 및 두 개의 제어점(Point1 및 Point2)의 네 점을 정의하여 입방형 베지어 곡선을 만듭니다. 입방형 3차원 곡선의 두 제어점은 자석처럼 동작하여 서로를 향해서 직선 방향에 놓일 부분을 잡아당겨 곡선을 형성합니다. 첫 번째 제어점 Point1, 시작 부분에 영향을 줍니다 곡선의 부분, 두 번째 제어점 Point2, 곡선의 끝 부분에 영향을 줍니다.
그런 다음, 예제에서는 앞에 오는 이전 BezierSegment의 끝점부터 LineSegment 속성으로 지정된 점까지 그려지는 LineSegment를 추가합니다.
그런 다음, 예제에서는 이전 LineSegment의 끝점에서 Point 속성으로 지정된 점까지 그려지는 ArcSegment를 추가합니다. 또한 이 예제에서는 호의 x 및 y 반지름(Size), 회전 각도(RotationAngle), 필요한 결과 원호의 각도 크기를 나타내는 플래그(IsLargeArc), 호를 그릴 방향을 나타내는 값(SweepDirection)도 지정합니다. 다음 그림은 이 예제에서 만들어지는 도형을 보여 줍니다.
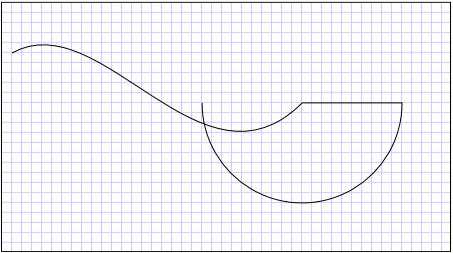 호가 있는 PathGeometry.graphicsmm_path2
PathGeometry
<Path Stroke="Black" StrokeThickness="1" >
  <Path.Data>
    <PathGeometry>
      <PathGeometry.Figures>
        <PathFigure StartPoint="10,50">
          <PathFigure.Segments>
            <BezierSegment
              Point1="100,0"
              Point2="200,200"
              Point3="300,100"/>
            <LineSegment Point="400,100" />
            <ArcSegment
              Size="50,50" RotationAngle="45"
              IsLargeArc="True" SweepDirection="Clockwise"
              Point="200,100"/>
          </PathFigure.Segments>
        </PathFigure>
      </PathGeometry.Figures>
    </PathGeometry>
  </Path.Data>
</Path>
// Create a figure.
PathFigure myPathFigure = new PathFigure();
myPathFigure.StartPoint = new Point(10,50);
myPathFigure.Segments.Add(
    new BezierSegment(
        new Point(100,0),
        new Point(200,200),
        new Point(300,100),
        true /* IsStroked */  ));
myPathFigure.Segments.Add(
    new LineSegment(
        new Point(400,100),
        true /* IsStroked */ ));
myPathFigure.Segments.Add(
    new ArcSegment(
        new Point(200,100),
        new Size(50,50),
        45,
        true, /* IsLargeArc */
        SweepDirection.Clockwise,
        true /* IsStroked */ ));

/// Create a PathGeometry to contain the figure.
PathGeometry myPathGeometry = new PathGeometry();
myPathGeometry.Figures.Add(myPathFigure);

// Display the PathGeometry.
Path myPath = new Path();
myPath.Stroke = Brushes.Black;
myPath.StrokeThickness = 1;
myPath.Data = myPathGeometry;
' Create a figure.
Dim myPathFigure As New PathFigure()
myPathFigure.StartPoint = New Point(10,50)
myPathFigure.Segments.Add(New BezierSegment(New Point(100,0), New Point(200,200), New Point(300,100), True)) ' IsStroked
myPathFigure.Segments.Add(New LineSegment(New Point(400,100), True)) ' IsStroked
myPathFigure.Segments.Add(New ArcSegment(New Point(200,100), New Size(50,50), 45, True, SweepDirection.Clockwise, True)) ' IsStroked  -  IsLargeArc

''' Create a PathGeometry to contain the figure.
Dim myPathGeometry As New PathGeometry()
myPathGeometry.Figures.Add(myPathFigure)

' Display the PathGeometry.
Dim myPath As New Path()
myPath.Stroke = Brushes.Black
myPath.StrokeThickness = 1
myPath.Data = myPathGeometry
PathGeometry 내에서 여러 PathFigure 개체를 사용하여 훨씬 더 복잡한 기하 도형을 만들 수 있습니다.
다음 예제에서는 각각 여러 PathSegment 개체를 포함하는 두 개의 PathFigure 개체가 있는 PathGeometry를 만듭니다. 위의 예제의 PathFigure와 PolyLineSegment 및 QuadraticBezierSegment가 있는 PathFigure가 사용됩니다. PolyLineSegment는 점 배열로 정의되고, QuadraticBezierSegment는 제어점과 끝점으로 정의됩니다. 다음 그림은 이 예제에서 만들어지는 도형을 보여 줍니다.
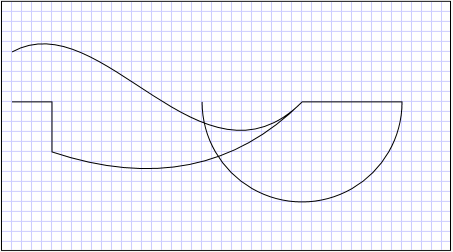 두 개의 PathFigure 개체를 포함하는 호가 있는 PathGeometry.graphicsmm_path
여러 그림이 있는 PathGeometry
<Path Stroke="Black" StrokeThickness="1" >
  <Path.Data>
    <PathGeometry>
      <PathGeometry.Figures>
        <PathFigure StartPoint="10,50">
          <PathFigure.Segments>
            <BezierSegment
              Point1="100,0"
              Point2="200,200"
              Point3="300,100"/>
            <LineSegment Point="400,100" />
            <ArcSegment
              Size="50,50" RotationAngle="45"
              IsLargeArc="True" SweepDirection="Clockwise"
              Point="200,100"/>
          </PathFigure.Segments>
        </PathFigure>

        <PathFigure StartPoint="10,100">
          <PathFigure.Segments>
            <PolyLineSegment Points="50,100 50,150" />
            <QuadraticBezierSegment Point1="200,200" Point2="300,100"/>
          </PathFigure.Segments>
        </PathFigure>
      </PathGeometry.Figures>
    </PathGeometry>
  </Path.Data>
</Path>
PathGeometry myPathGeometry = new PathGeometry();

// Create a figure.
PathFigure pathFigure1 = new PathFigure();
pathFigure1.StartPoint = new Point(10,50);
pathFigure1.Segments.Add(
    new BezierSegment(
        new Point(100,0),
        new Point(200,200),
        new Point(300,100),
        true /* IsStroked */ ));
pathFigure1.Segments.Add(
    new LineSegment(
        new Point(400,100),
        true /* IsStroked */ ));
pathFigure1.Segments.Add(
    new ArcSegment(
        new Point(200,100),
        new Size(50,50),
        45,
        true, /* IsLargeArc */
        SweepDirection.Clockwise,
        true /* IsStroked */ ));
myPathGeometry.Figures.Add(pathFigure1);

// Create another figure.
PathFigure pathFigure2 = new PathFigure();
pathFigure2.StartPoint = new Point(10,100);
Point[] polyLinePointArray =
    new Point[]{ new Point(50, 100), new Point(50, 150)};
PolyLineSegment myPolyLineSegment = new PolyLineSegment();
myPolyLineSegment.Points =
    new PointCollection(polyLinePointArray);
pathFigure2.Segments.Add(myPolyLineSegment);
pathFigure2.Segments.Add(
    new QuadraticBezierSegment(
        new Point(200,200),
        new Point(300,100),
        true /* IsStroked */ ));
myPathGeometry.Figures.Add(pathFigure2);

// Display the PathGeometry.
Path myPath = new Path();
myPath.Stroke = Brushes.Black;
myPath.StrokeThickness = 1;
myPath.Data = myPathGeometry;
Dim myPathGeometry As New PathGeometry()

' Create a figure.
Dim pathFigure1 As New PathFigure()
pathFigure1.StartPoint = New Point(10,50)
pathFigure1.Segments.Add(New BezierSegment(New Point(100,0), New Point(200,200), New Point(300,100), True)) ' IsStroked
pathFigure1.Segments.Add(New LineSegment(New Point(400,100), True)) ' IsStroked
pathFigure1.Segments.Add(New ArcSegment(New Point(200,100), New Size(50,50), 45, True, SweepDirection.Clockwise, True)) ' IsStroked  -  IsLargeArc
myPathGeometry.Figures.Add(pathFigure1)

' Create another figure.
Dim pathFigure2 As New PathFigure()
pathFigure2.StartPoint = New Point(10,100)
Dim polyLinePointArray() As Point = { New Point(50, 100), New Point(50, 150)}
Dim myPolyLineSegment As New PolyLineSegment()
myPolyLineSegment.Points = New PointCollection(polyLinePointArray)
pathFigure2.Segments.Add(myPolyLineSegment)
pathFigure2.Segments.Add(New QuadraticBezierSegment(New Point(200,200), New Point(300,100), True)) ' IsStroked
myPathGeometry.Figures.Add(pathFigure2)

' Display the PathGeometry.
Dim myPath As New Path()
myPath.Stroke = Brushes.Black
myPath.StrokeThickness = 1
myPath.Data = myPathGeometry
StreamGeometry
PathGeometry 클래스와 마찬가지로 StreamGeometry는 곡선, 호 및 선을 포함할 수 있는 복잡한 기하 도형을 정의합니다. PathGeometry와 달리 StreamGeometry의 콘텐츠는 데이터 바인딩, 애니메이션 또는 수정을 지원하지 않습니다. 복잡한 기하 도형을 설명해야 하지만 데이터 바인딩, 애니메이션 또는 수정을 지원하면서 발생하는 오버헤드를 원치 않을 경우에는 StreamGeometry를 사용합니다. 효율성이 높기 때문에 StreamGeometry 클래스는 표시기를 설명하는 데 적합합니다.
예제를 보려면 StreamGeometry를 사용하여 도형 만들기를 참조하세요.
경로 태그 구문
PathGeometry 및 StreamGeometry 형식은 특수한 일련의 이동 및 그리기 명령을 사용하여 XAML(Extensible Application Markup Language) 특성 구문을 지원합니다. 자세한 내용은 경로 태그 구문을 참조하세요.
복합 기하 도형
사용 하 여 복합 기 하 도형 개체를 만들 수 있습니다는 GeometryGroup, CombinedGeometry, 또는 정적 호출 하 여 Geometry 메서드 Combine합니다.
CombinedGeometry 개체 및 Combine 메서드는 두 개의 기하 도형으로 정의된 영역을 결합하여 부울 연산을 수행합니다. 영역이 없는 Geometry 개체는 삭제됩니다. 두 Geometry 개체만 결합할 수 있습니다(단, 이러한 두 기하 도형도 복합 기하 도형이어야 함).
GeometryGroup 클래스는 영역을 결합하지 않고 포함하는 Geometry 개체의 융화를 만듭니다. 여러 개의 Geometry 개체를 GeometryGroup에 추가할 수 있습니다. 예제를 보려면 복합 도형 만들기를 참조하세요.
결합 작업을 수행하지 않으므로 GeometryGroup 개체를 사용하면 CombinedGeometry 개체 또는 Combine 메서드를 사용할 때보다 성능상의 이점이 있습니다.
결합된 기하 도형
이전 섹션에서는 CombinedGeometry 개체 및 Combine 메서드가 포함하는 기하 도형으로 정의되는 영역을 결합한다는 사실을 언급했습니다. GeometryCombineMode 열거형은 기하 도형이 결합되는 방법을 지정합니다. GeometryCombineMode 속성의 가능한 값은 Union, Intersect, Exclude 및 Xor입니다.
다음 예제에서는 결합 모드 Union을 사용해서 CombinedGeometry를 정의합니다. Geometry1 및 Geometry2 둘 다 동일한 반지름의 원이지만 중심 오프셋은 50에 해당합니다.
<Path Stroke="Black" StrokeThickness="1" Fill="#CCCCFF">
  <Path.Data>

    <!-- Combines two geometries using the union combine mode. -->
    <CombinedGeometry GeometryCombineMode="Union">
      <CombinedGeometry.Geometry1>
        <EllipseGeometry RadiusX="50" RadiusY="50" Center="75,75" />
      </CombinedGeometry.Geometry1>
      <CombinedGeometry.Geometry2>
        <EllipseGeometry RadiusX="50" RadiusY="50" Center="125,75" />
      </CombinedGeometry.Geometry2>
    </CombinedGeometry>
  </Path.Data>
</Path>
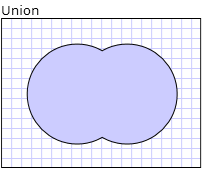 합집합 결합 모드의 결과mil_task_combined_geometry_union
다음 예제에서는 결합 모드 Xor를 사용해서 CombinedGeometry를 정의합니다. Geometry1 및 Geometry2 둘 다 동일한 반지름의 원이지만 중심 오프셋은 50에 해당합니다.
<Path Stroke="Black" StrokeThickness="1" Fill="#CCCCFF">
  <Path.Data>

    <!-- Combines two geometries using the XOR combine mode. -->
    <CombinedGeometry GeometryCombineMode="Xor">
      <CombinedGeometry.Geometry1>
        <EllipseGeometry RadiusX="50" RadiusY="50" Center="75,75" />
      </CombinedGeometry.Geometry1>
      <CombinedGeometry.Geometry2>
        <EllipseGeometry RadiusX="50" RadiusY="50" Center="125,75" />
      </CombinedGeometry.Geometry2>
    </CombinedGeometry>
  </Path.Data>
</Path>
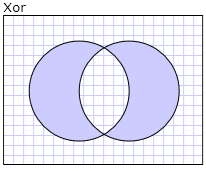 Xor 결합 모드의 결과mil_task_combined_geometry_xor
추가 예제를 보려면 복합 도형 만들기 및 결합된 기하 도형 만들기를 참조하세요.
Freezable 기능
Freezable 클래스에서 상속하기 때문에 Geometry 클래스는 몇 가지 특별한 기능을 제공합니다. Geometry 개체는 XAML 리소스로 선언될 수 있고, 여러 개체 간에 공유되며, 성능 향상을 위해 읽기 전용으로 만들고, 복제하고, 스레드로부터 안전하게 만들 수 있습니다. 제공 하는 다른 기능에 대 한 자세한 Freezable 개체를 참조 합니다 Freezable 개체 개요합니다.
기타 기하 도형 기능
Geometry 클래스는 다음과 같은 유용한 유틸리티 메서드도 제공합니다.
FillContains - 기하 도형에 다른 Geometry가 포함되어 있는지 여부를 확인합니다.
StrokeContains - Geometry의 스트로크에 지정된 점이 포함되는지 여부를 확인합니다.
메서드의 전체 목록은 Geometry 클래스를 참조하세요.
참고 항목
.NET Desktop feedback
