Provision custom security attributes from HR sources (preview)
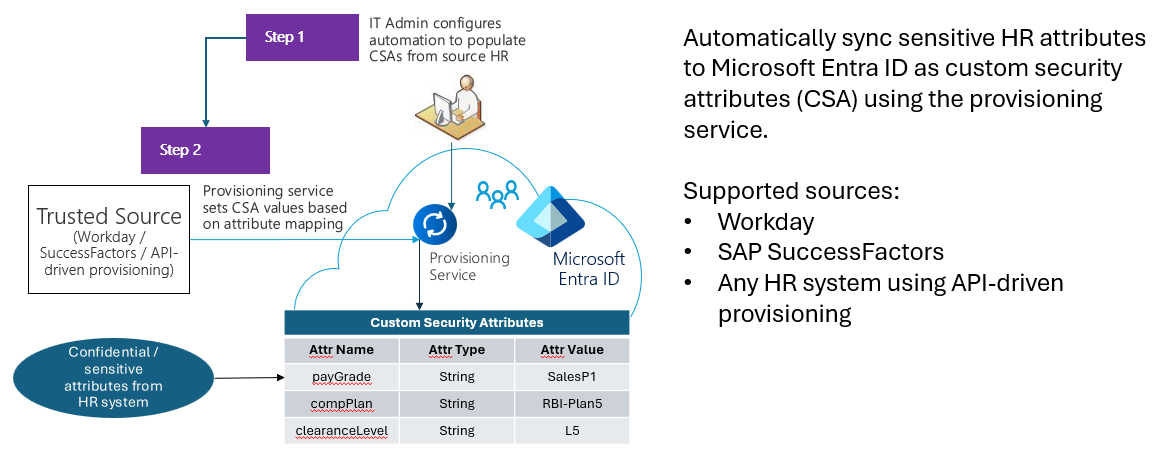
Custom security attribute provisioning enables customers to set custom security attributes automatically using Microsoft Entra inbound provisioning capabilities. With this public preview, you can source values for custom security attributes from authoritative sources, such as those from HR systems. Custom security attribute provisioning supports the following sources: Workday, SAP SuccessFactors, and other integrated HR systems that use API-driven provisioning. The provisioning target is your Microsoft Entra ID tenant.
Note
We make public previews available to our customers under the terms applicable to previews. These terms are outlined in the overall Microsoft product terms for online services. Normal service level agreements (SLAs) don't apply to public previews, and only limited customer support is available. In addition, this preview doesn't support custom security attributes provisioning to enterprise SaaS apps or on-premises Active Directory functionality.
Custom security attributes
Custom security attributes in Microsoft Entra ID are business-specific attributes (key value pairs) that you can define and assign to Microsoft Entra objects. These attributes can be used to store information, categorize objects, or enforce fine-tuned access control over specific Azure resources. To learn more about custom security attributes, see What are custom security attributes in Microsoft Entra ID?.
Prerequisites
To provision custom security attributes, you must meet the following prerequisites:
- A Microsoft Entra ID Premium P1 license to configure one of the following inbound provisioning apps:
- Active custom security attributes in your tenant for discovery during the attribute mapping process. Before using this preview feature, you must create custom security attribute sets in your Microsoft Entra ID tenant.
- To configure custom security attributes in the attribute mapping of your inbound provisioning app, sign in to the Microsoft Entra admin center as a user who is assigned the Microsoft Entra roles of Application Administrator and Attribute Provisioning Administrator:
- Application Administrator is required to create and update the provisioning app.
- Attribute Provisioning Administrator is required to add or remove custom security attributes in the attribute mapping section of the provisioning app.
Known limitations
- The provisioning service only supports setting custom security attributes of type
String. - Provisioning custom security attributes of type
IntegerandBooleanisn't supported. - Provisioning multi-valued custom security attributes isn't supported.
- Provisioning deactivated custom security attributes isn't supported.
- With the Attribute Log Reader role, you can't view the custom security attribute value in the provisioning logs.
Configuring your provisioning app with custom security attributes
Before you begin, follow these steps to add custom security attributes in your Microsoft Entra ID tenant and map custom security attributes in your inbound provisioning app.
Define custom security attributes in your Microsoft Entra ID tenant
In the Microsoft Entra admin center, access the option to add custom security attributes from the Protection menu. You need to have at least an Attribute Definition Administrator role to complete this task.
This example includes custom security attributes that you could add to your tenant. Use the attribute set HRConfidentialData and then add the following attributes to:
- EEOStatus
- FLSAStatus
- PayGrade
- PayScaleType
Map custom security attributes in your inbound provisioning app
Sign in to the Microsoft Entra admin center as a user who has both Application Administrator and Attribute Provisioning Administrator role permissions.
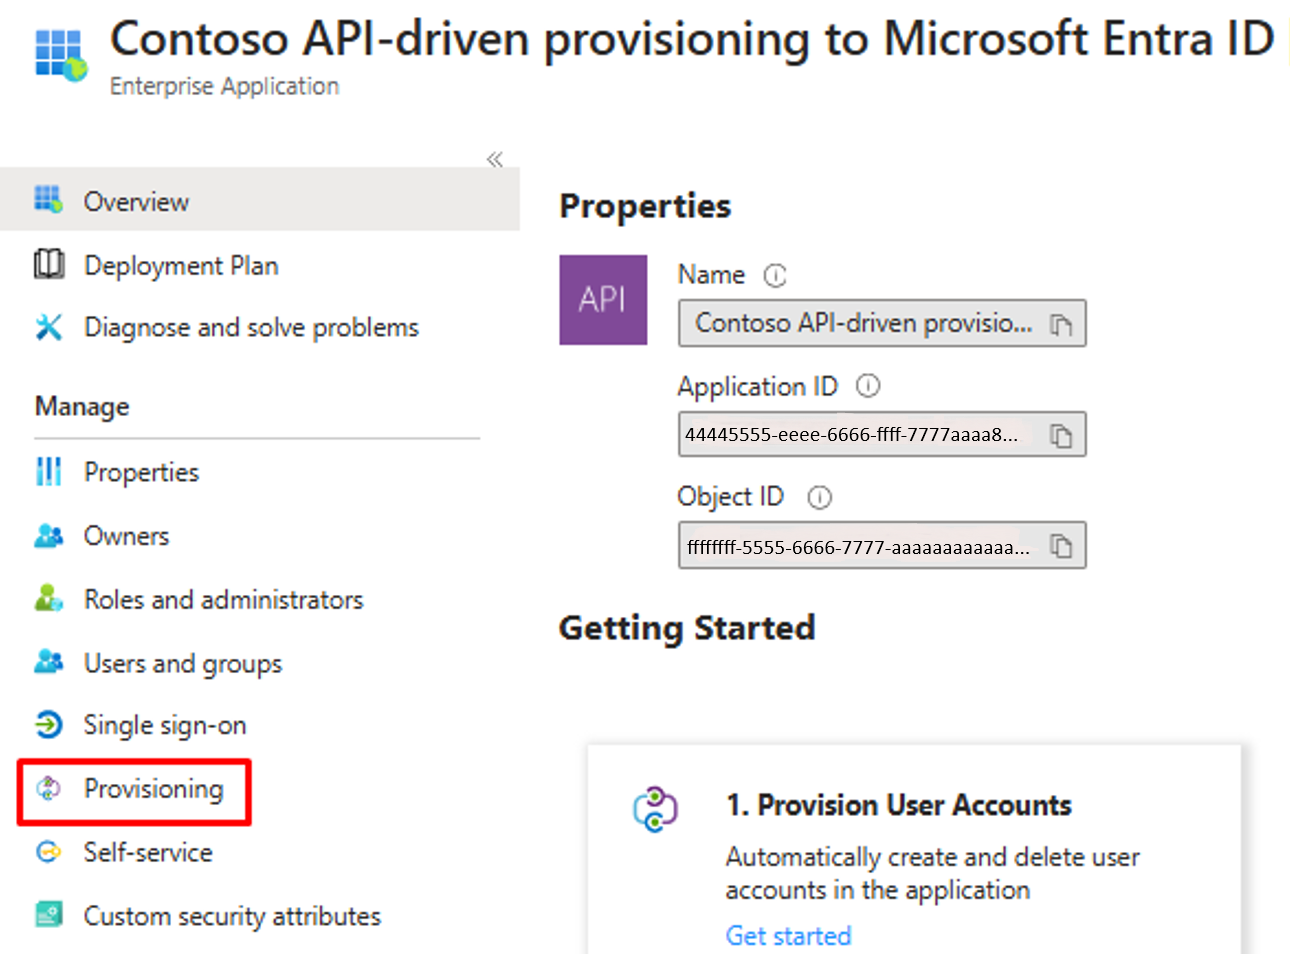
Go to Enterprise Applications, then open your inbound provisioning app.
Open the Provisioning screen.
Note
This guidance displays screen captures of API-driven provisioning to Microsoft Entra ID. If you’re using Workday or SuccessFactors provisioning apps, then you'll see Workday and SuccessFactors related attributes and configurations.
Select Edit provisioning.

Select Attribute mapping to open the attribute mapping screen.
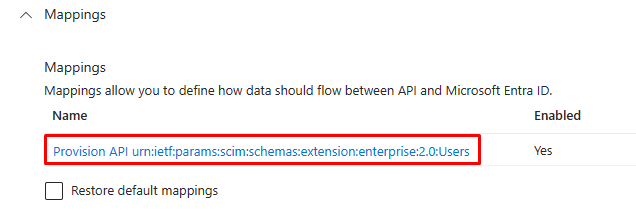
Define source attributes that you want to store sensitive HR data, then check the Show advanced options box to open the attribute list.
Select Edit attribute list for API to identify those attributes that you want to test.

Test custom security attributes provisioning with the Inbound Provisioning API by defining a SCIM schema namespace:
urn:ietf:params:scim:schemas:extension:microsoft:entra:csa. Be sure to include the following attributes:urn:ietf:params:scim:schemas:extension:microsoft:entra:csa:EEOStatusurn:ietf:params:scim:schemas:extension:microsoft:entra:csa:FLSAStatusurn:ietf:params:scim:schemas:extension:microsoft:entra:csa:PayGradeurn:ietf:params:scim:schemas:extension:microsoft:entra:csa:PayScaleType

Note
You can define your own SCIM schema namespace to represent sensitive HR data in your SCIM payload. Make sure it starts with
urn:ietf:params:scim:schemas:extension.If you're using Workday or SuccessFactors as your HR source, update the attribute list with API expressions to retrieve HR data to store is in the custom security attributes list.
If you want to retrieve the same set of HR data from SuccessFactors, use the following API expressions:
$.employmentNav.results[0].jobInfoNav.results[0].eeoClass$.employmentNav.results[0].jobInfoNav.results[0].flsaStatus$.employmentNav.results[0].jobInfoNav.results[0].payGradeNav.name$.employmentNav.results[0].jobInfoNav.results[0].payScaleType
Save the schema changes.
From the Attribute mapping screen, select Add new mapping.
- The custom security attributes display in the format
CustomSecurityAttributes.<AttributeSetName>_<AttributeName>.
- The custom security attributes display in the format
Add the following mappings, then save the changes:
API source attribute Microsoft Entra ID target attribute urn:ietf:params:scim:schemas:extension:microsoft:entra:csa:EEOStatus CustomSecurityAttributes.HRConfidentialData_EEOStatus urn:ietf:params:scim:schemas:extension:microsoft:entra:csa:FLSAStatus CustomSecurityAttributes.HRConfidentialData_FLSAStatus urn:ietf:params:scim:schemas:extension:microsoft:entra:csa:PayGrade CustomSecurityAttributes.HRConfidentialData_PayGrade urn:ietf:params:scim:schemas:extension:microsoft:entra:csa:PayScaleType CustomSecurityAttributes.HRConfidentialData_PayScaleType
Test custom security attributes provisioning
Once you've mapped HR source attributes to the custom security attributes, use the following method to test the flow of custom security attributes data. The method you choose depends upon your provisioning app type.
- If your job uses either Workday or SuccessFactors as its source, then use the On-demand provisioning capability to test the custom security attributes data flow.
- If your job uses API-driven provisioning, then send SCIM bulk payload to the bulkUpload API endpoint of your job.
Test with SuccessFactors provisioning app
In this example, SAP SuccessFactors attributes are mapped to custom security attributes as shown here:

- Open the SuccessFactors provisioning job, then select Provision on demand.

In the Select a user box, enter the personIdExternal attribute of the user that you want to test.
The provisioning logs display the custom security attributes that you set.

Note
The source and target values of custom security attributes are redacted in the provisioning logs.
In the Custom security attributes screen of the user's Microsoft Entra ID profile, you can view the actual values set for that user. You need at least the Attribute Assignment Administrator or Attribute Assignment Reader role to view this data.
Test with the API-driven provisioning app
Create a SCIM bulk request payload that includes values for custom security attributes.

- To access the full SCIM payload, see Sample SCIM payload.
Copy the bulkUpload API URL from the provisioning job overview page.
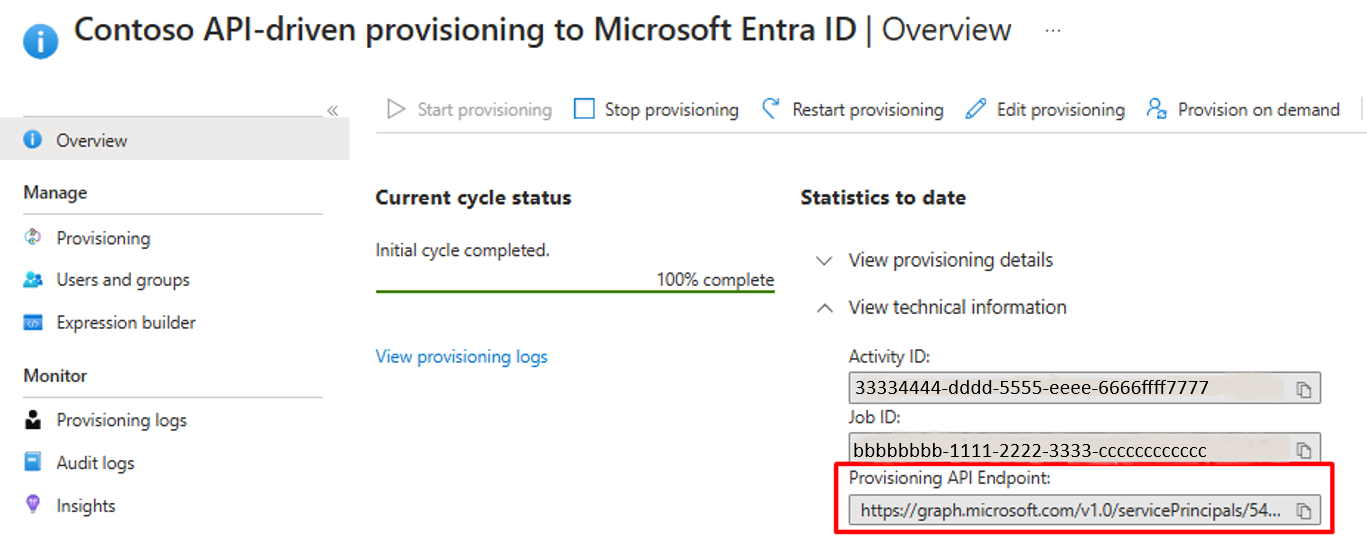
Use either Graph Explorer or cURL, then post the SCIM payload to the bulkUpload API endpoint.
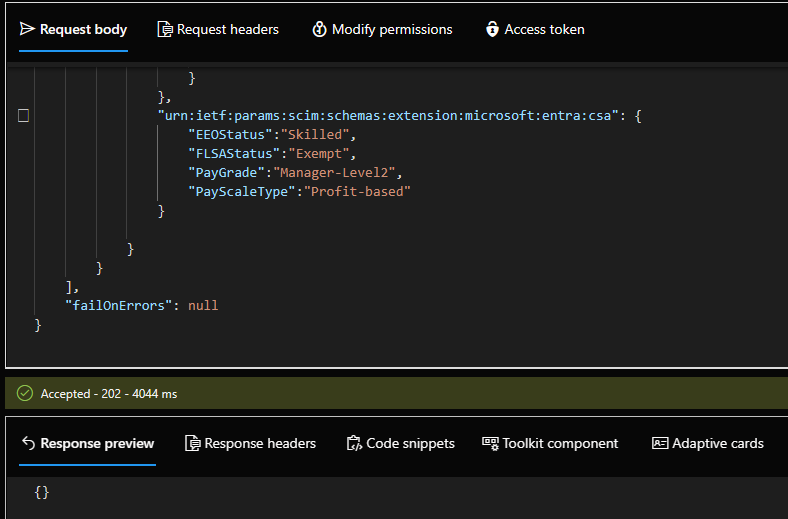
- If there are no errors in the SCIM payload format, you receive an Accepted status.
- Wait a few minutes, then check the provisioning logs of your API-driven provisioning job.
The custom security attribute displays as in the following example.
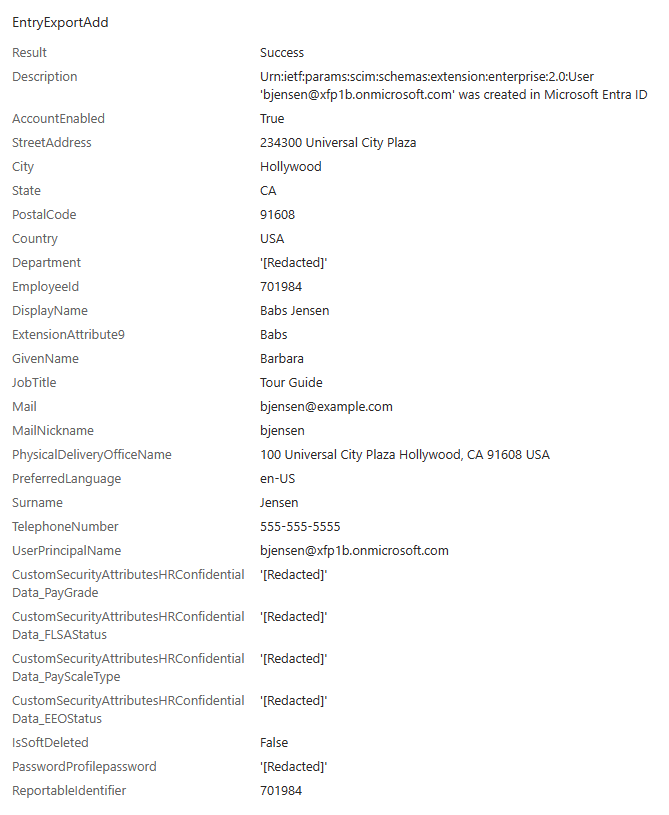
Note
The source and target values of custom security attributes get redacted in the provisioning logs. To view the actual values set for the user, go the user's Microsoft Entra ID profile.
You view the data in the Custom security attributes screen. You need at least the Attribute Assignment Administrator or Attribute Assignment Reader role to view this data.
Sample SCIM payload with custom security attributes
This sample SCIM bulk request includes custom fields under the extension urn:ietf:params:scim:schemas:extension:microsoft:entra:csa that can be mapped to custom security attributes.
{
    "schemas": ["urn:ietf:params:scim:api:messages:2.0:BulkRequest"],
    "Operations": [{
            "method": "POST",
            "bulkId": "897401c2-2de4-4b87-a97f-c02de3bcfc61",
            "path": "/Users",
            "data": {
                "schemas": ["urn:ietf:params:scim:schemas:core:2.0:User",
                    "urn:ietf:params:scim:schemas:extension:enterprise:2.0:User",
                    "urn:ietf:params:scim:schemas:extension:microsoft:entra:csa"],
                "id": "2819c223-7f76-453a-919d-413861904646",
                "externalId": "701984",
                "userName": "bjensen@example.com",
                "name": {
                    "formatted": "Ms. Barbara J Jensen, III",
                    "familyName": "Jensen",
                    "givenName": "Barbara",
                    "middleName": "Jane",
                    "honorificPrefix": "Ms.",
                    "honorificSuffix": "III"
                },
                "displayName": "Babs Jensen",
                "nickName": "Babs",
                "emails": [{
                        "value": "bjensen@example.com",
                        "type": "work",
                        "primary": true
                    }
                ],
                "addresses": [{
                        "type": "work",
                        "streetAddress": "234300 Universal City Plaza",
                        "locality": "Hollywood",
                        "region": "CA",
                        "postalCode": "91608",
                        "country": "USA",
                        "formatted": "100 Universal City Plaza\nHollywood, CA 91608 USA",
                        "primary": true
                    }
                ],
                "phoneNumbers": [{
                        "value": "555-555-5555",
                        "type": "work"
                    }
                ],
                "userType": "Employee",
                "title": "Tour Guide",
                "preferredLanguage": "en-US",
                "locale": "en-US",
                "timezone": "America/Los_Angeles",
                "active": true,
                "password": "t1meMa$heen",
                "urn:ietf:params:scim:schemas:extension:enterprise:2.0:User": {
                    "employeeNumber": "701984",
                    "costCenter": "4130",
                    "organization": "Universal Studios",
                    "division": "Theme Park",
                    "department": "Tour Operations",
                    "manager": {
                        "value": "89607",
                        "$ref": "../Users/26118915-6090-4610-87e4-49d8ca9f808d",
                        "displayName": "John Smith"
                    }
                },
                "urn:ietf:params:scim:schemas:extension:microsoft:entra:csa": {
                    "EEOStatus":"Semi-skilled",
                    "FLSAStatus":"Non-exempt",
                    "PayGrade":"IC-Level5",
                    "PayScaleType":"Revenue-based"
                }
            }
        }, {
            "method": "POST",
            "bulkId": "897401c2-2de4-4b87-a97f-c02de3bcfc61",
            "path": "/Users",
            "data": {
                "schemas": ["urn:ietf:params:scim:schemas:core:2.0:User",
                    "urn:ietf:params:scim:schemas:extension:enterprise:2.0:User",
                    "urn:ietf:params:scim:schemas:extension:microsoft:entra:csa" ],
                "id": "2819c223-7f76-453a-919d-413861904646",
                "externalId": "701985",
                "userName": "Kjensen@example.com",
                "name": {
                    "formatted": "Ms. Kathy J Jensen, III",
                    "familyName": "Jensen",
                    "givenName": "Kathy",
                    "middleName": "Jane",
                    "honorificPrefix": "Ms.",
                    "honorificSuffix": "III"
                },
                "displayName": "Kathy Jensen",
                "nickName": "Kathy",
                "emails": [{
                        "value": "kjensen@example.com",
                        "type": "work",
                        "primary": true
                    }
                ],
                "addresses": [{
                        "type": "work",
                        "streetAddress": "100 Oracle City Plaza",
                        "locality": "Hollywood",
                        "region": "CA",
                        "postalCode": "91618",
                        "country": "USA",
                        "formatted": "100 Oracle City Plaza\nHollywood, CA 91618 USA",
                        "primary": true
                    }
                ],
                "phoneNumbers": [{
                        "value": "555-555-5545",
                        "type": "work"
                    }
                ],
                "userType": "Employee",
                "title": "Tour Lead",
                "preferredLanguage": "en-US",
                "locale": "en-US",
                "timezone": "America/Los_Angeles",
                "active": true,
                "urn:ietf:params:scim:schemas:extension:enterprise:2.0:User": {
                    "employeeNumber": "701984",
                    "costCenter": "4130",
                    "organization": "Universal Studios",
                    "division": "Theme Park",
                    "department": "Tour Operations",
                    "manager": {
                        "value": "89607",
                        "$ref": "../Users/26118915-6090-4610-87e4-49d8ca9f808d",
                        "displayName": "John Smith"
                    }
                },
                "urn:ietf:params:scim:schemas:extension:microsoft:entra:csa": {
                    "EEOStatus":"Skilled",
                    "FLSAStatus":"Exempt",
                    "PayGrade":"Manager-Level2",
                    "PayScaleType":"Profit-based"
                }

            }
        }
    ],
    "failOnErrors": null
}
Provision custom security attributes for hybrid users
Hybrid users are provisioned from HR systems first in on-premises Active Directory and then synchronized to Microsoft Entra ID using Entra Connect Sync or Cloud Sync. Custom security attributes can be assigned to hybrid users, and these attributes are only present on the Microsoft Entra ID profile of the hybrid user.
This section describes the provisioning topology to auto provision custom security attributes for hybrid users. It uses Workday as the trusted HR source. However, the same topology can also be used with SuccessFactors and API-driven provisioning.
Let’s say Workday is your HR system of record for identities. To set custom security attributes on hybrid users sourced from Workday, configure two provisioning apps:
- Workday to on-premises Active Directory provisioning: This provisioning app creates and updates hybrid users in on-premises Active Directory. It only processes normal attributes from Workday.
- Workday to Microsoft Entra ID provisioning: Configure this provisioning app to only process Update operations and restrict the attribute mapping to only include custom security attributes as target attributes.
With this topology, here is how the end-to-end flow works:
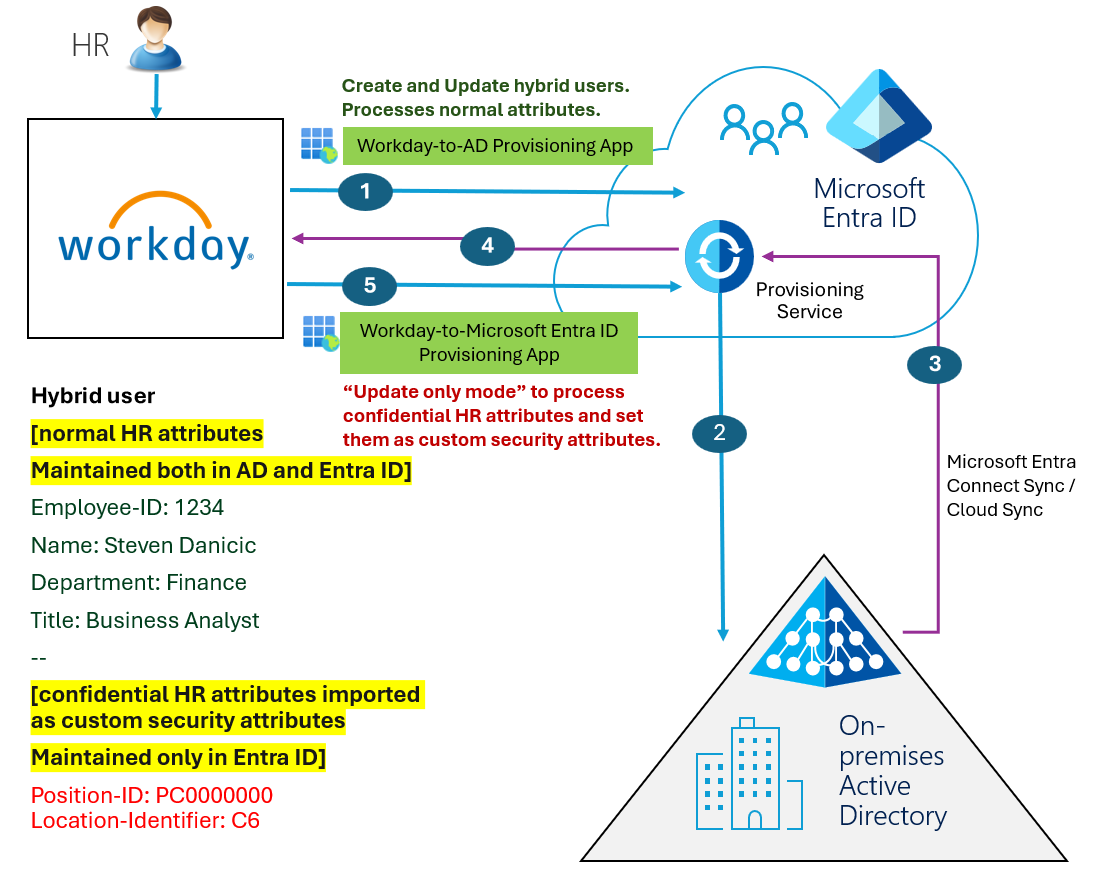
- The Workday-to-AD provisioning app imports the core user profile from Workday.
- The app creates/updates the user account in on-premises Active Directory using the Employee ID as the matching identifier.
- Microsoft Entra Connect Sync / Cloud Sync synchronizes the user profile to Microsoft Entra ID.
- If you’ve configured Workday Writeback, email or phone number information is written back to Workday.
- The Workday-to-Microsoft Entra ID provisioning app is configured to only process updates and set confidential attributes as custom security attributes. Use the schema editor under Show advanced options to remove default attribute mappings like
accountEnabledandisSoftDeletedthat are not relevant in this scenario.
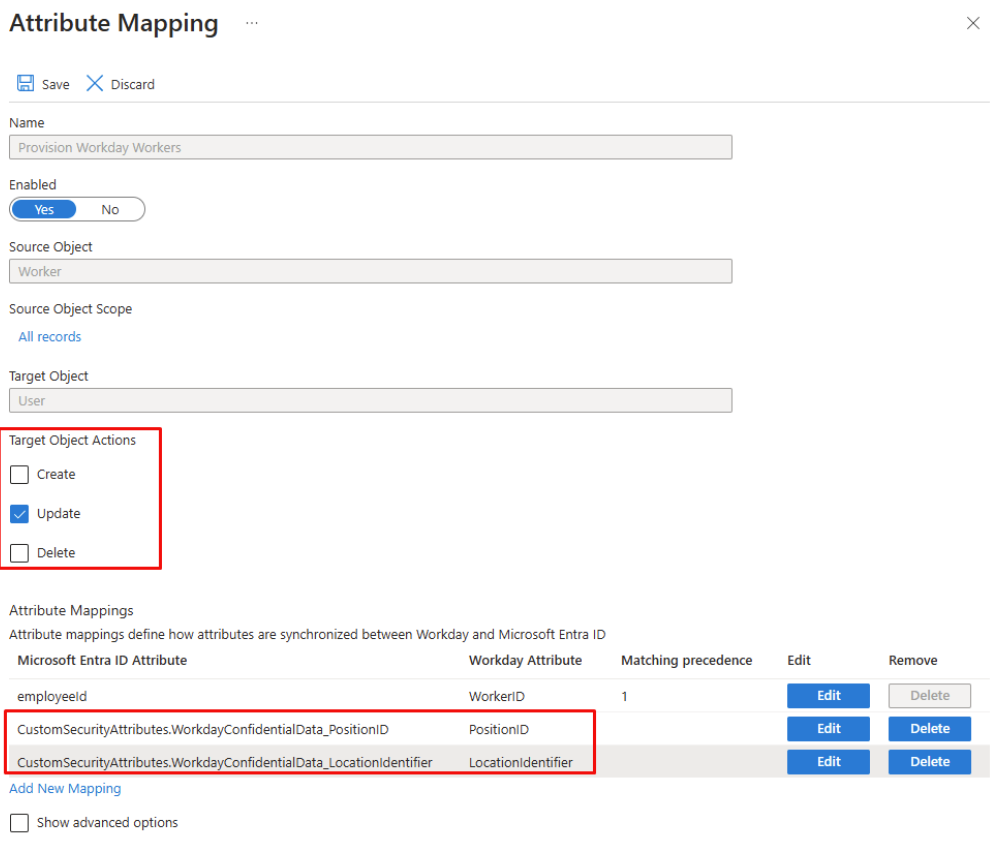
This configuration assigns the custom security attributes to hybrid users synchronized to Microsoft Entra ID from on-premises Active Directory.
Note
The above configuration relies on three different sync cycles to complete in a specific order. If the hybrid user profile is not available in Microsoft Entra ID, when the Workday-to-Microsoft Entra ID provisioning job runs, then the update operation fails, and is retried during the next execution. If you’re using the API-driven provisioning-to-Microsoft Entra ID app, then you have better control on timing the execution of the custom security attribute update.
API permissions for custom security attributes provisioning
This preview feature introduces the following new Graph API permissions. This functionality enables you to access and modify provisioning app schemas that contain custom security attribute mappings, either directly or on behalf of the signed-in user.
CustomSecAttributeProvisioning.ReadWrite.All: This permission grants the calling app ability to read and write the attribute mapping that contains custom security attributes. This permission with
Application.ReadWrite.OwnedByorSynchronization.ReadWrite.AllorApplication.ReadWrite.All(from least to highest privilege) is required to edit a provisioning app that contains custom security attributes mappings. This permission enables you to get the complete schema that includes the custom security attributes and to update or reset the schema with custom security attributes.CustomSecAttributeProvisioning.Read.All: This permission grants the calling app ability to read the attribute mapping and the provisioning logs that contain custom security attributes. This permission with
Synchronization.Read.AllorApplication.Read.All(from least to highest privilege) is required to view the custom security attributes names and values in the protected resources.
If an app doesn't have the CustomSecAttributeProvisioning.ReadWrite.All permission or the CustomSecAttributeProvisioning.Read.All permission, it's not able to access or modify provisioning apps that contain custom security attributes. Instead, an error message or redacted data appears.
Troubleshoot custom security attributes provisioning
| Issue | Troubleshoot steps |
|---|---|
| Custom Security Attributes aren't showing up in the Target attributes mapping drop-down list. | - Ensure that you're adding custom security attributes to a provisioning app that supports custom security attributes. - Ensure that the logged-in user is assigned the role Attribute Provisioning Administrator (for edit access) or Attribute Provisioning Reader (for view access). |
Error returned when you reset or update the provisioning app schema. HTTP 403 Forbidden - InsufficientAccountPermission Provisioning schema has custom security attributes. The account does not have sufficient permissions to perform this operation. |
Ensure that the logged-in user is assigned the role Attribute Provisioning Administrator. |
| Unable to remove custom security attributes present in an attribute mapping. | Ensure that the logged in user is assigned the role Attribute Provisioning Administrator. |
The attribute mapping table has rows where the string redacted appears under source and target attributes. |
This behavior is by design if the logged-in user doesn't have Attribute Provisioning Administrator or Attribute Provisioning Reader role. Assigning one of these roles displays the custom security attribute mappings. |
Error returned The provisioning service does not support setting custom security attributes of type boolean and integer. Unable to set CSA attribute. |
Remove the integer/Boolean custom security attribute from the provisioning app attribute mapping. |
Error returned The provisioning service does not support setting custom security attributes that are deactivated. Unable to set CSA attribute <attribute name>. |
There was an attempt to update a deactivated custom security attribute. Remove the deactivated custom security attribute from the provisioning app attribute mapping. |


