Import a WebSocket API
APPLIES TO: Developer | Basic | Basic v2 | Standard | Standard v2 | Premium | Premium v2
With API Management’s WebSocket API solution, API publishers can quickly add a WebSocket API in API Management via the Azure portal, Azure CLI, Azure PowerShell, and other Azure tools.
Note
Currently, this feature isn't available in workspaces.
You can secure WebSocket APIs by applying existing access control policies, like JWT validation. You can also test WebSocket APIs using the API test consoles in both Azure portal and developer portal. Building on existing observability capabilities, API Management provides metrics and logs for monitoring and troubleshooting WebSocket APIs.
In this article, you will:
- Understand WebSocket passthrough flow.
- Add a WebSocket API to your API Management instance.
- Test your WebSocket API.
- View the metrics and logs for your WebSocket API.
- Learn the limitations of WebSocket API.
Prerequisites
- An existing API Management instance. Create one if you haven't already.
- A WebSocket API.
- Azure CLI
WebSocket passthrough
API Management supports WebSocket passthrough.

During the WebSocket passthrough the client application establishes a WebSocket connection with the API Management Gateway, which then establishes a connection with the corresponding backend services. API Management then proxies WebSocket client-server messages.
- The client application sends a WebSocket handshake request to APIM gateway, invoking onHandshake operation.
- APIM gateway sends WebSocket handshake request to the corresponding backend service.
- The backend service upgrades a connection to WebSocket.
- APIM gateway upgrades the corresponding connection to WebSocket.
- Once the connection pair is established, APIM will broker messages back and forth between the client application and backend service.
- The client application sends message to APIM gateway.
- APIM gateway forwards the message to the backend service.
- The backend service sends a message to APIM gateway.
- APIM gateway forwards the message to the client application.
- When either side disconnects, APIM terminates the corresponding connection.
Note
The client-side and backend-side connections consist of one-to-one mapping.
onHandshake operation
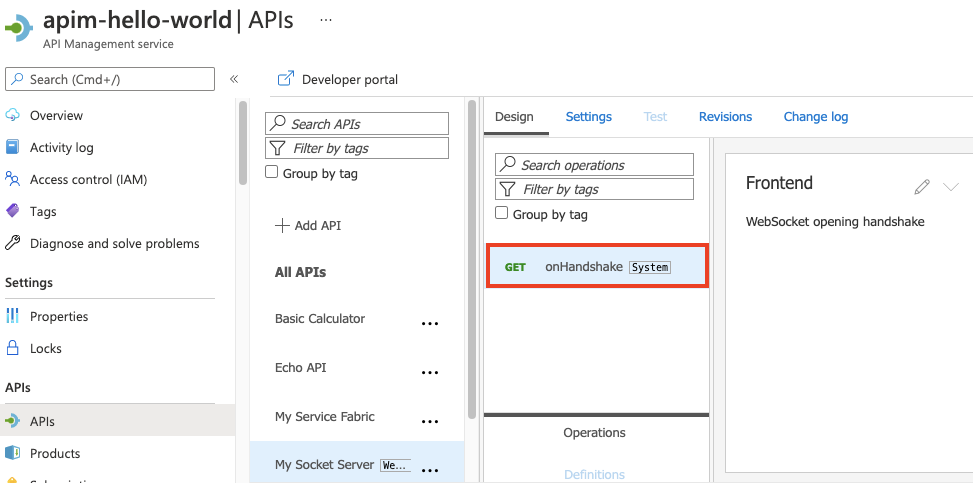
Per the WebSocket protocol, when a client application tries to establish a WebSocket connection with a backend service, it will first send an opening handshake request. Each WebSocket API in API Management has an onHandshake operation. onHandshake is an immutable, unremovable, automatically created system operation. The onHandshake operation enables API publishers to intercept these handshake requests and apply API Management policies to them.

Add a WebSocket API
-
- In the Azure portal, navigate to your API Management instance.
In the left menu, select APIs > + Add API.
Under Define a new API, select WebSocket.
In the dialog box, select Full and complete the required form fields.
Field Description Display name The name by which your WebSocket API will be displayed. Name Raw name of the WebSocket API. Automatically populates as you type the display name. WebSocket URL The base URL with your websocket name. For example: ws://example.com/your-socket-name URL scheme Accept the default API URL suffix Add a URL suffix to identify this specific API in this API Management instance. It has to be unique in this APIM instance. Products Associate your WebSocket API with a product to publish it. Gateways Associate your WebSocket API with existing gateways. Click Create.
Test your WebSocket API
Navigate to your WebSocket API.
Within your WebSocket API, select the onHandshake operation.
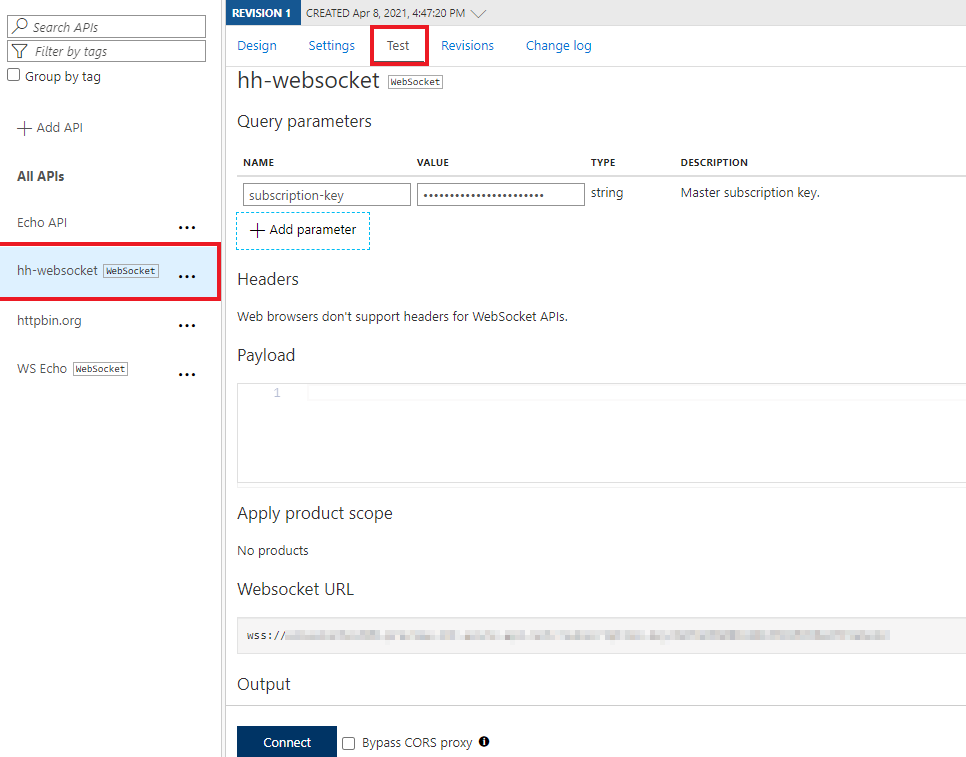
Select the Test tab to access the Test console.
Optionally, provide query string parameters required for the WebSocket handshake.

Click Connect.
View connection status in Output.
Enter value in Payload.
Click Send.
View received messages in Output.
Repeat preceding steps to test different payloads.
When testing is complete, select Disconnect.
View metrics and logs
Use standard API Management and Azure Monitor features to monitor WebSocket APIs:
- View API metrics in Azure Monitor
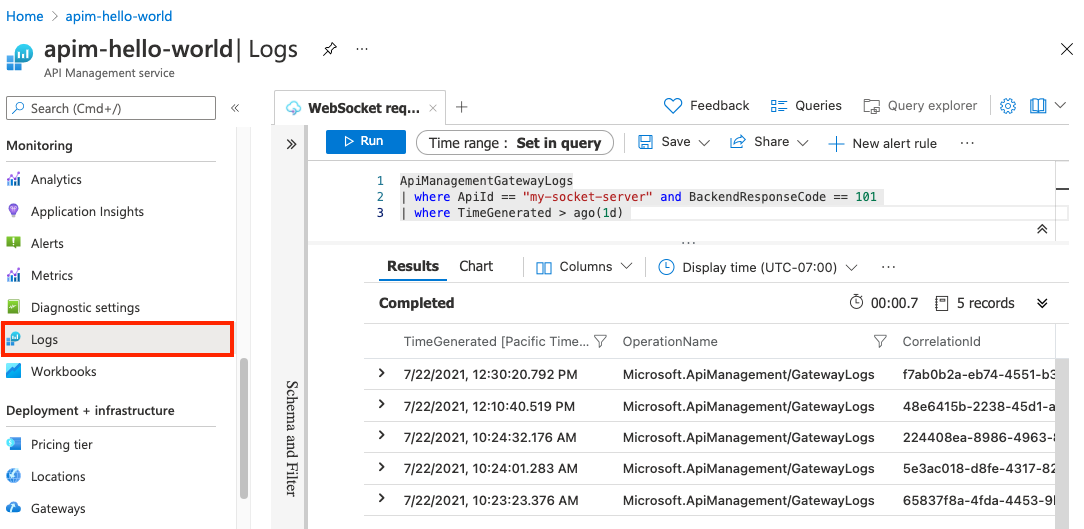
- Optionally enable diagnostic settings to collect and view API Management gateway logs, which include WebSocket API operations
For example, the following screenshot shows recent WebSocket API responses with code 101 from the ApiManagementGatewayLogs table. These results indicate the successful switch of the requests from TCP to the WebSocket protocol.

Limitations
Below are the current restrictions of WebSocket support in API Management:
- WebSocket APIs are not supported yet in the Consumption tier.
- WebSocket APIs support the following valid buffer types for messages: Close, BinaryFragment, BinaryMessage, UTF8Fragment, and UTF8Message.
- Currently, the set-header policy doesn't support changing certain well-known headers, including
Hostheaders, in onHandshake requests. - During the TLS handshake with a WebSocket backend, API Management validates that the server certificate is trusted and that its subject name matches the hostname. With HTTP APIs, API Management validates that the certificate is trusted but doesn’t validate that hostname and subject match.
For WebSocket connection limits, see API Management limits.
Unsupported policies
The following policies are not supported by and cannot be applied to the onHandshake operation:
- Mock response
- Get from cache
- Store to cache
- Allow cross-domain calls
- CORS
- JSONP
- Set request method
- Set body
- Convert XML to JSON
- Convert JSON to XML
- Transform XML using XSLT
- Validate content
- Validate parameters
- Validate headers
- Validate status code
Note
If you applied the policies at higher scopes (i.e., global or product) and they were inherited by a WebSocket API through the policy, they will be skipped at runtime.
Related topics
- API import limitations
- Import an OpenAPI specification
- Import a SOAP API
- Import a SOAP API and convert to REST
- Import an App Service API
- Import a Container App API
- Import a WebSocket API
- Import a GraphQL API
- Import a GraphQL schema and set up field resolvers
- Import an Azure Function App
- Import an Azure Logic App
- Import a Service Fabric service
- Import an Azure OpenAI API
- Import an OData API
- Import SAP OData metadata
- Import a gRPC API
- Edit an API