更新 Azure Resource Manager 範本中的資源
有時候,當您需要在部署期間更新資源,例如,在建立其他相依資源之前,您無法指定資源的所有屬性時。 例如,如果您建立負載平衡器的後端集區,您可能會更新虛擬機器 (VM) 上的網路介面 (NIC),以將這些介面納入後端集區。 Resource Manager支援在部署期間更新資源,但您必須正確設計範本以避免錯誤,並確保部署會以更新的形式處理。
當您建立資源並稍後加以更新時,您會參考它兩次。 您會先在建立它的範本中參考它。 稍後,當您更新資源時,您會以相同名稱加以參考。 不過,如果這兩個資源在範本中擁有相同名稱,Resource Manager 就會擲回例外狀況。 若要避免此錯誤,請在第二個範本中指定已更新的資源,該範本會連結或包含為使用 Microsoft.Resources/deployments 資源類型的子範本。
在第二個範本中,您必須指定要變更的屬性名稱,或指定要加入之屬性的新名稱。 您也必須指定不會變更之屬性的名稱和原始值。 如果您無法指定一或多個原始屬性,Resource Manager假設您想要建立新的資源並刪除原始資源。
範本範例
讓我們看看示範技術的範例範本。 此範本會部署名為 firstVNet 的虛擬網路,其具有一個名為 的 firstSubnet 子網。 然後,它會部署名為 (NIC) nic1 虛擬網路介面,並將 NIC 與子網產生關聯。 名為 updateVNet 的部署資源包含巢狀範本,可藉由新增名為 secondSubnet 的第二個子網來更新 firstVNet 。
{
    "$schema": "https://schema.management.azure.com/schemas/2019-04-01/deploymentTemplate.json#",
    "contentVersion": "1.0.0.0",
    "parameters": {},
    "resources": [
        {
            "apiVersion": "2020-05-01",
            "name": "firstVNet",
            "location": "[resourceGroup().location]",
            "type": "Microsoft.Network/virtualNetworks",
            "properties": {
                "addressSpace": {
                    "addressPrefixes": [
                        "10.0.0.0/22"
                    ]
                },
                "subnets": [
                    {
                        "name": "firstSubnet",
                        "properties": {
                            "addressPrefix": "10.0.0.0/24"
                        }
                    }
                ]
            }
        },
        {
            "apiVersion": "2020-05-01",
            "type": "Microsoft.Network/networkInterfaces",
            "name": "nic1",
            "location": "[resourceGroup().location]",
            "dependsOn": [
                "firstVNet"
            ],
            "properties": {
                "ipConfigurations": [
                    {
                        "name": "ipconfig1",
                        "properties": {
                            "privateIPAllocationMethod": "Dynamic",
                            "subnet": {
                                "id": "[resourceId('Microsoft.Network/virtualNetworks/subnets', 'firstVNet', 'firstSubnet')]"
                            }
                        }
                    }
                ]
            }
        },
        {
            "apiVersion": "2020-06-01",
            "type": "Microsoft.Resources/deployments",
            "name": "updateVNet",
            "dependsOn": [
                "nic1"
            ],
            "properties": {
                "mode": "Incremental",
                "parameters": {},
                "template": {
                    "$schema": "https://schema.management.azure.com/schemas/2019-04-01/deploymentTemplate.json#",
                    "contentVersion": "1.0.0.1",
                    "parameters": {},
                    "variables": {},
                    "resources": [
                        {
                            "apiVersion": "2020-05-01",
                            "name": "firstVNet",
                            "location": "[resourceGroup().location]",
                            "type": "Microsoft.Network/virtualNetworks",
                            "properties": {
                                "addressSpace": "[reference('firstVNet').addressSpace]",
                                "subnets": [
                                    {
                                        "name": "[reference('firstVNet').subnets[0].name]",
                                        "properties": {
                                            "addressPrefix": "[reference('firstVNet').subnets[0].properties.addressPrefix]"
                                        }
                                    },
                                    {
                                        "name": "secondSubnet",
                                        "properties": {
                                            "addressPrefix": "10.0.1.0/24"
                                        }
                                    }
                                ]
                            }
                        }
                    ],
                    "outputs": {}
                }
            }
        }
    ],
    "outputs": {}
}
請考慮資源 firstVNet 的資源物件。 請注意,我們會在巢狀範本中再次指定 我們的 firstVNet 設定,這是因為Resource Manager不允許相同範本中的相同部署名稱,而巢狀範本會被視為不同的範本。 再次指定資源的值 firstSubnet ,我們會告訴Resource Manager更新現有的資源,而不是刪除它並重新部署。 最後,在此更新期間會收取 secondSubnet 的新設定。
試用範本
您可以在 GitHub 上取得範本範例。 若要部署範本,請執行下列 Azure CLI 命令:
az group create --location <location> --name <resource-group-name>
az deployment group create -g <resource-group-name> \
    --template-uri https://raw.githubusercontent.com/mspnp/template-examples/master/example1-update/deploy.json
部署完成後,開啟您在入口網站中指定的資源群組。 您會看到名為 firstVNet 的虛擬網路和名為 nic1 的 NIC。 按一下 firstVNet,然後再按一下 subnets。 您會看到原先建立的 firstSubnet,並看到 updateVNet 資源中新增的 secondSubnet。

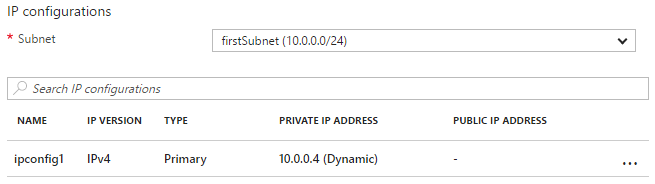
然後,返回資源群組並按一下 nic1 ,然後按一下 IP configurations 。 在 IP configurations 區段中,subnet 會設為 firstSubnet (10.0.0.0/24)。
原始 firstVNet 版本已更新,而不是重新建立。 如果 firstVNet 已重新建立, nic1 則不會與 相關聯 firstVNet 。
下一步
- Azure Resource Manager
- 什麼是 ARM 範本?
- 教學課程:建立及部署您的第一個 ARM 範本
- 教學課程:將資源新增至 ARM 範本
- ARM 範本最佳做法
- Azure Resource Manager 文件
- ARM 範本文件