快速入門:如何新增自定義已驗證的電子郵件網域
在本快速入門中,您將瞭解如何在 Azure 通訊服務 中布建自定義已驗證的電子郵件網域。
必要條件
- 具有有效訂用帳戶的 Azure 帳戶。 請參閱 免費建立帳戶。
- Azure 通訊服務 電子郵件資源已建立並準備好新增網域。 請參閱 開始使用建立電子郵件通訊資源。
布建自定義網域
若要佈建自訂網域,您需要:
- 在域名系統 (DNS) 中新增 TXT 記錄,以驗證自定義網域擁有權。
- 新增寄件者原則架構 (SPF) 和 DomainKeys 識別的郵件 (DKIM) 記錄,以設定寄件者驗證。
驗證自訂網域
在本節中,您會在 DNS 中新增 TXT 記錄來驗證自定義網域擁有權。
開啟您在開始使用建立電子郵件通訊資源中建立的電子郵件通訊服務資源 [概觀] 頁面。
使用下列其中一個選項建立自定義網域。
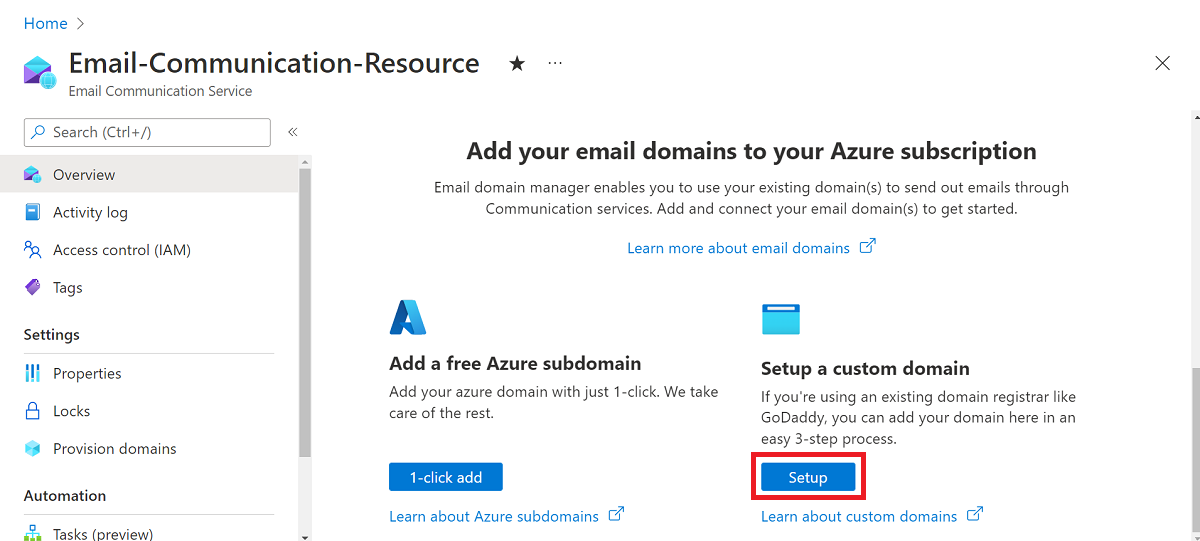
(選項 1) 按一下 [設定自訂網域] 下的 [設定] 按鈕。 繼續進行步驟 3。
(選項 2) 按一下左側導覽面板上的 [佈建網域]。
![顯示 [布建網域] 頁面導覽鏈接的螢幕快照。](media/email-domains-custom-navigation.png)
按一下上方導覽列上的 [新增網域]。
從下拉式清單中,選取 [自訂網域]。
按兩下 [ 新增自定義網域]。
在文字框中輸入您的功能變數名稱。
在下一個文字框中重新輸入您的功能變數名稱。
按一下 [確認]。
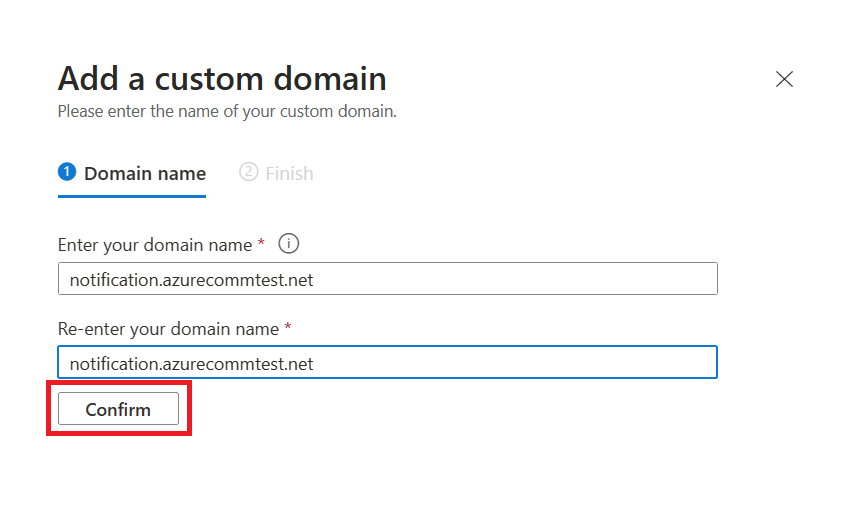
請確定您輸入的功能變數名稱正確,而且兩個文字框都相同。 如有需要,請按兩下 [ 編輯 ] 以在確認之前更正域名。
按一下新增。
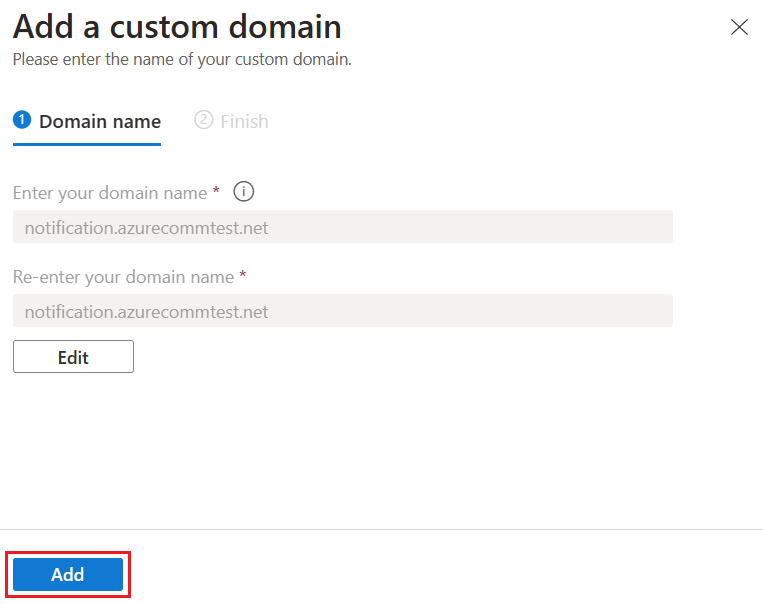
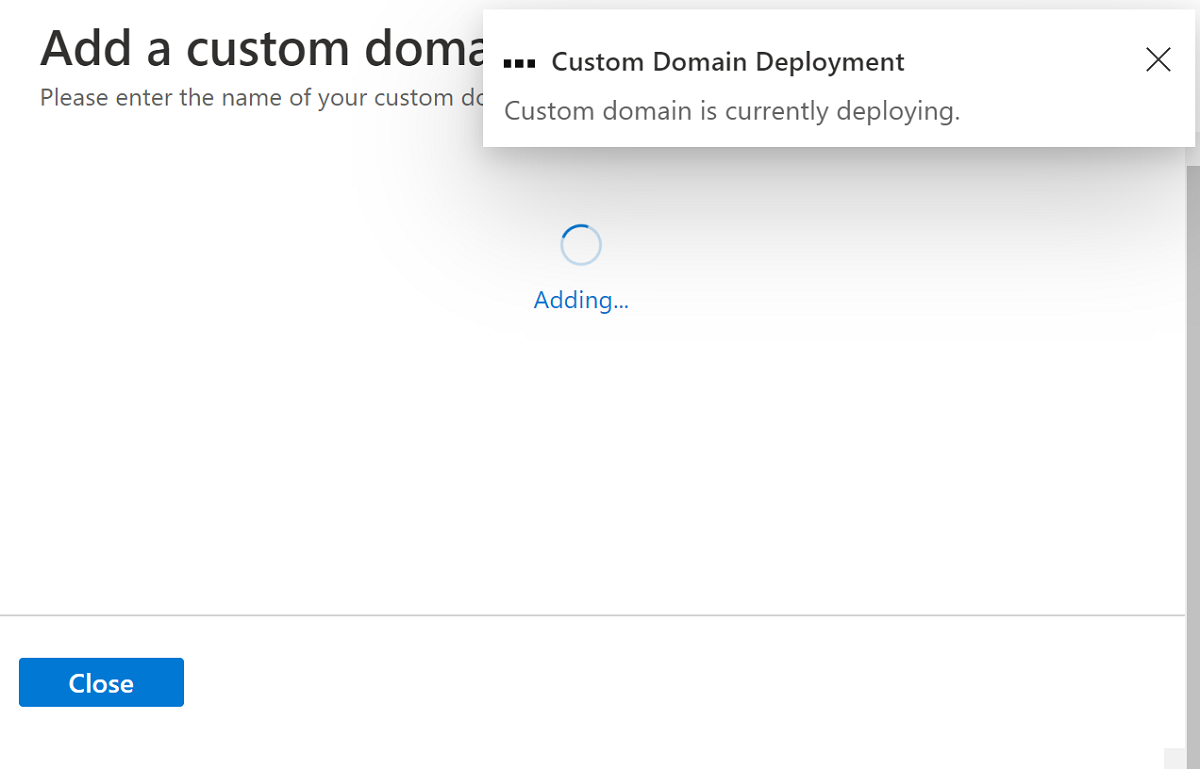
Azure 通訊服務 為您的網域建立自定義網域組態。
若要驗證網域擁有權,請按兩下 [ 驗證網域]。
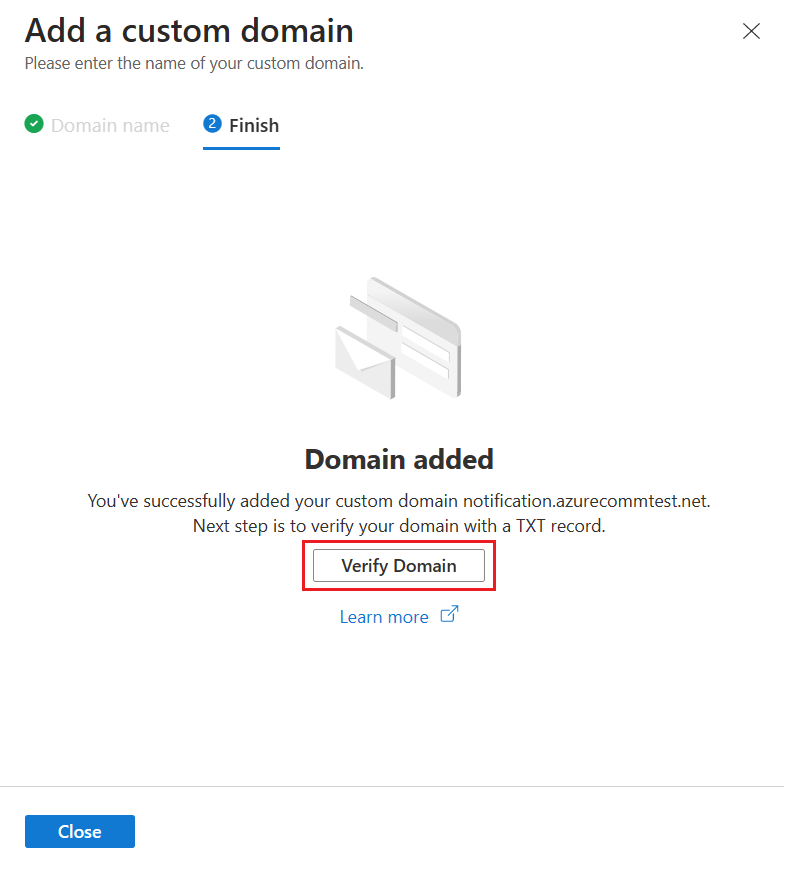 .
.若要稍後繼續驗證,請按兩下 [ 關閉 並繼續]。 然後,若要繼續從 [布建網域] 進行驗證,請按兩下 [ 設定]。
當您選取 [驗證網域] 或 [設定] 時,它會開啟 [透過 TXT 記錄驗證網域] 對話方塊。
將上述 TXT 記錄新增至網域的註冊機構或 DNS 主機服務提供者。 如需為 DNS 提供者新增 TXT 記錄的相關信息,請參閱 TXT 記錄一節。
完成此步驟之後,請按 [ 下一步]。
確認您的 DNS 中已成功建立 TXT 記錄,然後按兩下 [ 完成]。
DNS 變更需要 15 到 30 分鐘才會生效。 按一下 [關閉] 。
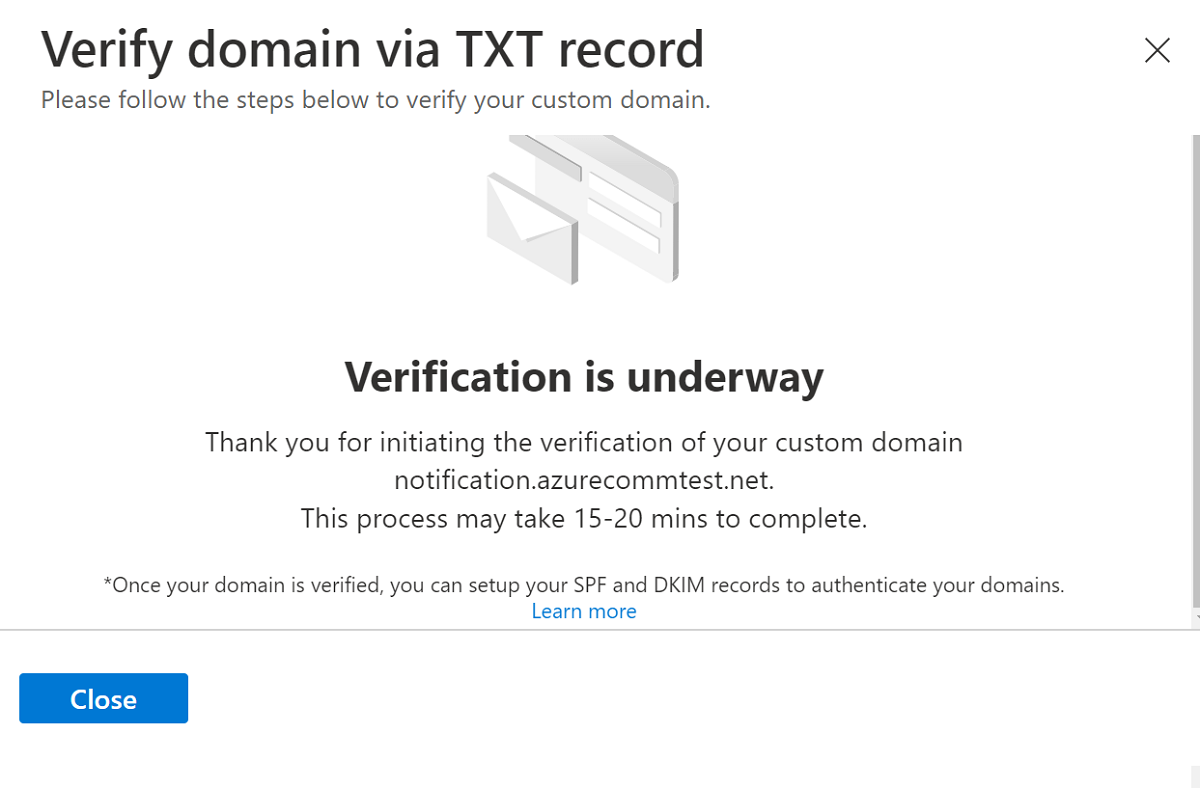
驗證網域之後,您可以新增SPF和 DKIM 記錄來驗證您的網域。
設定自訂網域的傳送者驗證
若要設定網域的發件者驗證,您需要新增更多域名服務 (DNS) 記錄。 本節說明如何 Azure 通訊服務 供應項目記錄,讓您新增至 DNS。 不過,根據您要註冊的網域是根域或子域而定,您必須將記錄新增至個別區域,或對自動產生的記錄進行變更。
本節說明如何為自定義網域 新增 SPF 和 DKIM 記錄 sales.us.notification.azurecommtest.net。 下列範例說明將這些記錄新增至 DNS 的四種不同的方法,視您要新增記錄的區域層級而定。
- 區域:sales.us.notification.azurecommtest.net
| 錄製 | 類型 | 名稱 | 值 |
|---|---|---|---|
| SPF | TXT | sales.us.notification.azurecommtest.net | v=spf1 include:spf.protection.outlook.com -all |
| DKIM | CNAME | selector1-azurecomm-prod-net._domainkey | selector1-azurecomm-prod-net._domainkey.azurecomm.net |
| DKIM2 | CNAME | selector2-azurecomm-prod-net._domainkey | selector2-azurecomm-prod-net._domainkey.azurecomm.net |
入口網站所產生的記錄假設您要將這些記錄新增至此區域中 的 DNS sales.us.notification.azurecommtest.net。
- 區域:us.notification.azurecommtest.net
| 錄製 | 類型 | 名稱 | 值 |
|---|---|---|---|
| SPF | TXT | sales | v=spf1 include:spf.protection.outlook.com -all |
| DKIM | CNAME | selector1-azurecomm-prod-net._domainkey.sales | selector1-azurecomm-prod-net._domainkey.azurecomm.net |
| DKIM2 | CNAME | selector2-azurecomm-prod-net._domainkey.sales | selector2-azurecomm-prod-net._domainkey.azurecomm.net |
- 區域:notification.azurecommtest.net
| 錄製 | 類型 | 名稱 | 值 |
|---|---|---|---|
| SPF | TXT | sales.us | v=spf1 include:spf.protection.outlook.com -all |
| DKIM | CNAME | selector1-azurecomm-prod-net._domainkey.sales.us | selector1-azurecomm-prod-net._domainkey.azurecomm.net |
| DKIM2 | CNAME | selector2-azurecomm-prod-net._domainkey.sales.us | selector2-azurecomm-prod-net._domainkey.azurecomm.net |
- 區域:azurecommtest.net
| 錄製 | 類型 | 名稱 | 值 |
|---|---|---|---|
| SPF | TXT | sales.us.notification | v=spf1 include:spf.protection.outlook.com -all |
| DKIM | CNAME | selector1-azurecomm-prod-net._domainkey.sales.us.notification | selector1-azurecomm-prod-net._domainkey.azurecomm.net |
| DKIM2 | CNAME | selector2-azurecomm-prod-net._domainkey.sales.us.notification | selector2-azurecomm-prod-net._domainkey.azurecomm.net |
新增SPF和 DKIM 記錄
在本節中,您會新增寄件人原則架構 (SPF) 和 DomainKeys 識別郵件 (DKIM) 記錄來設定寄件者驗證。
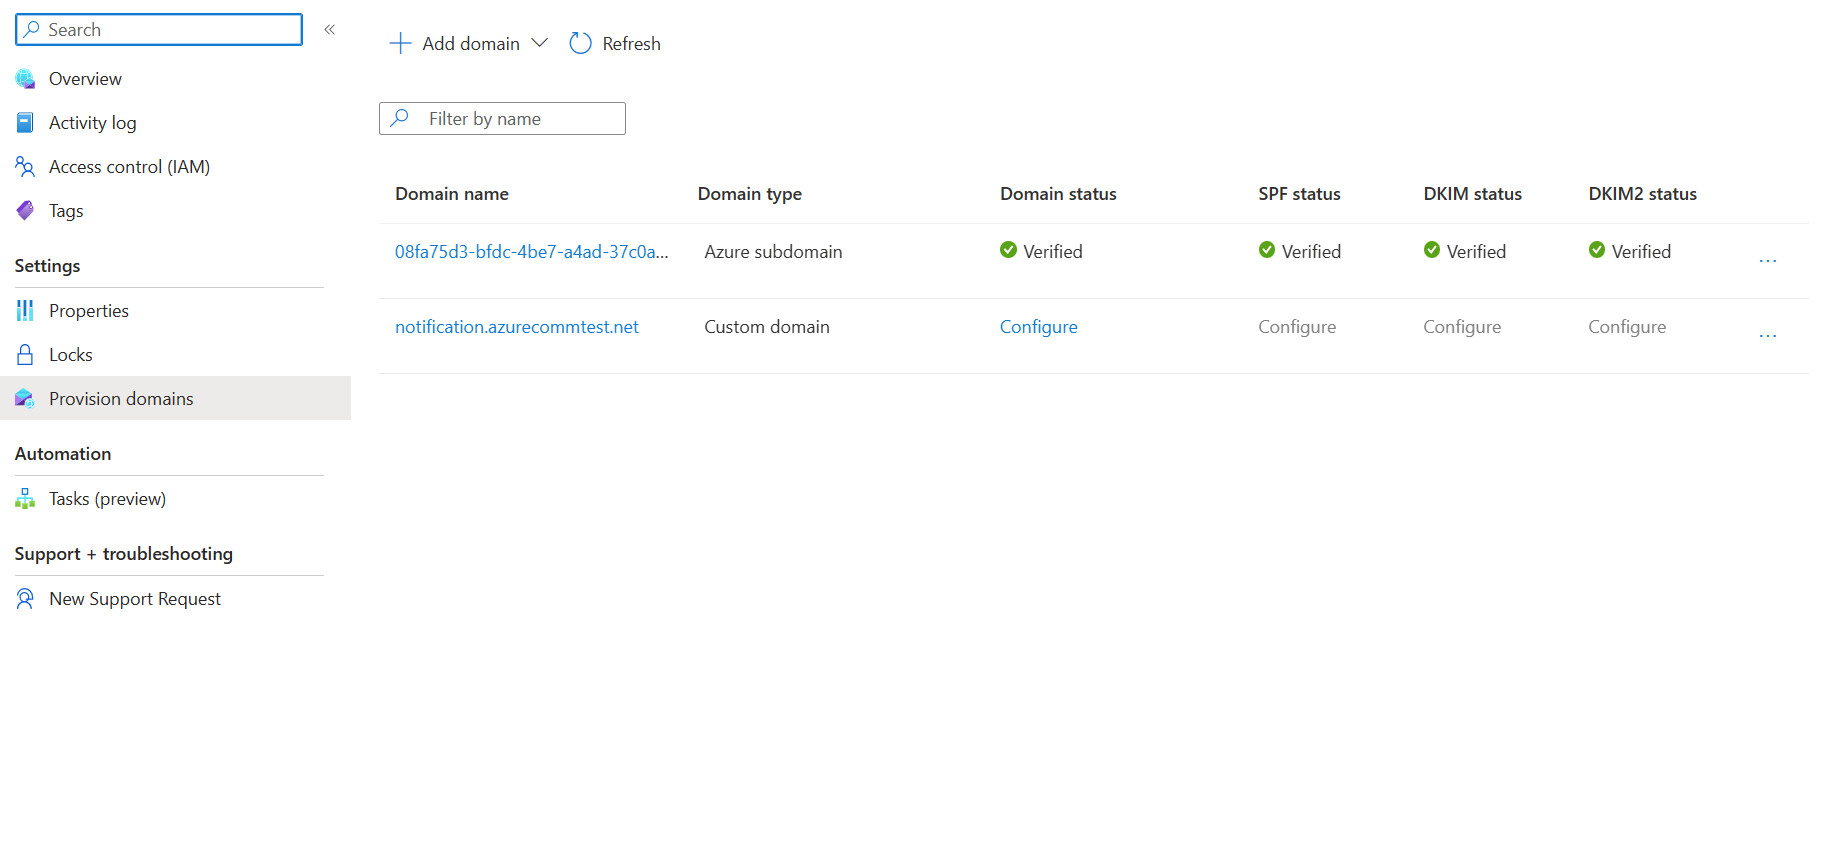
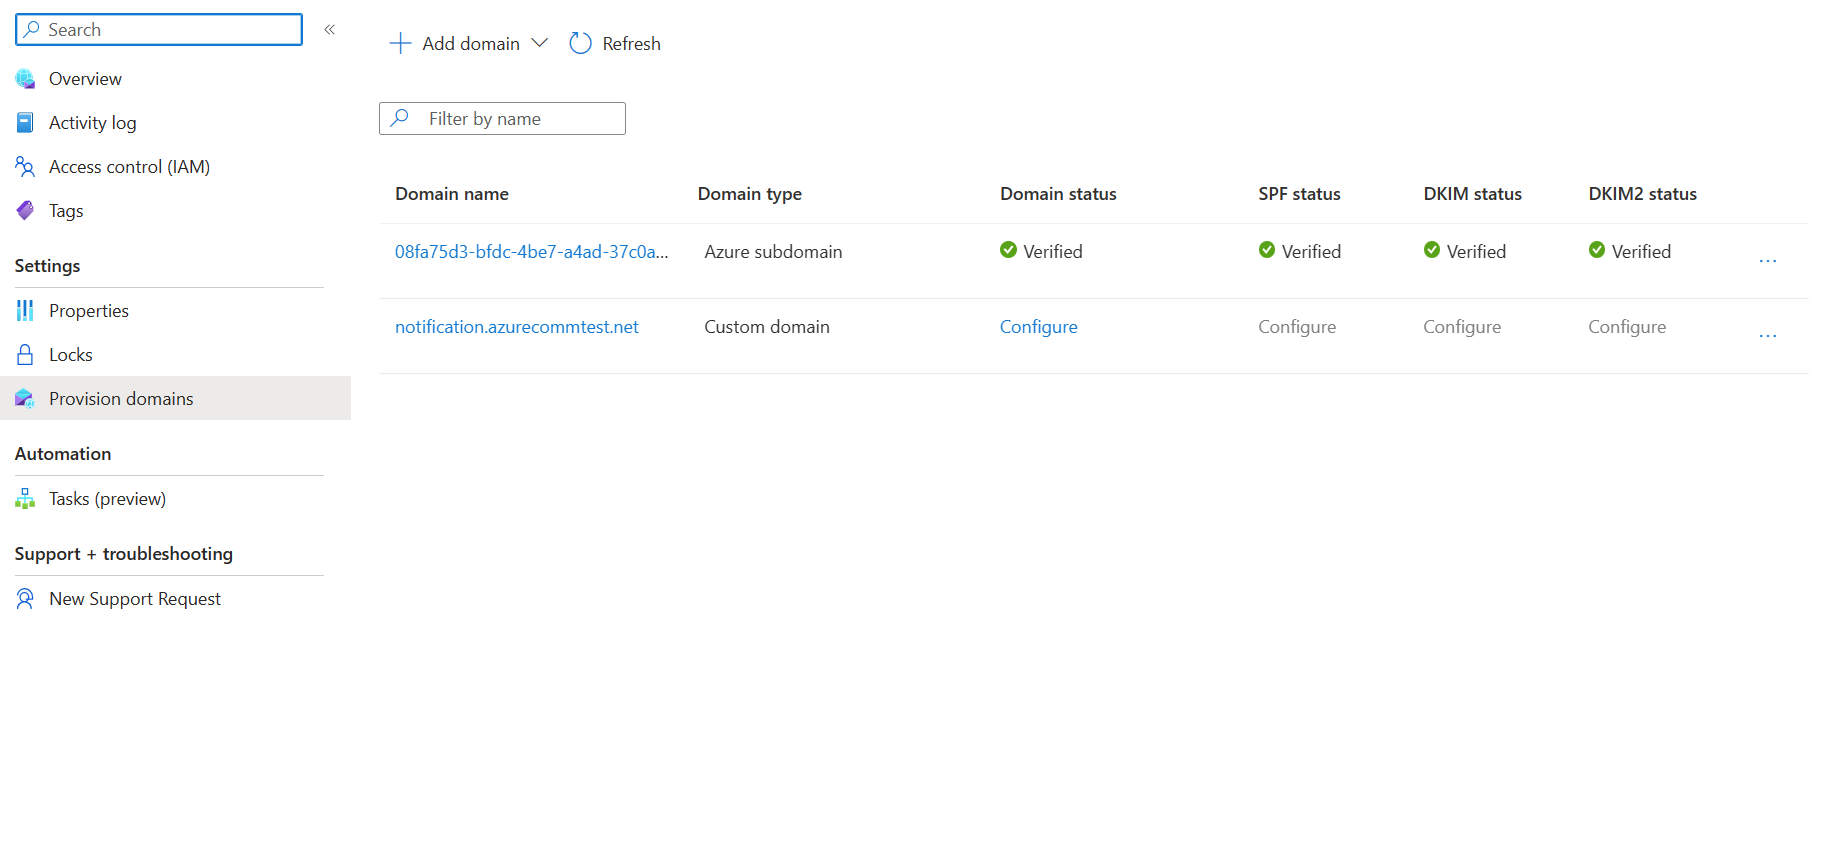
開啟 [布建 網域], 並確認 [網域狀態 ] 處於
Verified狀態。若要新增SPF和 DKIM資訊,請按兩下 [ 設定]。
將下列 TXT 記錄和 CNAME 記錄新增至網域的登錄器或 DNS 裝載提供者。 如需 為 DNS 提供者新增 TXT 和 CNAME 記錄的相關信息,請參閱熱門網域註冊機構數據表 中的新增 DNS 記錄。
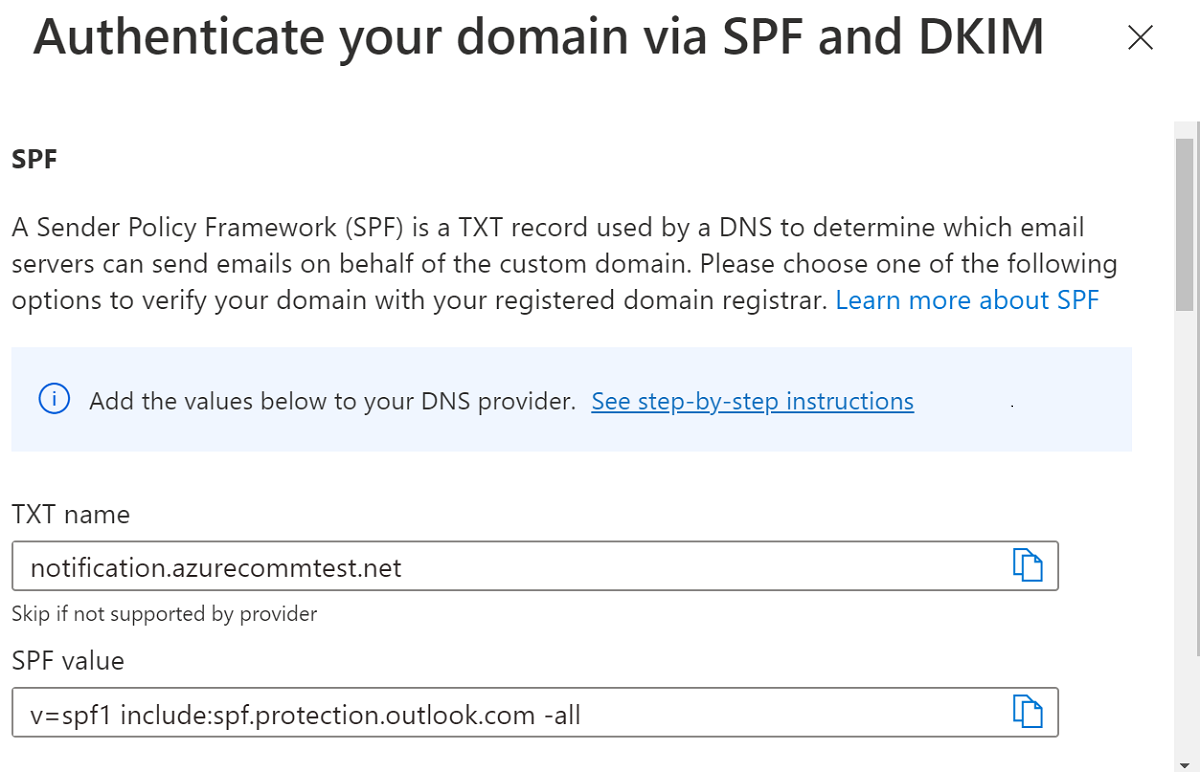
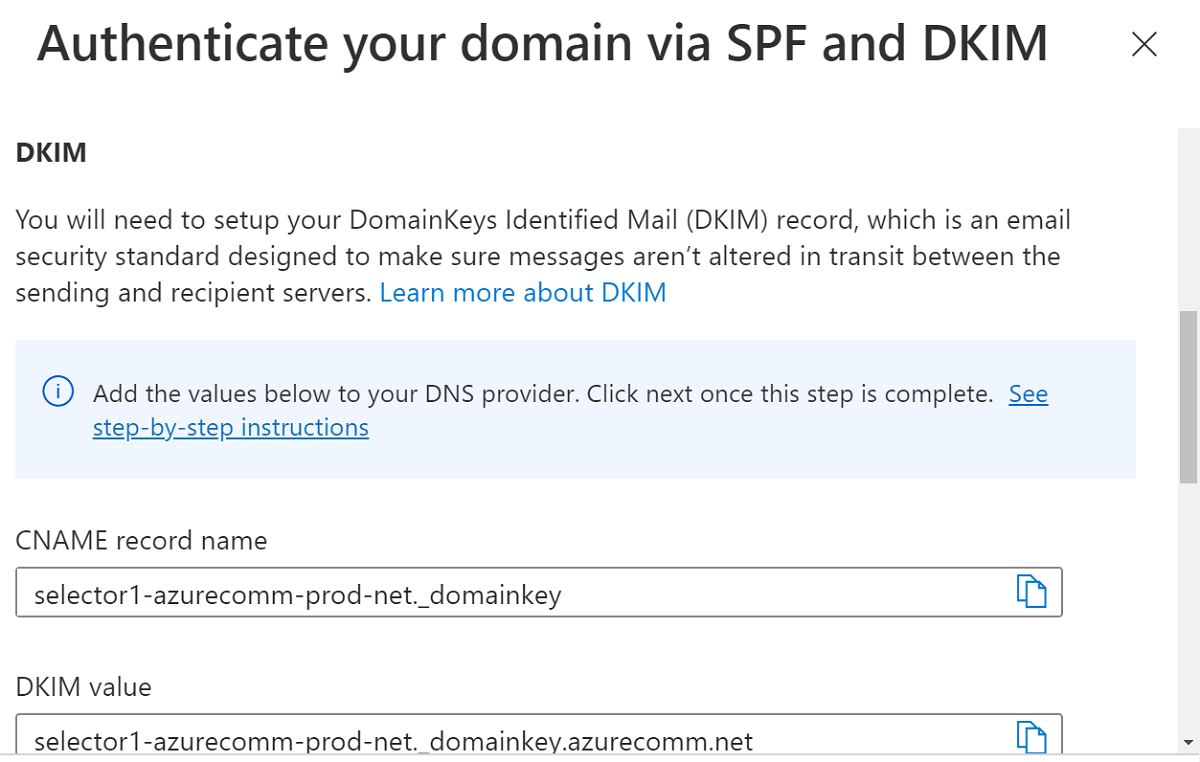
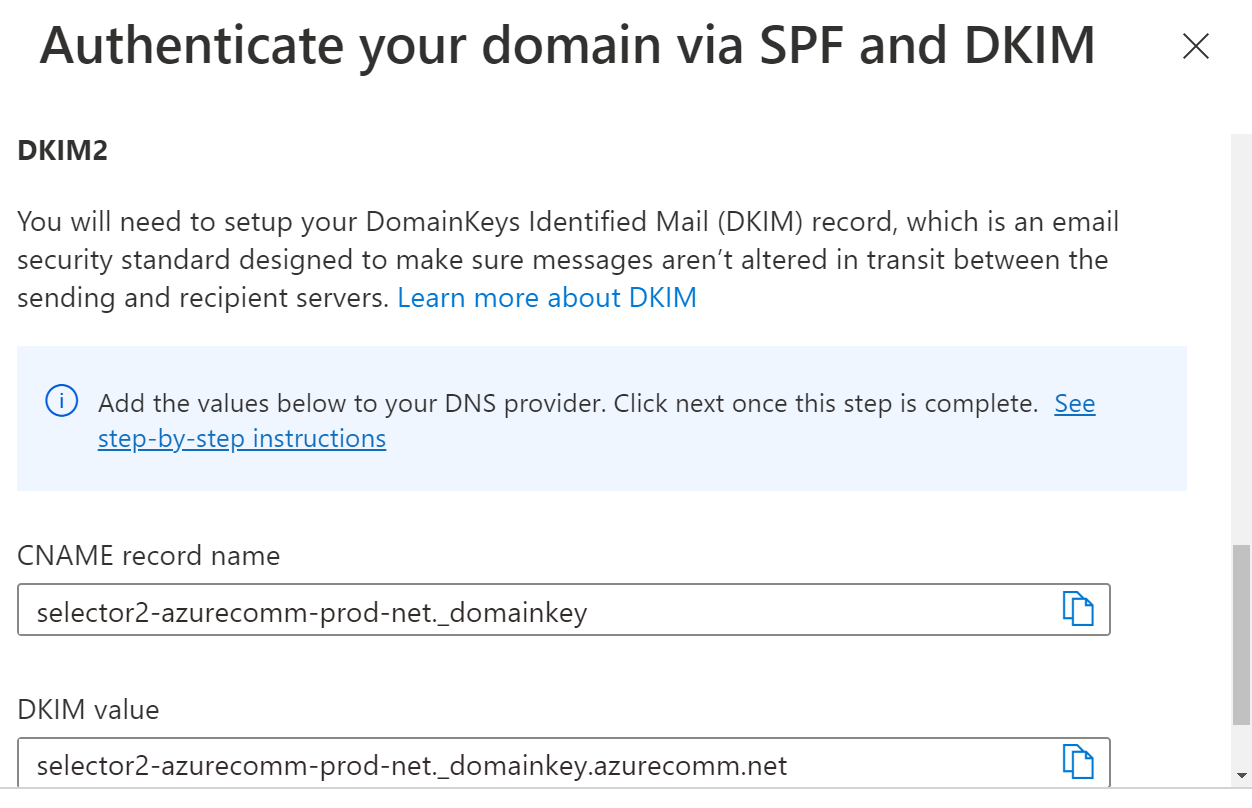
當您完成新增 TXT 和 CNAME 資訊時,請按 [下一步 ] 繼續。
確認您的 DNS 中已成功建立 TXT 和 CNAME 記錄。 然後按一下 [完成]。
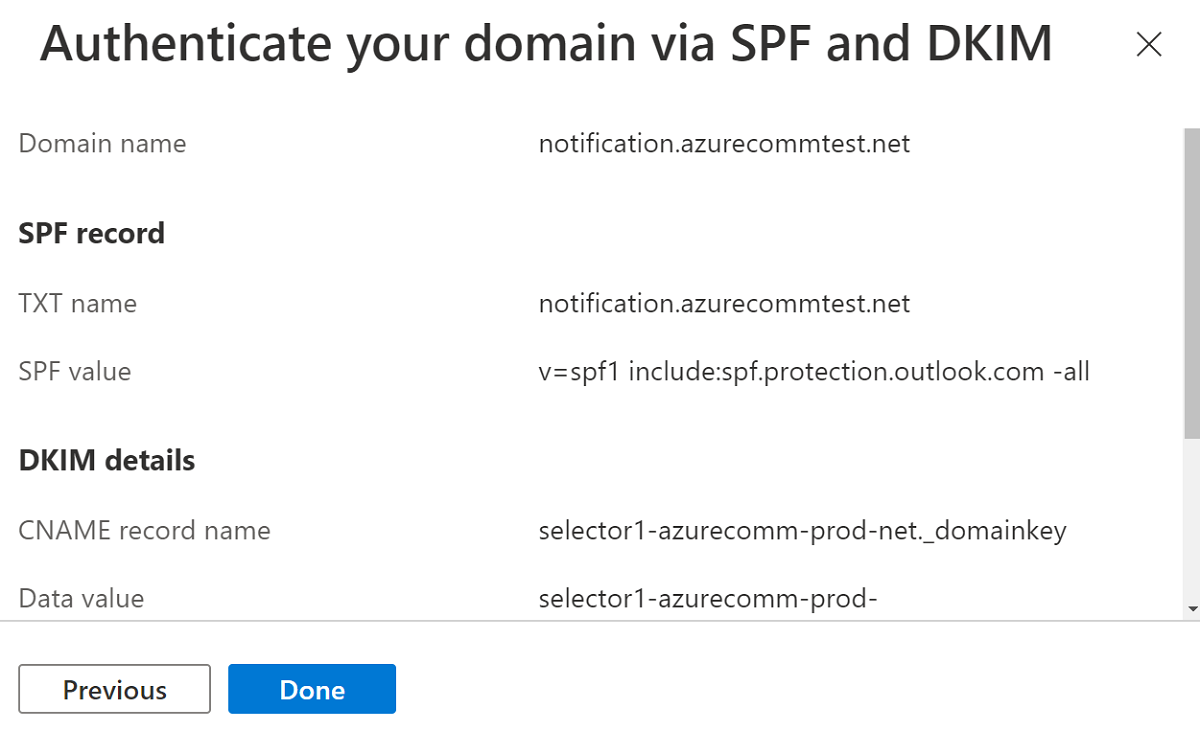
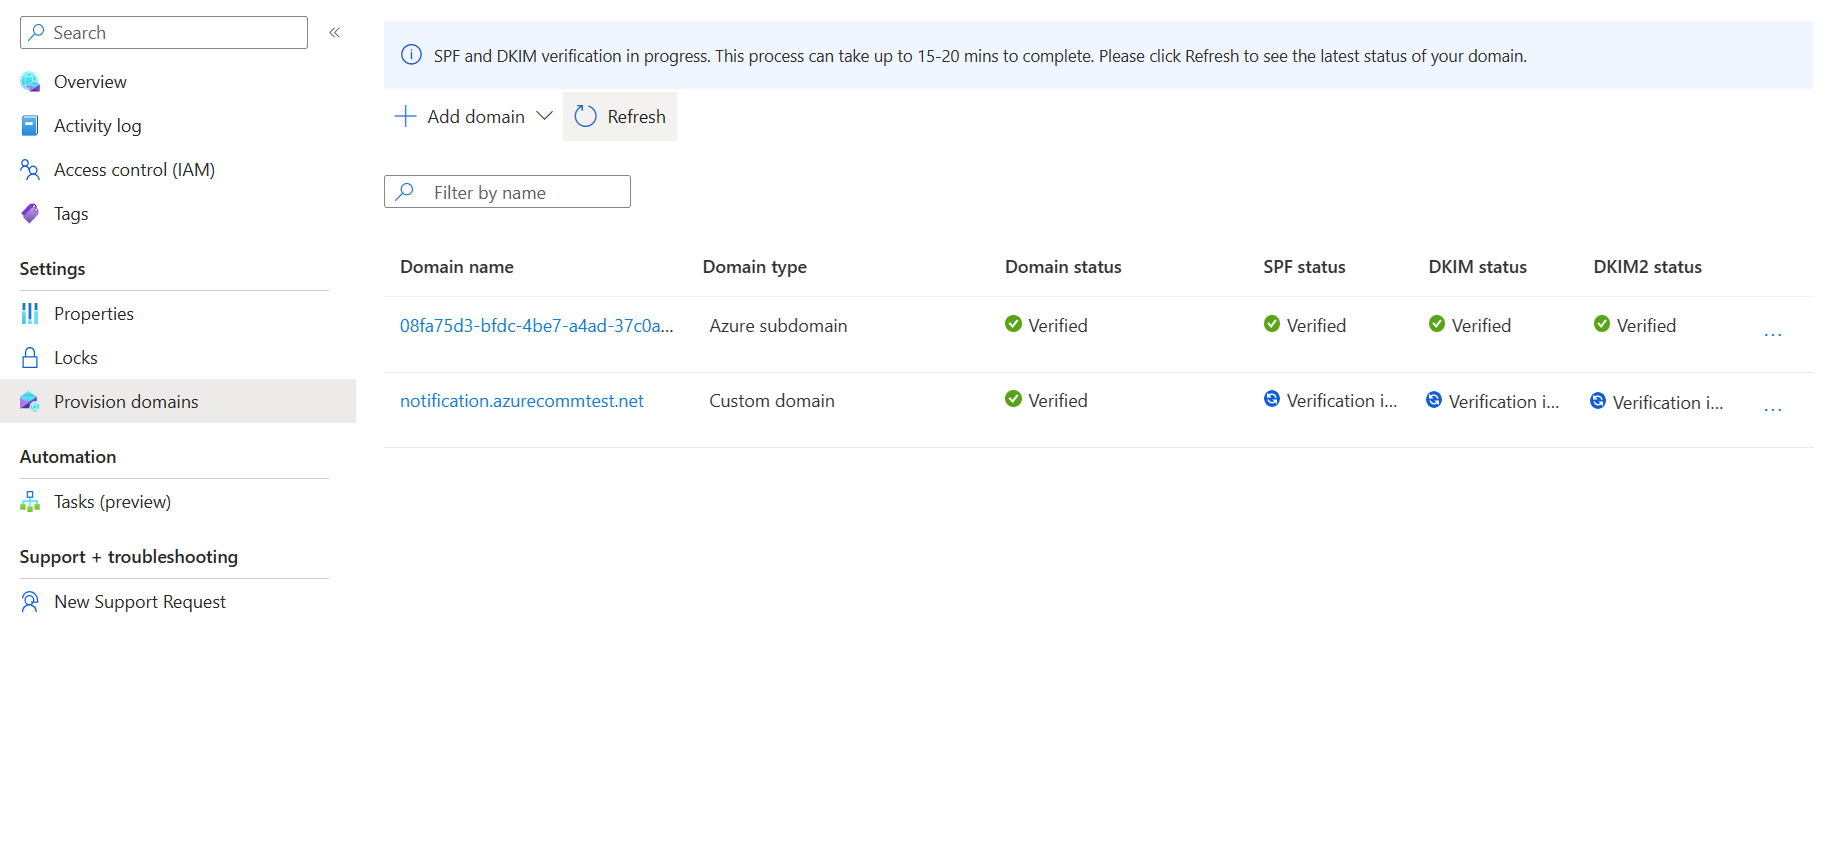
DNS 變更會在 15 到 30 分鐘內生效。 按兩下 [ 關閉 ] 並等候驗證完成。
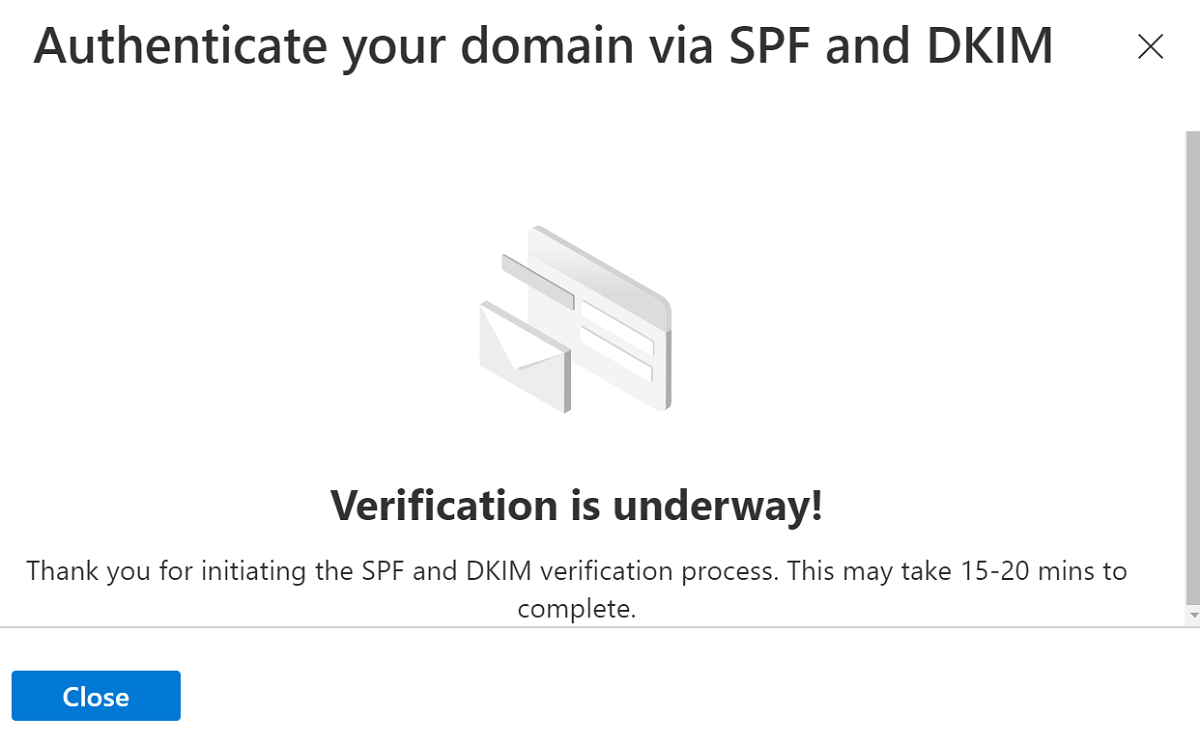
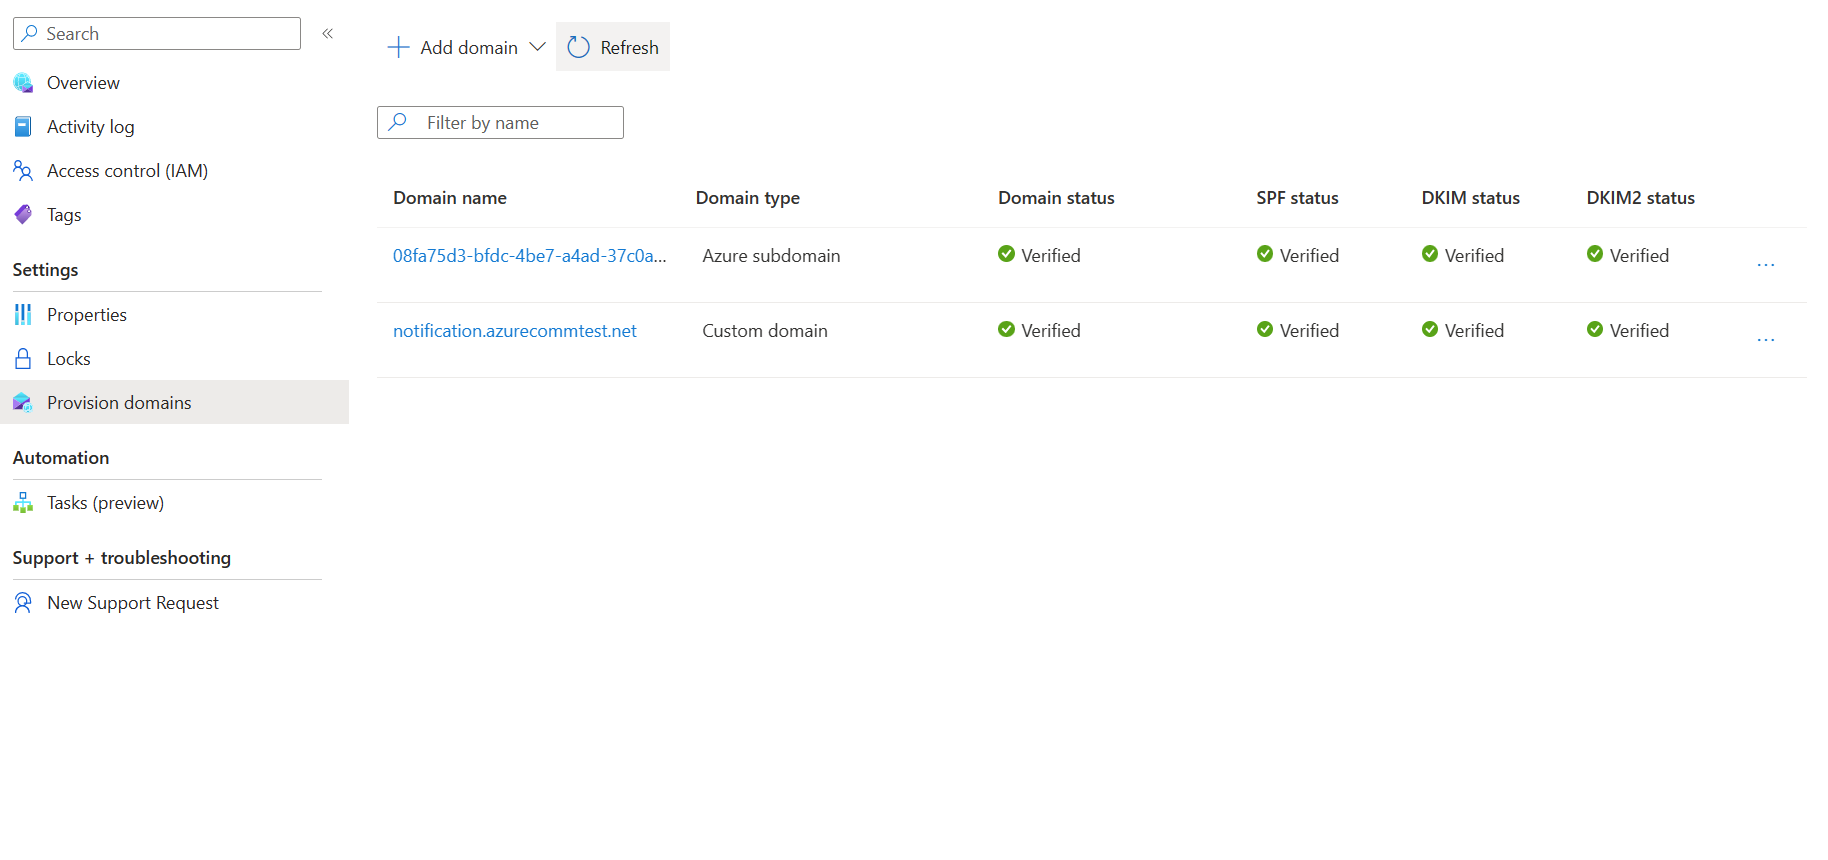
檢查 [布建網域] 頁面上的驗證狀態。
驗證寄件者驗證設定之後,您的電子郵件網域便已準備好使用自定義網域傳送電子郵件。
必要條件
布建自定義網域
若要佈建自訂網域,您需要:
- 在域名系統 (DNS) 中新增 TXT 記錄,以驗證自定義網域擁有權。
- 新增寄件者原則架構 (SPF) 和 DomainKeys 識別的郵件 (DKIM) 記錄,以設定寄件者驗證。
建立網域資源
若要建立網域資源, 請登入 Azure CLI。 您可以從終端機執行 az login 命令,並提供您的認證來登入。 若要建立資源,請執行下列命令:
az communication email domain create --domain-name "contoso.com" --email-service-name "<EmailServiceName>" --location "Global" --resource-group "<resourceGroup>" --domain-management CustomerManaged
如果您想要選取特定的訂用帳戶,您也可以指定 --subscription 旗標並提供訂用帳戶識別碼。
az communication email domain create --domain-name "contoso.com" --email-service-name "<EmailServiceName>" --location "Global" --resource-group "<resourceGroup>" --domain-management CustomerManaged --subscription "<subscriptionId>"
您可以使用下列選項來設定網域資源:
- 資源群組
- 電子郵件通訊服務資源的名稱。
- 資源將相關聯的地理位置。
- 網域資源的名稱。
- Domain management 屬性的值。
- 針對自定義網域,此值應該是 - CustomerManaged。
在下一個步驟中,您可以將標記或更新使用者參與追蹤指派給網域資源。 標記可用來組織您的網域資源。 如需標記的詳細資訊,請參閱 資源標記文件。
管理您的網域資源
若要將標籤或更新使用者參與追蹤新增至您的網域資源,請執行下列命令。 您也可以以特定訂用帳戶為目標。
az communication email domain update --domain-name "contoso.com" --email-service-name "<EmailServiceName>" --resource-group "<resourceGroup>" --tags newTag="newVal1" --user-engmnt-tracking Enabled

az communication email domain update --domain-name "contoso.com" --email-service-name "<EmailServiceName>" --resource-group "<resourceGroup>" --tags newTag="newVal1" --user-engmnt-tracking Disabled --subscription "<subscriptionId>"
若要列出指定電子郵件通訊服務中的所有網域資源,請使用下列命令:
az communication email domain list --email-service-name "<EmailServiceName>" --resource-group "<resourceGroup>"
若要顯示指定網域資源上的所有資訊,請使用下列命令:
az communication email domain show --domain-name "contoso.com" --email-service-name "<EmailServiceName>" --resource-group "<resourceGroup>"
網域資源的驗證作業
若要設定網域的發件者驗證,請參閱 [Azure 入口網站] 索引標籤中的設定自定義網域的發件者驗證一節。
起始驗證
若要起始網域驗證,請執行下列命令:
az communication email domain initiate-verification --domain-name "contoso.com" --email-service-name "<EmailServiceName>" --resource-group "<resourceGroup>" --verification-type Domain
取消驗證
若要取消網域驗證,請執行下列命令:
az communication email domain cancel-verification --domain-name "contoso.com" --email-service-name "<EmailServiceName>" --resource-group "<resourceGroup>" --verification-type Domain
清除網域資源
如果您要清除並移除網域資源,您可以執行下列命令來刪除。
az communication email domain delete --domain-name "contoso.com" --email-service-name "<EmailServiceName>" --resource-group "<resourceGroup>"
注意
資源刪除為永久性,而且如果您刪除資源,則無法復原任何資料,包括事件方格篩選、電話號碼或其他繫結至資源的資料。
如需其他命令的相關信息,請參閱 網域 CLI。
必要條件
- 具有有效訂用帳戶的 Azure 帳戶。 免費建立帳戶。
- 適用於您的作業系統的最新版本 .NET Core SDK。
- 取得最新版本的 .NET 身分識別 SDK。
- 取得最新版本的 .NET 管理 SDK。
布建自定義網域
若要佈建自訂網域,您需要:
- 在域名系統 (DNS) 中新增 TXT 記錄,以驗證自定義網域擁有權。
- 新增寄件者原則架構 (SPF) 和 DomainKeys 識別的郵件 (DKIM) 記錄,以設定寄件者驗證。
安裝 SDK
首先,將通訊服務管理 SDK 包含在您的 C# 專案中:
using Azure.ResourceManager.Communication;
訂用帳戶識別碼
您必須知道 Azure 訂用帳戶的識別碼。 可以從入口網站取得:
- 登入您的 Azure 帳戶
- 選取左側資訊看板的 [訂用帳戶]
- 選取所需的任何訂用帳戶
- 按一下 [概觀]
- 選取訂用帳戶識別碼
在本快速入門中,我們假設您已將訂用帳戶識別碼儲存在名為 AZURE_SUBSCRIPTION_ID 的環境變數中。
驗證
若要與網域資源通訊,您必須先向 Azure 驗證自己。
驗證用戶端
建立已驗證客戶端的預設選項是使用 DefaultAzureCredential。 由於所有管理 API 都經過相同的端點,為了與資源互動,因此必須建立一個最上層的 ArmClient。
若要向 Azure 進行驗證並建立 ArmClient,請執行下列程式代碼:
using System;
using System.Threading.Tasks;
using Azure;
using Azure.Core;
using Azure.Identity;
using Azure.ResourceManager;
using Azure.ResourceManager.Communication;
using Azure.ResourceManager.Resources;
...
// get your azure access token, for more details of how Azure SDK get your access token, please refer to https://learn.microsoft.com/dotnet/azure/sdk/authentication?tabs=command-line
TokenCredential cred = new DefaultAzureCredential();
// authenticate your client
ArmClient client = new ArmClient(cred);
與 Azure 資源互動
現在您已通過驗證。
針對下列每個範例,我們會將網域資源指派給現有的電子郵件通訊服務。
如果您需要建立電子郵件通訊服務,您可以使用 Azure 入口網站 來執行此動作。
建立網域資源
建立網域資源時,您將指定資源組名、電子郵件通訊服務名稱、資源名稱和 DomainManagement。
注意
Location 屬性一律為 global。
// this example assumes you already have this EmailServiceResource created on azure
// for more information of creating EmailServiceResource, please refer to the document of EmailServiceResource
string subscriptionId = "aaaa0a0a-bb1b-cc2c-dd3d-eeeeee4e4e4e";
string resourceGroupName = "MyResourceGroup";
string emailServiceName = "MyEmailServiceResource";
ResourceIdentifier emailServiceResourceId = EmailServiceResource.CreateResourceIdentifier(subscriptionId, resourceGroupName, emailServiceName);
EmailServiceResource emailServiceResource = client.GetEmailServiceResource(emailServiceResourceId);

// get the collection of this CommunicationDomainResource
CommunicationDomainResourceCollection collection = emailServiceResource.GetCommunicationDomainResources();

// invoke the operation
string domainName = "contoso.com";
CommunicationDomainResourceData data = new CommunicationDomainResourceData(new AzureLocation("Global"))
{
    DomainManagement = DomainManagement.CustomerManaged,
};
ArmOperation<CommunicationDomainResource> lro = await collection.CreateOrUpdateAsync(WaitUntil.Completed, domainName, data);
CommunicationDomainResource result = lro.Value;

// the variable result is a resource, you could call other operations on this instance as well
// but just for demo, we get its data from this resource instance
CommunicationDomainResourceData resourceData = result.Data;
// for demo we just print out the id
Console.WriteLine($"Succeeded on id: {resourceData.Id}");
管理您的網域資源
更新網域資源
...
// this example assumes you already have this CommunicationDomainResource created on azure
// for more information of creating CommunicationDomainResource, please refer to the document of CommunicationDomainResource
string subscriptionId = "aaaa0a0a-bb1b-cc2c-dd3d-eeeeee4e4e4e";
string resourceGroupName = "MyResourceGroup";
string emailServiceName = "MyEmailServiceResource";
string domainName = "contoso.com";
ResourceIdentifier communicationDomainResourceId = CommunicationDomainResource.CreateResourceIdentifier(subscriptionId, resourceGroupName, emailServiceName, domainName);
CommunicationDomainResource communicationDomainResource = client.GetCommunicationDomainResource(communicationDomainResourceId);

// invoke the operation
CommunicationDomainResourcePatch patch = new CommunicationDomainResourcePatch()
{
    UserEngagementTracking = UserEngagementTracking.Enabled,
};
ArmOperation<CommunicationDomainResource> lro = await communicationDomainResource.UpdateAsync(WaitUntil.Completed, patch);
CommunicationDomainResource result = lro.Value;

// the variable result is a resource, you could call other operations on this instance as well
// but just for demo, we get its data from this resource instance
CommunicationDomainResourceData resourceData = result.Data;
// for demo we just print out the id
Console.WriteLine($"Succeeded on id: {resourceData.Id}");
依電子郵件服務列出
// this example assumes you already have this EmailServiceResource created on azure
// for more information of creating EmailServiceResource, please refer to the document of EmailServiceResource
string subscriptionId = "aaaa0a0a-bb1b-cc2c-dd3d-eeeeee4e4e4e";
string resourceGroupName = "MyResourceGroup";
string emailServiceName = "MyEmailServiceResource";
ResourceIdentifier emailServiceResourceId = EmailServiceResource.CreateResourceIdentifier(subscriptionId, resourceGroupName, emailServiceName);
EmailServiceResource emailServiceResource = client.GetEmailServiceResource(emailServiceResourceId);

// get the collection of this CommunicationDomainResource
CommunicationDomainResourceCollection collection = emailServiceResource.GetCommunicationDomainResources();

// invoke the operation and iterate over the result
await foreach (CommunicationDomainResource item in collection.GetAllAsync())
{
    // the variable item is a resource, you could call other operations on this instance as well
    // but just for demo, we get its data from this resource instance
    CommunicationDomainResourceData resourceData = item.Data;
    // for demo we just print out the id
    Console.WriteLine($"Succeeded on id: {resourceData.Id}");
}

Console.WriteLine($"Succeeded");
取得網域資源
// this example assumes you already have this EmailServiceResource created on azure
// for more information of creating EmailServiceResource, please refer to the document of EmailServiceResource
string subscriptionId = "aaaa0a0a-bb1b-cc2c-dd3d-eeeeee4e4e4e";
string resourceGroupName = "MyResourceGroup";
string emailServiceName = "MyEmailServiceResource";
ResourceIdentifier emailServiceResourceId = EmailServiceResource.CreateResourceIdentifier(subscriptionId, resourceGroupName, emailServiceName);
EmailServiceResource emailServiceResource = client.GetEmailServiceResource(emailServiceResourceId);

// get the collection of this CommunicationDomainResource
CommunicationDomainResourceCollection collection = emailServiceResource.GetCommunicationDomainResources();

// invoke the operation
string domainName = "contoso.com";
bool result = await collection.ExistsAsync(domainName);

Console.WriteLine($"Succeeded: {result}");
網域資源的驗證作業
若要設定網域的發件者驗證,請參閱 [Azure 入口網站] 索引標籤中的設定自定義網域的發件者驗證一節。
起始驗證
// this example assumes you already have this CommunicationDomainResource created on azure
// for more information of creating CommunicationDomainResource, please refer to the document of CommunicationDomainResource
string subscriptionId = "aaaa0a0a-bb1b-cc2c-dd3d-eeeeee4e4e4e";
string resourceGroupName = "MyResourceGroup";
string emailServiceName = "MyEmailServiceResource";
string domainName = "contoso.com";
ResourceIdentifier communicationDomainResourceId = CommunicationDomainResource.CreateResourceIdentifier(subscriptionId, resourceGroupName, emailServiceName, domainName);
CommunicationDomainResource communicationDomainResource = client.GetCommunicationDomainResource(communicationDomainResourceId);

// invoke the operation
DomainsRecordVerificationContent content = new DomainsRecordVerificationContent(DomainRecordVerificationType.Spf);
await communicationDomainResource.InitiateVerificationAsync(WaitUntil.Completed, content);

Console.WriteLine($"Succeeded");
取消驗證
// this example assumes you already have this CommunicationDomainResource created on azure
// for more information of creating CommunicationDomainResource, please refer to the document of CommunicationDomainResource
string subscriptionId = "aaaa0a0a-bb1b-cc2c-dd3d-eeeeee4e4e4e";
string resourceGroupName = "MyResourceGroup";
string emailServiceName = "MyEmailServiceResource";
string domainName = "contoso.com";
ResourceIdentifier communicationDomainResourceId = CommunicationDomainResource.CreateResourceIdentifier(subscriptionId, resourceGroupName, emailServiceName, domainName);
CommunicationDomainResource communicationDomainResource = client.GetCommunicationDomainResource(communicationDomainResourceId);

// invoke the operation
DomainsRecordVerificationContent content = new DomainsRecordVerificationContent(DomainRecordVerificationType.Spf);
await communicationDomainResource.CancelVerificationAsync(WaitUntil.Completed, content);

Console.WriteLine($"Succeeded");
清除網域資源
// this example assumes you already have this CommunicationDomainResource created on azure
// for more information of creating CommunicationDomainResource, please refer to the document of CommunicationDomainResource
string subscriptionId = "aaaa0a0a-bb1b-cc2c-dd3d-eeeeee4e4e4e";
string resourceGroupName = "MyResourceGroup";
string emailServiceName = "MyEmailServiceResource";
string domainName = "contoso.com";
ResourceIdentifier communicationDomainResourceId = CommunicationDomainResource.CreateResourceIdentifier(subscriptionId, resourceGroupName, emailServiceName, domainName);
CommunicationDomainResource communicationDomainResource = client.GetCommunicationDomainResource(communicationDomainResourceId);

// invoke the operation
await communicationDomainResource.DeleteAsync(WaitUntil.Completed);

Console.WriteLine($"Succeeded");
注意
資源刪除為永久性,而且如果您刪除資源,則無法復原任何資料,包括事件方格篩選、電話號碼或其他繫結至資源的資料。
必要條件
- 具有有效訂用帳戶的 Azure 帳戶。 免費建立帳戶。
- 安裝 Azure Az PowerShell 模組
- 建立 電子郵件通訊服務。
布建自定義網域
若要佈建自訂網域,您需要:
- 在域名系統 (DNS) 中新增 TXT 記錄,以驗證自定義網域擁有權。
- 新增寄件者原則架構 (SPF) 和 DomainKeys 識別的郵件 (DKIM) 記錄,以設定寄件者驗證。
建立網域資源
若要建立網域資源,請使用 Connect-AzAccount 下列命令登入您的 Azure 帳戶,並提供您的認證。
PS C:\> Connect-AzAccount
首先,請務必使用下列命令安裝 Azure 通訊服務模組 Az.Communication。
PS C:\> Install-Module Az.Communication
執行下列命令以建立自訂受控網域資源:
PS C:\> New-AzEmailServiceDomain -ResourceGroupName ContosoResourceProvider1 -EmailServiceName ContosoEmailServiceResource1 -Name contoso.com -DomainManagement CustomerManaged
您可以使用下列選項來設定網域資源:
- 資源群組
- 電子郵件通訊服務資源的名稱。
- 網域資源的名稱。
- Domain management 屬性的值。
- 針對自定義網域,此值應該是 『CustomerManaged』。
在下一個步驟中,您可以將標記或更新使用者參與追蹤指派給網域資源。 標記可用來組織您的網域資源。 如需標記的詳細資訊,請參閱資源標記文件。
管理您的網域資源
若要將標籤或更新使用者參與追蹤新增至您的網域資源,請執行下列命令。 您也可以以特定訂用帳戶為目標。
PS C:\> Update-AzEmailServiceDomain -Name contoso.com -EmailServiceName ContosoEmailServiceResource1 -ResourceGroupName ContosoResourceProvider1 -Tag @{ExampleKey1="ExampleValue1"} -UserEngagementTracking 1

PS C:\> Update-AzEmailServiceDomain -Name contoso.com -EmailServiceName ContosoEmailServiceResource1 -ResourceGroupName ContosoResourceProvider1 -Tag @{ExampleKey1="ExampleValue1"} -UserEngagementTracking 0 -SubscriptionId SubscriptionID
若要列出指定電子郵件通訊服務中的所有網域資源,請使用下列命令:
PS C:\> Get-AzEmailServiceDomain -EmailServiceName ContosoEmailServiceResource1 -ResourceGroupName ContosoResourceProvider1
若要列出指定網域資源上的所有資訊,請使用下列命令:
PS C:\> Get-AzEmailServiceDomain -Name contoso.com -EmailServiceName ContosoEmailServiceResource1 -ResourceGroupName ContosoResourceProvider1
網域資源的驗證作業
若要設定網域的發件者驗證,請參閱 [Azure 入口網站] 索引標籤中的設定自定義網域的發件者驗證一節。
起始驗證
若要叫用網域驗證,請執行下列命令:
PS C:\> Invoke-AzEmailServiceInitiateDomainVerification -DomainName contoso.com -EmailServiceName ContosoEmailServiceResource1 -ResourceGroupName ContosoResourceProvider1 -VerificationType Domain
取消驗證
若要停止網域驗證,請執行下列命令:
PS C:\> Stop-AzEmailServiceDomainVerification -DomainName contoso.com -EmailServiceName ContosoEmailServiceResource1 -ResourceGroupName ContosoResourceProvider1 -VerificationType Domain
清除網域資源
如果您要清除和移除網域資源,您可以執行下列命令來刪除網域資源:
PS C:\> Remove-AzEmailServiceDomain -Name contoso.com -EmailServiceName ContosoEmailServiceResource1 -ResourceGroupName ContosoResourceProvider1
注意
資源刪除為永久性,而且如果您刪除資源,則無法復原任何資料,包括事件方格篩選、電話號碼或其他繫結至資源的資料。
相較於自定義網域的 Azure 受控網域
布建自定義電子郵件網域之前,請檢閱下表,以決定哪一個網域類型最符合您的需求。
| Azure 受控網域 | 自訂網域 | |
|---|---|---|
| 優點: | - 設定快速又簡單 - 不需要網域驗證 |
- 電子郵件是從您自己的網域傳送 |
| 缺點: | - 寄件者網域未個人化且無法變更 - 寄件者使用者名稱無法個人化 - 有限的傳送量 - 無法啟用使用者參與追蹤 |
- 需要驗證網域記錄 - 驗證的設定時間較長 |
服務限制
Azure 受控網域和自定義網域都受限於服務限制。 服務限制包括失敗、速率和大小限制。 如需詳細資訊,請參閱 Azure 通訊服務 > 電子郵件的服務限制。
變更自定義網域的 MailFrom 和 FROM 顯示名稱
您可以選擇性地將位址 MailFrom 設定為預設值 DoNotReply 以外的專案,並將多個寄件者用戶名稱新增至您的網域。 如需如何設定寄件者位址的詳細資訊,請參閱 快速入門:如何新增多個發件者位址。
您的電子郵件網域現在已準備好傳送電子郵件。
在熱門網域註冊機構中新增 DNS 記錄
TXT 記錄
下列連結提供如何使用熱門網域註冊機構新增 TXT 記錄的指示。
| 登錄器名稱 | 文件連結 |
|---|---|
| IONOS by 1 & 1 | 步驟 1-7 |
| 123-reg.co.uk | 步驟 1-6 |
| Amazon Web Services (AWS) | 步驟 1-8 |
| Cloudflare | 步驟 1-6 |
| GoDaddy | 步驟 1-6 |
| Namecheap | 步驟 1-9 |
| Network Solutions | 步驟 1-9 |
| OVH | 步驟 1-9 |
| web.com | 步驟 1-8 |
| Wix | 步驟 1-5 |
| 其他 (一般) | 步驟 1-4 |
CNAME 記錄
下列連結提供如何使用熱門網域註冊機構新增 CNAME 記錄的詳細資訊。 請務必從組態視窗使用您的值,而不是文件連結中的範例。
| 登錄器名稱 | 文件連結 |
|---|---|
| IONOS by 1 & 1 | 步驟 1-10 |
| 123-reg.co.uk | 步驟 1-6 |
| Amazon Web Services (AWS) | 步驟 1-8 |
| Cloudflare | 步驟 1-6 |
| GoDaddy | 步驟 1-6 |
| Namecheap | 步驟 1-8 |
| Network Solutions | 步驟 1-9 |
| OVH | 步驟 1-8 |
| web.com | 步驟 1-8 |
| Wix | 步驟 1-5 |
| 其他 (一般) | 指南 |
下一步
相關文章
- 熟悉電子郵件用戶端程式庫
- 檢閱電子郵件失敗限制、速率限制和 Azure 通訊服務 > 電子郵件的服務限制大小限制。
- 瞭解如何在快速入門中使用 Azure 受控網域傳送電子郵件:如何將 Azure 受控網域新增至電子郵件通訊服務。
![顯示您需要按下以驗證網域擁有權之 [設定] 連結的螢幕快照。](media/email-domains-custom-verify.png)
