將裝置連接至遠端監視預先設定方案 (Linux)
案例概觀
在此案例中,您會建立一個裝置,此裝置會將下列遙測資料傳送給遠端監視預先設定解決方案:
- 外部溫度
- 內部溫度
- 溼度
為了簡化起見,在裝置上的程式碼會產生範例值,但我們鼓勵您將實際的感應器連接到您的裝置並傳送實際的遙測資料來擴充此範例。
此裝置同時也能夠回應從解決方案儀表板叫用的方法,以及回應解決方案儀表板中設定的所需屬性值。
若要完成此教學課程,您需要一個有效的 Azure 帳戶。 如果您沒有帳戶,只需要幾分鐘的時間就可以建立免費試用帳戶。 如需詳細資料,請參閱 Azure 免費試用。
開始之前
在您為裝置撰寫任何程式碼之前,您必須先佈建遠端監視預先設定解決方案,並在該解決方案中佈建新的自訂裝置。
佈建遠端監視預先設定解決方案
您在本教學課程中建立的裝置會將資料傳送給遠端監視預先設定解決方案的執行個體。 如果您尚未在您的 Azure 帳戶中佈建遠端監視預先設定解決方案,請依照下列步驟執行:
- 在 https://www.azureiotsolutions.com/ 頁面上,按一下 + 以建立解決方案。
- 按一下 [遠端監視] 面板上的 [選取],以建立解決方案。
- 在 [建立遠端監視解決方案] 頁面上,輸入 您選擇的 [解決方案名稱],選取您要部署的 [區域],並選取想要使用的 Azure 訂用帳戶。 按一下 [建立解決方案] 。
- 等候佈建程序完成。
警告
預先設定的解決方案使用可計費的 Azure 服務。 當您使用完預先設定的解決方案之後,請務必將它從您的訂用帳戶中移除,以避免任何不必要的費用。 您可以造訪 https://www.azureiotsolutions.com/ 頁面,以從訂用帳戶中完全移除預先設定的解決方案。
當遠端監視解決方案的佈建程序完成之後,請按一下 [啟動] ,以在瀏覽器中開啟解決方案儀表板。

在遠端監視解決方案中佈建您的裝置
注意
如果您已經在解決方案中佈建裝置,則可以略過此步驟。 建立用戶端應用程式時,您需要知道裝置認證。
對於連線到預先設定解決方案的裝置,該裝置必須使用有效的認證向 IoT 中樞識別自己。 您會從解決方案儀表板收到裝置認證。 稍後在本教學課程中,您會將您的裝置認證包含在您的用戶端應用程式中。
若要在您的遠端監視解決方案中新增裝置,請在解決方案儀表板中完成下列步驟:
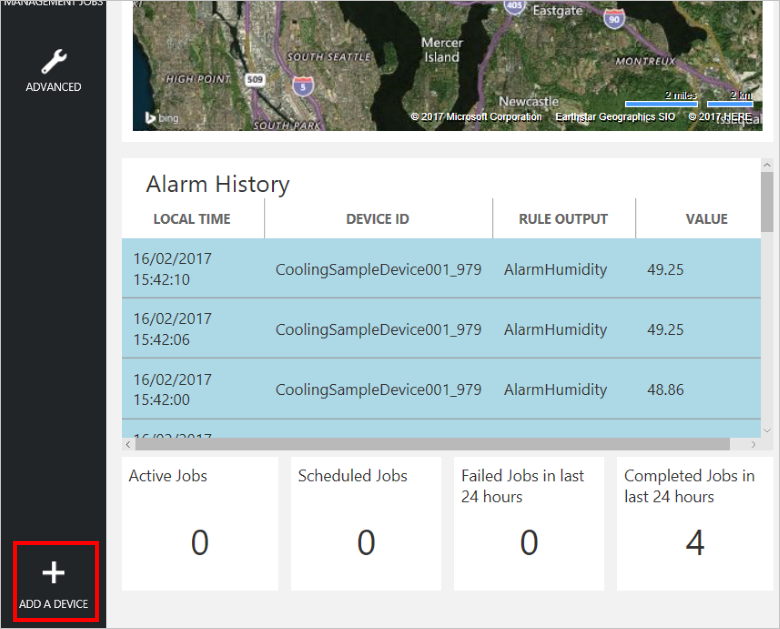
在儀表板左下角,按一下 [新增裝置] 。
在 [自訂裝置] 面板中,按一下 [新增]。

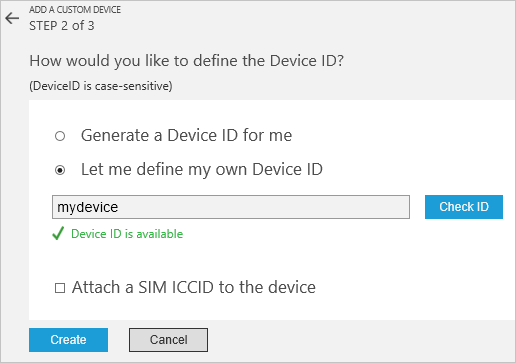
選擇 [讓我定義自己的裝置識別碼]。 輸入裝置識別碼 (例如 mydevice),按一下 [檢查 ID] 以確認沒有其他裝置使用該名稱,然後按一下 [建立] 來佈建裝置。
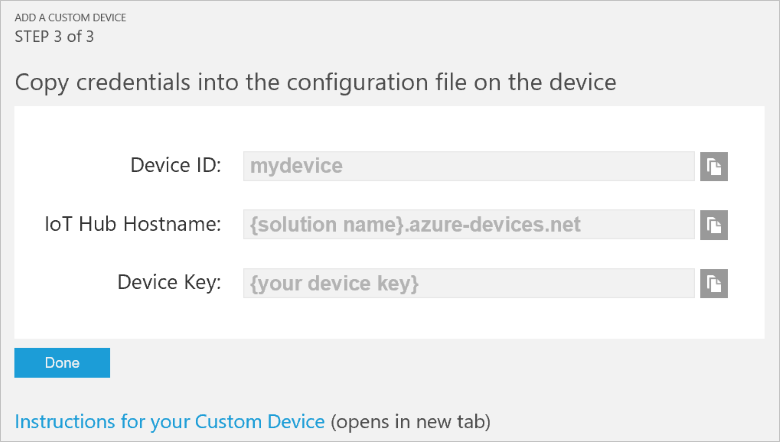
記下裝置認證 (裝置識別碼、IoT 中樞主機名稱及裝置金鑰)。 用戶端應用程式需要這些值,才能連接到遠端監視解決方案。 然後按一下 [完成]。
從解決方案儀表板的裝置清單中選取您的裝置。 然後,在 [裝置詳細資料] 面板中,按一下 [啟用裝置]。 裝置的狀態現在會是 [正在執行]。 遠端監視解決方案現在已可從您的裝置接收遙測資料,並在該裝置上叫用方法。
建置並執行範例 C 用戶端 Linux
下列步驟說明如何建立用戶端應用程式來與預先設定的遠端監視解決方案進行通訊。 此應用程式是以 C 撰寫並在 Ubuntu Linux 上建置和執行。
若要完成這些步驟,您需要執行 Ubuntu 版本 15.04 或 15.10 的裝置。 繼續之前,使用下列命令在 Ubuntu 裝置上安裝的必要條件封裝:
sudo apt-get install cmake gcc g++
在裝置上安裝用戶端程式庫
Azure IoT 中樞用戶端程式庫可當成封裝來使用,而您可以使用 apt get 命令在 Ubuntu 裝置上安裝這類封裝。 完成下列步驟來安裝套件,其中包含 Ubuntu 電腦上的 IoT 中樞用戶端程式庫和標頭檔:
在殼層中,將 AzureIoT 儲存機制新增至電腦:
sudo add-apt-repository ppa:aziotsdklinux/ppa-azureiot
sudo apt-get update
安裝 azure-iot-sdk-c-dev 封裝
sudo apt-get install -y azure-iot-sdk-c-dev
安裝 Parson JSON 剖析器
IoT 中樞用戶端程式庫會使用 Parson JSON 剖析器來剖析訊息承載。 在您電腦上的適當資料夾中,使用下列命令複製 Parson GitHub 儲存機制︰
git clone https://github.com/kgabis/parson.git
準備您的專案
在 Ubuntu 電腦上,建立名為 remote_monitoring的資料夾。 在 [remote_monitoring] 資料夾中:
- 建立四個 main.c、 remote_monitoring.c、 remote_monitoring.h和 CMakeLists.txt檔案。
- 建立一個名為 parson 的資料夾。
將 parson.c 和 parson.h 檔案從 Parson 存放庫的本機複本複製到 remote_monitoring/parson 資料夾。
在文字編輯器中,開啟 remote_monitoring.c 檔案。 新增下列 #include 陳述式:
#include "iothubtransportmqtt.h"
#include "schemalib.h"
#include "iothub_client.h"
#include "serializer_devicetwin.h"
#include "schemaserializer.h"
#include "azure_c_shared_utility/threadapi.h"
#include "azure_c_shared_utility/platform.h"
#include "parson.h"
指定 IoT 裝置的行為
IoT 中樞序列化程式用戶端程式庫會使用模型來指定裝置與 IoT 中樞交換之訊息的格式。
在
#include陳述式之後新增下列變數宣告。 使用您在遠端監視解決方案儀表板中為裝置記下的值來取代 [Device ID] 和 [Device Key] 預留位置值。 使用解決方案儀表板中的「IoT 中樞主機名稱」來取代 [IoTHub Name]。 例如,若您的 IoT 中樞主機名稱是 contoso.azure-devices.net,請使用 contoso 取代 [IoTHub Name]:static const char* deviceId = "[Device Id]"; static const char* connectionString = "HostName=[IoTHub Name].azure-devices.net;DeviceId=[Device Id];SharedAccessKey=[Device Key]";新增下列程式碼以定義可讓裝置與 IoT 中樞通訊的模型。 此模型會指定裝置:
- 可以傳送溫度、外部溫度、濕度及裝置識別碼作為遙測資料。
- 可以將裝置相關中繼資料傳送給 IoT 中樞。 裝置會在啟動時傳送 DeviceInfo 物件中的基本中繼資料。
- 可以將回報的屬性傳送給 IoT 中樞內的裝置對應項。 這些回報的屬性會依組態、裝置及系統屬性分組。
- 可以接收 IoT 中樞內裝置對應項中設定的所需屬性,並根據這些屬性採取動作。
- 可以回應透過解決方案入口網站叫用的 Reboot 和 InitiateFirmwareUpdate 直接方法。 裝置會使用回報的屬性來傳送它所支援之直接方法的相關資訊。
// Define the Model
BEGIN_NAMESPACE(Contoso);

/* Reported properties */
DECLARE_STRUCT(SystemProperties,
  ascii_char_ptr, Manufacturer,
  ascii_char_ptr, FirmwareVersion,
  ascii_char_ptr, InstalledRAM,
  ascii_char_ptr, ModelNumber,
  ascii_char_ptr, Platform,
  ascii_char_ptr, Processor,
  ascii_char_ptr, SerialNumber
);

DECLARE_STRUCT(LocationProperties,
  double, Latitude,
  double, Longitude
);

DECLARE_STRUCT(ReportedDeviceProperties,
  ascii_char_ptr, DeviceState,
  LocationProperties, Location
);

DECLARE_MODEL(ConfigProperties,
  WITH_REPORTED_PROPERTY(double, TemperatureMeanValue),
  WITH_REPORTED_PROPERTY(uint8_t, TelemetryInterval)
);

/* Part of DeviceInfo */
DECLARE_STRUCT(DeviceProperties,
  ascii_char_ptr, DeviceID,
  _Bool, HubEnabledState
);

DECLARE_DEVICETWIN_MODEL(Thermostat,
  /* Telemetry (temperature, external temperature and humidity) */
  WITH_DATA(double, Temperature),
  WITH_DATA(double, ExternalTemperature),
  WITH_DATA(double, Humidity),
  WITH_DATA(ascii_char_ptr, DeviceId),

  /* DeviceInfo */
  WITH_DATA(ascii_char_ptr, ObjectType),
  WITH_DATA(_Bool, IsSimulatedDevice),
  WITH_DATA(ascii_char_ptr, Version),
  WITH_DATA(DeviceProperties, DeviceProperties),

  /* Device twin properties */
  WITH_REPORTED_PROPERTY(ReportedDeviceProperties, Device),
  WITH_REPORTED_PROPERTY(ConfigProperties, Config),
  WITH_REPORTED_PROPERTY(SystemProperties, System),

  WITH_DESIRED_PROPERTY(double, TemperatureMeanValue, onDesiredTemperatureMeanValue),
  WITH_DESIRED_PROPERTY(uint8_t, TelemetryInterval, onDesiredTelemetryInterval),

  /* Direct methods implemented by the device */
  WITH_METHOD(Reboot),
  WITH_METHOD(InitiateFirmwareUpdate, ascii_char_ptr, FwPackageURI),

  /* Register direct methods with solution portal */
  WITH_REPORTED_PROPERTY(ascii_char_ptr_no_quotes, SupportedMethods)
);

END_NAMESPACE(Contoso);
實作裝置的行為
現在,請新增程式碼來實作模型中所定義的行為。
新增下列函式,這些函式會處理在解決方案儀表板中設定的所需屬性。 這些所需屬性是在模型中定義:
void onDesiredTemperatureMeanValue(void* argument)
{
  /* By convention 'argument' is of the type of the MODEL */
  Thermostat* thermostat = argument;
  printf("Received a new desired_TemperatureMeanValue = %f\r\n", thermostat->TemperatureMeanValue);

}

void onDesiredTelemetryInterval(void* argument)
{
  /* By convention 'argument' is of the type of the MODEL */
  Thermostat* thermostat = argument;
  printf("Received a new desired_TelemetryInterval = %d\r\n", thermostat->TelemetryInterval);
}
新增下列函式,這些函式會處理透過 IoT 中樞叫用的直接方法。 這些直接方法是在模型中定義:
/* Handlers for direct methods */
METHODRETURN_HANDLE Reboot(Thermostat* thermostat)
{
  (void)(thermostat);

  METHODRETURN_HANDLE result = MethodReturn_Create(201, "\"Rebooting\"");
  printf("Received reboot request\r\n");
  return result;
}

METHODRETURN_HANDLE InitiateFirmwareUpdate(Thermostat* thermostat, ascii_char_ptr FwPackageURI)
{
  (void)(thermostat);

  METHODRETURN_HANDLE result = MethodReturn_Create(201, "\"Initiating Firmware Update\"");
  printf("Recieved firmware update request. Use package at: %s\r\n", FwPackageURI);
  return result;
}
新增下列函式,此函式會傳送訊息給預先設定的解決方案:
/* Send data to IoT Hub */
static void sendMessage(IOTHUB_CLIENT_HANDLE iotHubClientHandle, const unsigned char* buffer, size_t size)
{
  IOTHUB_MESSAGE_HANDLE messageHandle = IoTHubMessage_CreateFromByteArray(buffer, size);
  if (messageHandle == NULL)
  {
    printf("unable to create a new IoTHubMessage\r\n");
  }
  else
  {
    if (IoTHubClient_SendEventAsync(iotHubClientHandle, messageHandle, NULL, NULL) != IOTHUB_CLIENT_OK)
    {
      printf("failed to hand over the message to IoTHubClient");
    }
    else
    {
      printf("IoTHubClient accepted the message for delivery\r\n");
    }

    IoTHubMessage_Destroy(messageHandle);
  }
  free((void*)buffer);
}
新增下列回呼處理常式,此處理常式會在裝置將新回報的屬性值傳送給預先設定的解決方案後執行:
/* Callback after sending reported properties */
void deviceTwinCallback(int status_code, void* userContextCallback)
{
  (void)(userContextCallback);
  printf("IoTHub: reported properties delivered with status_code = %u\n", status_code);
}
新增下列函式,以將您的裝置連接到雲端中的預先設定解決方案,然後交換資料。 此函式會執行下列步驟:
- 將平台初始化。
- 使用序列化程式庫來註冊 Contoso 命名空間。
- 使用裝置連接字串將用戶端初始化。
- 建立「控溫器」模型的執行個體。
- 建立並傳送回報的屬性值。
- 傳送 DeviceInfo 物件。
- 建立迴圈來每秒傳送遙測資料。
- 將所有資源取消初始化。
void remote_monitoring_run(void) { if (platform_init() != 0) { printf("Failed to initialize the platform.\n"); } else { if (SERIALIZER_REGISTER_NAMESPACE(Contoso) == NULL) { printf("Unable to SERIALIZER_REGISTER_NAMESPACE\n"); } else { IOTHUB_CLIENT_HANDLE iotHubClientHandle = IoTHubClient_CreateFromConnectionString(connectionString, MQTT_Protocol); if (iotHubClientHandle == NULL) { printf("Failure in IoTHubClient_CreateFromConnectionString\n"); } else { #ifdef MBED_BUILD_TIMESTAMP // For mbed add the certificate information if (IoTHubClient_SetOption(iotHubClientHandle, "TrustedCerts", certificates) != IOTHUB_CLIENT_OK) { printf("Failed to set option \"TrustedCerts\"\n"); } #endif // MBED_BUILD_TIMESTAMP Thermostat* thermostat = IoTHubDeviceTwin_CreateThermostat(iotHubClientHandle); if (thermostat == NULL) { printf("Failure in IoTHubDeviceTwin_CreateThermostat\n"); } else { /* Set values for reported properties */ thermostat->Config.TemperatureMeanValue = 55.5; thermostat->Config.TelemetryInterval = 3; thermostat->Device.DeviceState = "normal"; thermostat->Device.Location.Latitude = 47.642877; thermostat->Device.Location.Longitude = -122.125497; thermostat->System.Manufacturer = "Contoso Inc."; thermostat->System.FirmwareVersion = "2.22"; thermostat->System.InstalledRAM = "8 MB"; thermostat->System.ModelNumber = "DB-14"; thermostat->System.Platform = "Plat 9.75"; thermostat->System.Processor = "i3-7"; thermostat->System.SerialNumber = "SER21"; /* Specify the signatures of the supported direct methods */ thermostat->SupportedMethods = "{\"Reboot\": \"Reboot the device\", \"InitiateFirmwareUpdate--FwPackageURI-string\": \"Updates device Firmware. Use parameter FwPackageURI to specify the URI of the firmware file\"}"; /* Send reported properties to IoT Hub */ if (IoTHubDeviceTwin_SendReportedStateThermostat(thermostat, deviceTwinCallback, NULL) != IOTHUB_CLIENT_OK) { printf("Failed sending serialized reported state\n"); } else { printf("Send DeviceInfo object to IoT Hub at startup\n"); thermostat->ObjectType = "DeviceInfo"; thermostat->IsSimulatedDevice = 0; thermostat->Version = "1.0"; thermostat->DeviceProperties.HubEnabledState = 1; thermostat->DeviceProperties.DeviceID = (char*)deviceId; unsigned char* buffer; size_t bufferSize; if (SERIALIZE(&buffer, &bufferSize, thermostat->ObjectType, thermostat->Version, thermostat->IsSimulatedDevice, thermostat->DeviceProperties) != CODEFIRST_OK) { (void)printf("Failed serializing DeviceInfo\n"); } else { sendMessage(iotHubClientHandle, buffer, bufferSize); } /* Send telemetry */ thermostat->Temperature = 50; thermostat->ExternalTemperature = 55; thermostat->Humidity = 50; thermostat->DeviceId = (char*)deviceId; while (1) { unsigned char*buffer; size_t bufferSize; (void)printf("Sending sensor value Temperature = %f, Humidity = %f\n", thermostat->Temperature, thermostat->Humidity); if (SERIALIZE(&buffer, &bufferSize, thermostat->DeviceId, thermostat->Temperature, thermostat->Humidity, thermostat->ExternalTemperature) != CODEFIRST_OK) { (void)printf("Failed sending sensor value\r\n"); } else { sendMessage(iotHubClientHandle, buffer, bufferSize); } ThreadAPI_Sleep(1000); } IoTHubDeviceTwin_DestroyThermostat(thermostat); } } IoTHubClient_Destroy(iotHubClientHandle); } serializer_deinit(); } } platform_deinit(); }以下是一個傳送給預先設定之解決方案的範例「遙測」訊息,可供您參考:
{"DeviceId":"mydevice01", "Temperature":50, "Humidity":50, "ExternalTemperature":55}
呼叫 remote_monitoring_run 函式
在文字編輯器中,開啟 remote_monitoring.h 檔案。 新增下列程式碼:
void remote_monitoring_run(void);
在文字編輯器中,開啟 main.c 檔案。 新增下列程式碼:
#include "remote_monitoring.h"

int main(void)
{
    remote_monitoring_run();

    return 0;
}
建置並執行應用程式
下列步驟說明如何使用 CMake 建置用戶端應用程式。
在文字編輯器中,開啟 remote_monitoring 資料夾中的 CMakeLists.txt 檔案。
新增下列指示來定義如何建置用戶端應用程式:
macro(compileAsC99)
  if (CMAKE_VERSION VERSION_LESS "3.1")
    if (CMAKE_C_COMPILER_ID STREQUAL "GNU")
      set (CMAKE_C_FLAGS "--std=c99 ${CMAKE_C_FLAGS}")
      set (CMAKE_CXX_FLAGS "--std=c++11 ${CMAKE_CXX_FLAGS}")
    endif()
  else()
    set (CMAKE_C_STANDARD 99)
    set (CMAKE_CXX_STANDARD 11)
  endif()
endmacro(compileAsC99)

cmake_minimum_required(VERSION 2.8.11)
compileAsC99()

set(AZUREIOT_INC_FOLDER "${CMAKE_SOURCE_DIR}" "${CMAKE_SOURCE_DIR}/parson" "/usr/include/azureiot" "/usr/include/azureiot/inc")

include_directories(${AZUREIOT_INC_FOLDER})

set(sample_application_c_files
    ./parson/parson.c
    ./remote_monitoring.c
    ./main.c
)

set(sample_application_h_files
    ./parson/parson.h
    ./remote_monitoring.h
)

add_executable(sample_app ${sample_application_c_files} ${sample_application_h_files})

target_link_libraries(sample_app
    serializer
    iothub_client
    iothub_client_mqtt_transport
    aziotsharedutil
    umqtt
    pthread
    curl
    ssl
    crypto
    m
)
在 remote_monitoring 資料夾中,建立資料夾來儲存 CMake 產生的 make 檔案,然後執行 cmake 和 make 命令,如下所示:
mkdir cmake
cd cmake
cmake ../
make
執行用戶端應用程式,並將遙測傳送至 IoT 中樞:
./sample_app
在儀表板中檢視裝置遙測
遠端監視解決方案中的儀表板可讓您檢視裝置傳送到 IoT 中樞的遙測資料。
在瀏覽器中,返回遠端監視解決方案儀表板,按一下左面板中的 [裝置] 瀏覽至 [裝置清單]。
在 [裝置清單] 中,您應該會看到裝置的狀態是 [正在執行]。 如果不是,請按一下 [裝置詳細資料] 面板中的 [啟用裝置]。

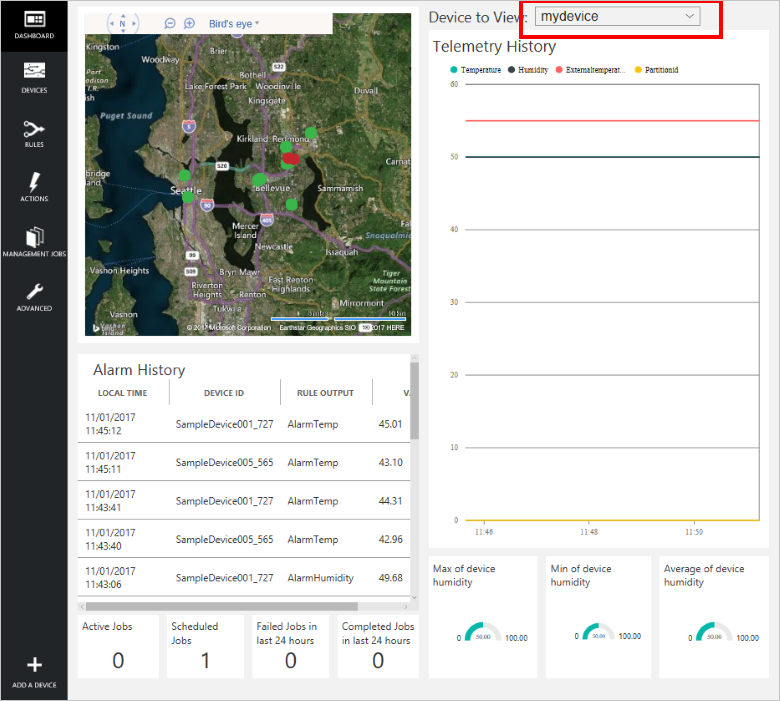
按一下 [儀表板] 以返回儀表板,從 [要檢視的裝置] 下拉式清單中選取您的裝置,以檢視其遙測。 範例應用程式的遙測是 50 個單位的內部溫度、 55 個單位的外部溫度,以及 50 個單位的濕度。
在裝置上叫用方法
遠端監視解決方案中的儀表板可讓您透過 IoT 中樞在裝置上叫用方法。 例如,在遠端監視解決方案中,您可以叫用方法來模擬裝置重新啟動。
在遠端監視解決方案的儀表板中,按一下左面板中的 [裝置] 瀏覽至 [裝置清單]。
在 [裝置清單] 中,按一下裝置的 [裝置識別碼]。
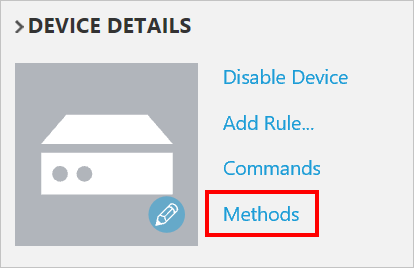
在 [裝置詳細資料] 面板中,按一下 [方法]。
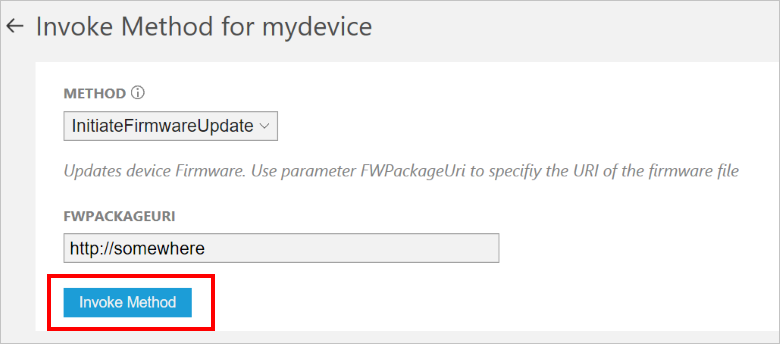
在 [方法] 下拉式清單中,選取 [InitiateFirmwareUpdate],然後在 [FWPACKAGEURI] 中輸入虛擬的 URL。 按一下 [叫用方法] 以在裝置上呼叫該方法。
當裝置處理該方法時,您可以在執行裝置程式碼的主控台中看見訊息。 該方法的結果會新增到解決方案入口網站的歷程記錄中:

後續步驟
自訂預先設定的方案一文描述可供您擴充此範例的一些方式。 可能的延伸模組包括使用真實的感應器和實作其他命令。
您可以深入了解 azureiotsuite.com 網站的權限。