방법: 자동 레이아웃에 Grid 사용
이 예제에서는 지역화할 수 있는 애플리케이션을 만드는 자동 레이아웃 방법에서 그리드를 사용하는 방법을 설명합니다.
UI(사용자 인터페이스)의 지역화는 시간이 오래 걸릴 수 있습니다. 지역화 담당자는 텍스트를 번역하는 작업 외에도 요소의 크기를 조정하고 위치를 변경해야 하는 경우가 많습니다. 과거에는 UI 조정에 사용한 각 언어에 조정 작업이 필요했습니다. 이제는 WPF(Windows Presentation Foundation)의 기능을 사용하여 조정 작업의 필요성이 낮은 요소를 디자인할 수 있습니다. 크기 조정 및 변경 작업이 보다 쉽도록 애플리케이션을 작성하는 방법을 auto layout이라고 합니다.
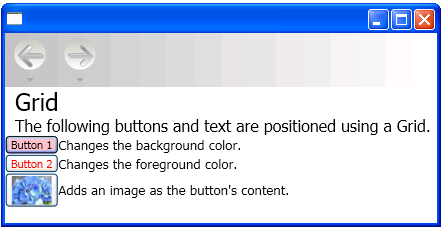
다음 XAML(Extensible Application Markup Language) 예제에서는 그리드를 사용하여 몇 가지 단추 및 텍스트의 위치를 지정하는 것을 보여 줍니다. 셀의 높이와 너비가 Auto로 설정되어 있으므로 이미지가 있는 단추가 포함된 셀이 이미지에 맞게 조정됩니다. Grid 요소는 해당 콘텐츠에 맞게 조정될 수 있으므로 지역화할 수 있는 애플리케이션을 디자인하는 자동 레이아웃 방법을 사용할 때 유용할 수 있습니다.
예제
다음 예제에서는 그리드를 사용하는 방법을 보여 줍니다.
<Grid Name="grid" ShowGridLines ="false">
<Grid.ColumnDefinitions>
<ColumnDefinition Width="Auto"/>
<ColumnDefinition Width="*"/>
</Grid.ColumnDefinitions>
<Grid.RowDefinitions>
<RowDefinition Height="Auto"/>
<RowDefinition Height="Auto"/>
<RowDefinition Height="Auto"/>
<RowDefinition Height="Auto"/>
<RowDefinition Height="Auto"/>
</Grid.RowDefinitions>

<TextBlock Margin="10, 10, 5, 5" Grid.Column="0" Grid.Row="0" FontSize="24">Grid
</TextBlock>
<TextBlock Margin="10, 10, 5, 5" Grid.Column="0" Grid.Row="1" FontSize="12"
    Grid.ColumnSpan="2">The following buttons and text are positioned using a Grid.
</TextBlock>
<Button Margin="10, 10, 5, 5" Grid.Column="0" Grid.Row="2" Background="Pink"
    BorderBrush="Black" BorderThickness="10">Button 1
</Button>
<TextBlock Margin="10, 10, 5, 5" Grid.Column="1" Grid.Row="2" FontSize="12"
   VerticalAlignment="Center" TextWrapping="WrapWithOverflow">Sets the background
   color.
</TextBlock>
<Button Margin="10, 10, 5, 5" Grid.Column="0" Grid.Row="3" Foreground="Red">
   Button 2
</Button>
<TextBlock Margin="10, 10, 5, 5" Grid.Column="1" Grid.Row="3" FontSize="12"
   VerticalAlignment="Center" TextWrapping="WrapWithOverflow">Sets the foreground
   color.
</TextBlock>
<Button Margin="10, 10, 5, 5" Grid.Column="0" Grid.Row="4">
   <Image Source="data\flower.jpg"></Image>
</Button>
<TextBlock Margin="10, 10, 5, 5" Grid.Column="1" Grid.Row="4" FontSize="12"
   VerticalAlignment="Center" TextWrapping="WrapWithOverflow">Adds an image as
   the button's content.
</TextBlock>
</Grid>
다음 그래픽에서는 코드 샘플의 출력을 보여 줍니다.
 그리드 예제glob_grid
그리드
참고 항목
.NET Desktop feedback
