방법: 자동 레이아웃을 사용하여 단추 만들기
이 예제는 자동 레이아웃 방식을 사용하여 지역화 가능한 애플리케이션에 단추를 만드는 방법을 설명합니다.
UI(사용자 인터페이스)의 지역화에는 많은 시간이 소요될 수 있습니다. 종종 지역화 담당자는 텍스트 번역 외에도 요소 크기를 조정하고 위치를 재조정해야 합니다. 과거에는 UI 조정에 사용한 각 언어에 조정 작업이 필요했습니다. 이제는 WPF(Windows Presentation Foundation)의 기능을 사용하여 조정 작업의 필요성이 낮은 요소를 디자인할 수 있습니다. 보다 쉽게 크기를 조정하고 위치를 재조정할 수 있는 애플리케이션 작성 방법을 automatic layout이라고 합니다.
예제
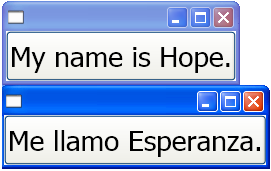
다음 두 XAML(Extensible Application Markup Language) 예제는 단추를 인스턴스화하는 애플리케이션을 만듭니다. 하나는 영어 텍스트이고 다른 하나는 스페인어 텍스트입니다. 코드는 텍스트를 제외하고 동일합니다. 단추는 텍스트에 맞게 조정됩니다.
<Window
    xmlns="http://schemas.microsoft.com/winfx/2006/xaml/presentation"
    xmlns:x="http://schemas.microsoft.com/winfx/2006/xaml"
    x:Class="ButtonLoc.Pane1"
    Name="myWindow"
    SizeToContent="WidthAndHeight"
    >

<DockPanel>
    <Button FontSize="28" Height="50">My name is Hope.</Button>
</DockPanel>
</Window>
<Window
    xmlns="http://schemas.microsoft.com/winfx/2006/xaml/presentation"
    xmlns:x="http://schemas.microsoft.com/winfx/2006/xaml"
    x:Class="ButtonLoc.Pane1"
    Name="myWindow"
    SizeToContent="WidthAndHeight"
    >

 <DockPanel>
    <Button FontSize="28" Height="50">Me llamo Esperanza.</Button>
  </DockPanel>
</Window>
다음 그림에서는 자동 크기 조정 단추로 코드 샘플의 출력을 보여 줍니다.
 텍스트가 여러 언어로 표시되는 동일한 단추
참고 항목
GitHub에서 Microsoft와 공동 작업
이 콘텐츠의 원본은 GitHub에서 찾을 수 있으며, 여기서 문제와 끌어오기 요청을 만들고 검토할 수도 있습니다. 자세한 내용은 참여자 가이드를 참조하세요.
.NET Desktop feedback
