訓練
認證
Microsoft Certified: Azure Data Scientist Associate - Certifications
使用 Python、Azure Machine Learning 和 MLflow 來管理資料擷取和準備、訓練及部署模型,以及監視機器學習解決方案。
重要
這項功能處於公開預覽狀態。
本文說明 Databricks 上的 MLflow 追蹤功能,以及如何使用它來為您的生成式 AI 應用程式具備可觀察性。
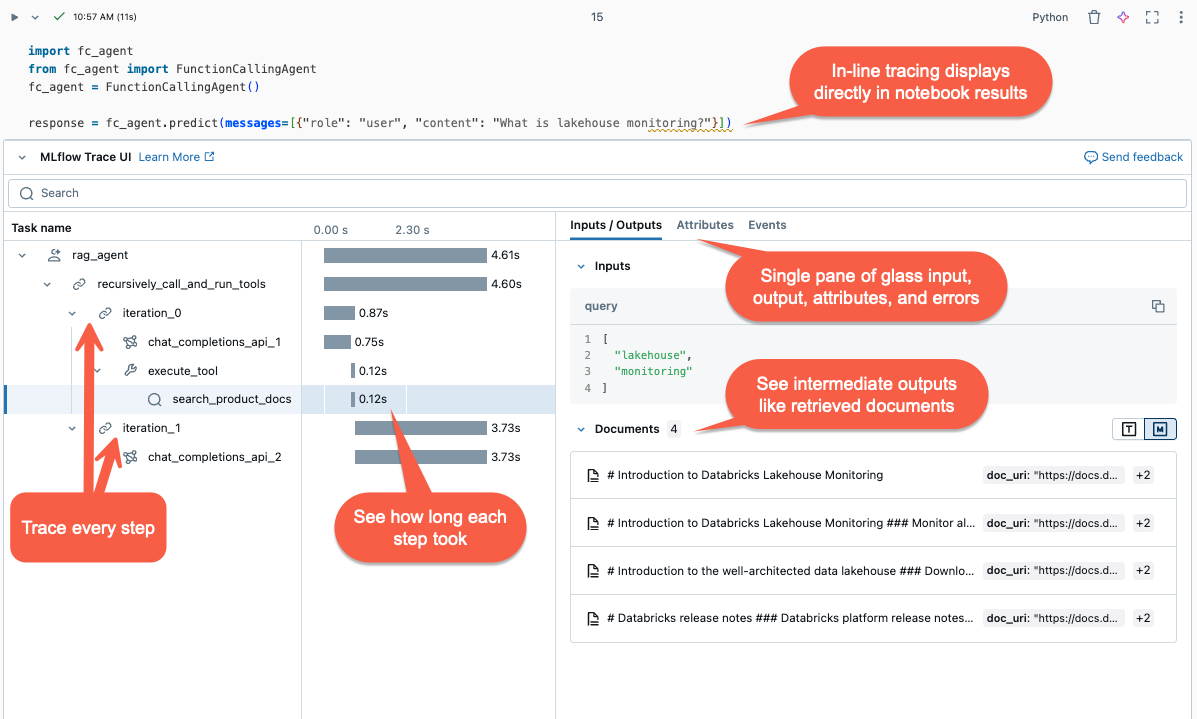
MLflow 追蹤 擷取執行 Gen AI 應用程式的詳細資訊。 追蹤與要求每個中繼步驟相關聯的輸入、輸出和元數據,以便您可以找出 Bug 和非預期行為的來源。 例如,如果您的模型幻覺,您可以快速檢查導致幻覺的每個步驟。
MLflow 追蹤與 Databricks 工具和基礎結構整合,可讓您在 Databricks 筆記本或 MLflow 實驗 UI 中儲存和顯示追蹤。

MLflow 追蹤提供數個優點:
MLflow 追蹤支援三種方法,可將追蹤加入到您的生成式 AI 應用程式。 如需 API 參照的詳細資料,請參閱 MLflow 文件。
| API | 建議的使用案例 | 描述 |
|---|---|---|
| MLflow 自動記錄 | 使用整合式 GenAI 程式庫進行開發 | 自動記錄會自動記錄支援的開放原始碼架構的追蹤,例如 LangChain、LlamaIndex 和 OpenAI。 |
| Fluent APIs | 使用 Pyfunc 的自訂代理程式 | 用於新增追蹤的低代碼 API,無需擔心管理追蹤的樹狀結構。 MLflow 會利用 Python 堆疊自動確定適當的父級/子級跨度關係。 |
| MLflow 用戶端 API | 進階使用案例,例如多執行緒 |
MLflowClient 針對進階使用案例提供更細微、安全線程的 API。 您必須手動管理 span 的父子關聯性。 這可讓您更妥善地控制追蹤生命週期,特別是針對多線程使用案例。 |
MLflow 追蹤功能適用於 MLflow 2.13.0 版及以上版本,並預先安裝在 <DBR< 15.4 LTS ML 及更高版本中。 如有必要,請使用下列程式代碼安裝 MLflow:
%pip install mlflow>=2.13.0 -qqqU
%restart_python
或者,您可以安裝最新版本的 databricks-agents,其中包含相容的 MLflow 版本:
%pip install databricks-agents
如果您的 GenAI 連結庫支援追蹤,例如 LangChain 或 OpenAI,請在程式代碼中新增 mlflow.<library>.autolog() 來啟用自動記錄功能。 例如:
mlflow.langchain.autolog()
注意
自 Databricks Runtime 15.4 LTS ML 起,預設將會在筆記本中啟用 MLflow。 若要停用追蹤,例如使用 LangChain,您可以在筆記本中執行「mlflow.langchain.autolog(log_traces=False)」指令。
MLflow 支援更多程式庫來進行追蹤的自動記錄。 如需整合式函式庫的完整 list,請參閱 MLflow 追蹤文件。
MLflow 中的 Fluent API 會根據您的程式代碼執行流程自動建立追蹤階層。
使用 @mlflow.trace 裝飾器,為被裝飾的函式建立作用範圍。
MLflow Span 物件 用來組織追蹤步驟。 Spans 會在工作流程中擷取個別作業或步驟的相關信息,例如 API 呼叫或向量存放區查詢。
範圍會在叫用函式時開始,並在函式傳回時結束。 MLflow 會記錄函式的輸入和輸出,以及從函式引發的任何例外狀況。
例如,下列程式代碼會建立名為 my_function 的範圍,以擷取輸入自變數 x 和 y 和輸出。
@mlflow.trace(name="agent", span_type="TYPE", attributes={"key": "value"})
def my_function(x, y):
    return x + y
如果您想要為任意程式代碼區塊建立範圍,而不只是函式,您可以使用 mlflow.start_span() 做為包裝程式碼區塊的內容管理員。 範圍會在進入上下文時開始,並在退出上下文時結束。 應該手動使用上下文管理員所產生的 span 物件的 setter 方法來提供 span 的輸入和輸出。
with mlflow.start_span("my_span") as span:
    span.set_inputs({"x": x, "y": y})
    result = x + y
    span.set_outputs(result)
    span.set_attribute("key", "value")
若要追蹤外部函式庫函數,請使用 mlflow.trace封裝函數。
from sklearn.metrics import accuracy_score

y_pred = [0, 2, 1, 3]
y_true = [0, 1, 2, 3]

traced_accuracy_score = mlflow.trace(accuracy_score)
traced_accuracy_score(y_true, y_pred)
### Fluent API example

The following example shows how to use the Fluent APIs `mlflow.trace` and `mlflow.start_span` to trace the `quickstart-agent`:

```python
import mlflow
from mlflow.deployments import get_deploy_client

class QAChain(mlflow.pyfunc.PythonModel):
    def __init__(self):
        self.client = get_deploy_client("databricks")

    @mlflow.trace(name="quickstart-agent")
    def predict(self, model_input, system_prompt, params):
        messages = [
                {
                    "role": "system",
                    "content": system_prompt,
                },
                {
                    "role": "user",
                    "content":  model_input[0]["query"]
                }
          ]

        traced_predict = mlflow.trace(self.client.predict)
        output = traced_predict(
            endpoint=params["model_name"],
            inputs={
                "temperature": params["temperature"],
                "max_tokens": params["max_tokens"],
                "messages": messages,
            },
        )

        with mlflow.start_span(name="_final_answer") as span:
          # Initiate another span generation
            span.set_inputs({"query": model_input[0]["query"]})

            answer = output["choices"][0]["message"]["content"]

            span.set_outputs({"generated_text": answer})
            # Attributes computed at runtime can be set using the set_attributes() method.
            span.set_attributes({
              "model_name": params["model_name"],
                        "prompt_tokens": output["usage"]["prompt_tokens"],
                        "completion_tokens": output["usage"]["completion_tokens"],
                        "total_tokens": output["usage"]["total_tokens"]
                    })
              return answer
新增追蹤之後,執行功能。 下列範例會繼續使用上一節中的 predict() 函式。 當您執行呼叫方法predict()時,追蹤會自動顯示。
SYSTEM_PROMPT = """
You are an assistant for Databricks users. You answer Python, coding, SQL, data engineering, spark, data science, DW and platform, API, or infrastructure administration questions related to Databricks. If the question is unrelated to one of these topics, kindly decline to answer. If you don't know the answer, say that you don't know; don't try to make up an answer. Keep the answer as concise as possible. Use the following pieces of context to answer the question at the end:
"""

model = QAChain()

prediction = model.predict(
  [
      {"query": "What is in MLflow 5.0"},
  ],
  SYSTEM_PROMPT,
  {
    # Using Databricks Foundation Model for easier testing, feel free to replace it.
    "model_name": "databricks-dbrx-instruct",
    "temperature": 0.1,
    "max_tokens": 1000,
  }
)
MlflowClient 公開細粒度的、執行緒安全的 API 來啟動和結束追蹤、管理 span,以及 set span 欄位。 它提供對追蹤生命週期和結構的全盤控制。 當 Fluent API 不足以滿足您的需求時,這些 API 會很有用,例如多線程應用程式和回呼。
以下是使用 MLflow 用戶端建立完整追蹤的步驟。
client = MlflowClient()創建 MLflowClient 的實例。
使用 client.start_trace() 方法啟動追蹤。 這會起始追蹤內容、啟動絕對根範圍,並傳回根範圍物件。 這個方法必須在 start_span() API 之前執行。
client.start_trace()中追蹤的屬性、輸入和輸出。注意
Fluent API 中沒有相當於 start_trace() 方法。 這是因為 Fluent APIs 會自動初始化追蹤上下文,並根據受控狀態判斷它是否是根範圍。
start_trace() API 會傳回範圍。
Get 要求標識碼、追蹤唯一標識 identifier (也稱為 trace_id),以及使用 span.request_id 和 span.span_id回傳的範圍標識碼。
使用 client.start_span(request_id, parent_id=span_id) 啟動子範圍,以 set 範圍的屬性、輸入和輸出。
request_id 和 parent_id,才能將範圍與追蹤階層中的正確位置產生關聯。 它會傳回另一個 span 物件。呼叫 client.end_span(request_id, span_id)結束子範圍。
重複步驟 3 - 5 來建立您所需要的任何子區段。
在子範圍全部結束後,呼叫 client.end_trace(request_id) 以關閉追蹤並進行記錄。
from mlflow.client import MlflowClient

mlflow_client = MlflowClient()

root_span = mlflow_client.start_trace(
  name="simple-rag-agent",
  inputs={
          "query": "Demo",
          "model_name": "DBRX",
          "temperature": 0,
          "max_tokens": 200
         }
  )

request_id = root_span.request_id

# Retrieve documents that are similar to the query
similarity_search_input = dict(query_text="demo", num_results=3)

span_ss = mlflow_client.start_span(
      "search",
      # Specify request_id and parent_id to create the span at the right position in the trace
        request_id=request_id,
        parent_id=root_span.span_id,
        inputs=similarity_search_input
  )
retrieved = ["Test Result"]

# You must explicitly end the span
mlflow_client.end_span(request_id, span_id=span_ss.span_id, outputs=retrieved)

root_span.end_trace(request_id, outputs={"output": retrieved})
若要在執行代理後檢閱追蹤,請使用以下其中一個選項:
MLflow 追蹤也與 Mosaic AI Model Serving 整合,可讓您有效率對問題進行偵錯、監視效能,以及建立用於離線評估的黃金資料集。 當您的服務端點啟用 MLflow 追蹤時,追蹤會記錄在 table底下的 column 中。
若要在服務端點啟用 MLflow 追蹤,您必須在端點組態中設定 setENABLE_MLFLOW_TRACING 環境變數,才能執行 True。 若要瞭解如何使用自定義環境變數部署端點,請參閱 新增純文本環境變數。 如果您使用 deploy() API 部署代理程式,追蹤會自動記錄至推斷 table。 請參閱為生成式 AI 應用程式部署代理程式。
注意
以異步方式將追蹤資料寫入推斷結果 table,因此在開發期間不會產生與筆記本環境中相同的額外負荷。 不過,它仍可能對端點的回應速度帶來一些額外負荷,尤其是當每個推斷要求的追蹤大小很大時。 Databricks 並不保證任何服務等級協定(SLA)對您的模型端點的實際延遲影響,因為這絕大多數取決於環境和模型的執行。 Databricks 建議先測試端點效能,並取得追蹤額外負荷的深入解析,再部署到生產應用程式。
下列 table 提供了不同追蹤大小對推理延遲影響的粗略指示。
| 每個要求的追蹤大小 | 對延遲的影響(毫秒) |
|---|---|
| ~10 KB | ~1 毫秒 |
| ~1 MB | 50 ~ 100 毫秒 |
| 10 MB | 150 毫秒 ~ |
LangChain 自動記錄可能不支援所有 LangChain 預測 API。 如需完整的支援 API list,請參閱 MLflow 文件。
訓練
認證
Microsoft Certified: Azure Data Scientist Associate - Certifications
使用 Python、Azure Machine Learning 和 MLflow 來管理資料擷取和準備、訓練及部署模型,以及監視機器學習解決方案。