標題列自訂
Windows 提供每個視窗的預設標題列,並可讓您自訂以符合您應用程式的風格。 預設標題列隨附一些標準元件和核心功能,例如拖曳和調整視窗大小。

如需自訂應用程式標題列、可接受的標題列區域內容和建議 UI 模式的指引,請參閱標題列設計文章。
重要
本文說明如何針對使用 Windows 應用程式 SDK 的應用程式自訂標題列,不論是否搭配 WinUI 3。 若為使用 UWP 和 WinUI 2 的應用程式,請參閱 UWP 適用的標題列自訂方法。
- 適用於:Windows 應用程式 SDK、WinUI 3 桌面應用程式
- 重要的 API:AppWindow.TitleBar 屬性、AppWindowTitleBar 類別、AppWindow 類別、Microsoft.UI.Xaml.Window 類別、Window.ExtendsContentIntoTitleBar 屬性、Window.SetTitleBar 方法
標題列元件
此清單描述標準標題列的元件。
- 標題列矩形
- 標題文字
- 系統圖示
- 系統選單 - 按一下應用程式圖示或以滑鼠右鍵按下標題列來存取
- 標題控制項
- 最小化按鈕
- 最大化/還原按鈕
- 關閉按鈕
視窗化
Windows 應用程式 SDK 中的視窗功能是透過 Win32 HWND 模型為基礎的 Microsoft.UI.Windowing.AppWindow 類別提供的。 AppWindow 與應用程式中最上層 HWND 之間有 1:1 的對應。 AppWindow 及其相關類別提供 API,可讓您管理應用程式最上層視窗的許多層面,包括標題列的自訂。 您可以修改 Windows 提供的預設標題列,使其與 UI 的其餘部分融合,或將應用程式畫布延伸至標題列區域,提供您自己的標題列內容。
WinUI 3 中的視窗功能也是透過以 Win32 HWND 模型為基礎的 Microsoft.UI.Xaml.Window 類別提供的。 針對使用 WinUI 3 的 XAML 應用程式,XAML 視窗 API 提供更簡單的方式來自定標題列,同時仍可讓您在需要時存取 AppWindow API。
如何使用 AppWindow
您可以將 AppWindow API 與 Windows 應用程式 SDK 支援的任何 UI 架構搭配使用 - Win32、WPF、WinForms 或 WinUI 3,而且只要使用您所需的 API,即可累加採用它們。
如果您使用 WinUI 3 XAML 做為應用程式的 UI 架構,則 Window 和 AppWindow API 都可供您使用。 從 Windows 應用程式 SDK 1.4 開始,XAML 視窗和 AppWindow 會使用相同的 AppWindowTitleBar 物件進行標題列自訂。 使用 Window.AppWindow 屬性可從現有的 XAML 視窗取得 AppWindow 物件。 使用此 AppWindow 物件,您可以存取標題列自訂 API。
若要存取標題列的其他功能,您可以從 XAML 視窗使用 AppWindow API,如下所示:AppWindow.TitleBar.ForegroundColor = Colors.White;。
如果您不是使用 WinUI 3 1.3 或更新版本,請使用 Interop API 來取得 AppWindow,並使用 AppWindow API 來自訂標題列。 如需 Interop API 的詳細資訊,請參閱管理應用程式視窗 - UI 架構和 HWND Interop 和視窗資源庫範例。
自訂標題列的程度
您可以套用至標題列的自訂層級有兩種:將次要修改套用至預設標題列,或將應用程式畫布延伸至標題列區域,並提供完全自訂的內容。
簡易
針對簡單的自訂,例如變更標題列色彩,您可以在 AppWindowTitleBar 物件上設定屬性,以指定您想要用於標題列元素的色彩。 在此情況下,系統會保留標題列所有其他層面的責任,例如繪製應用程式標題和定義拖曳區域。
完整
另一個選項是隱藏預設系統標題列,並將它取代為您自己的自訂內容。 例如,您可以將文字、搜尋方塊或自訂功能表放在標題列區域中。 您也必須使用此選項,將材料底圖 (如 Mica) 延伸至標題列區域。
當您選擇完全自訂時,您必須負責將內容放入標題列區域,而且您可以定義自己的拖曳區域。 標題控制項 (系統 [關閉]、[最小化] 和 [最大化] 按鈕) 仍可供系統使用及處理,但應用程式標題等元素則不是。 您必須視應用程式需要自行建立這些元素。
簡單自訂
如果您只想自訂標題列標題、色彩或圖示,您可以在應用程式視窗的標題列物件上設定屬性。
標題
根據預設,標題列會將應用程式類型顯示為視窗標題 (例如:「WinUI Desktop」)。 您應該更新視窗標題,以顯示有意義的應用程式顯示名稱。
XAML 應用程式具有 Package.appxmanifest 檔案中設定的顯示名稱。 您可以取得此值並使用它來設定 Title 屬性,如下所示。
Title = AppInfo.Current.DisplayInfo.DisplayName;
若要變更視窗標題,請將 Window.Title 屬性設定為單行文字值,如下所示。
<Window
    ...
    Title="App title">
    ...
</Window>
public MainWindow()
{
    InitializeComponent();
    Title = "App title";
}
若要使用 AppWindow API 變更視窗標題,請將 AppWindow.Title 屬性設定為單行文字值,如下所示。 此範例示範如何使用 Interop API 來取得 AppWindow,若您的應用程式不使用 WinUI 3 1.3 或更新版本,則為必要。
using Microsoft.UI;           // Needed for WindowId.
using Microsoft.UI.Windowing; // Needed for AppWindow.
using WinRT.Interop;          // Needed for XAML/HWND interop.

private AppWindow m_AppWindow;

public MainWindow()
{
    this.InitializeComponent();

    m_AppWindow = GetAppWindowForCurrentWindow();
    m_AppWindow.Title = "App title";
}

private AppWindow GetAppWindowForCurrentWindow()
{
    IntPtr hWnd = WindowNative.GetWindowHandle(this);
    WindowId wndId = Win32Interop.GetWindowIdFromWindow(hWnd);
    return AppWindow.GetFromWindowId(wndId);
}
顏色
若要自訂預設標題列色彩或變更預設視窗圖示,您必須使用 AppWindow API 或選擇完全自訂標題列。
此範例示範如何取得 AppWindowTitleBar 執行個體,並設定其色彩屬性。
重要
當應用程式在 Windows 10 上執行時,會忽略色彩自訂。
// Assumes "this" is a XAML Window. In projects that don't use
// WinUI 3 1.3 or later, use interop APIs to get the AppWindow.
AppWindow m_AppWindow = this.AppWindow;

private bool SetTitleBarColors()
{
    // Check to see if customization is supported.
    // The method returns true on Windows 10 since Windows App SDK 1.2,
    // and on all versions of Windows App SDK on Windows 11.
    if (AppWindowTitleBar.IsCustomizationSupported())
    {
        AppWindowTitleBar m_TitleBar = m_AppWindow.TitleBar;

        // Set active window colors.
        // Note: No effect when app is running on Windows 10
        // because color customization is not supported.
        m_TitleBar.ForegroundColor = Colors.White;
        m_TitleBar.BackgroundColor = Colors.Green;
        m_TitleBar.ButtonForegroundColor = Colors.White;
        m_TitleBar.ButtonBackgroundColor = Colors.SeaGreen;
        m_TitleBar.ButtonHoverForegroundColor = Colors.Gainsboro;
        m_TitleBar.ButtonHoverBackgroundColor = Colors.DarkSeaGreen;
        m_TitleBar.ButtonPressedForegroundColor = Colors.Gray;
        m_TitleBar.ButtonPressedBackgroundColor = Colors.LightGreen;

        // Set inactive window colors.
        // Note: No effect when app is running on Windows 10
        // because color customization is not supported.
        m_TitleBar.InactiveForegroundColor = Colors.Gainsboro;
        m_TitleBar.InactiveBackgroundColor = Colors.SeaGreen;
        m_TitleBar.ButtonInactiveForegroundColor = Colors.Gainsboro;
        m_TitleBar.ButtonInactiveBackgroundColor = Colors.SeaGreen;
        return true;
    }
    return false;
}
設定標題列色彩時,有幾個事項需要注意:
- 不會將按鈕背景色彩套用至 [關閉] 按鈕的 [暫留] 和 [已按下] 狀態。 [關閉] 按鈕一律會針對這些狀態使用系統定義的色彩。
- 設定色彩屬性,將
null重設為預設系統色彩。 - 您無法設定透明色彩。 會忽略色彩的 Alpha 色板。
Windows 可讓使用者選擇將選取的輔色套用至標題列。 如果您設定任何標題列色彩,建議您明確設定好所有色彩。 這可確保不會因為使用者定義的色彩設定而發生非預期的色彩組合。
圖示和系統功能表
您可以隱藏系統圖示,或將它取代為自訂圖示。 系統圖示會在以滑鼠右鍵點選或點選一次時顯示系統功能表。 當按兩下/點選時,它會關閉視窗。
若要顯示或隱藏系統圖示和相關聯的行為,請設定標題列 IconShowOptions 屬性。
m_TitleBar.IconShowOptions = IconShowOptions.HideIconAndSystemMenu;
若要使用自訂視窗圖示,請呼叫 AppWindow.SetIcon 其中一個方法來設定新的圖示。
SetIcon(String)The SetIcon(String) 方法目前僅適用於 .ico 檔案。 您傳遞給此方法的字串是 .ico 檔案的完整路徑。
m_AppWindow.SetIcon("iconPath/iconName.ico");SetIcon(IconId)如果您已經擁有圖示函示的其中一個圖示代碼程式 (
HICON),例如:CreateIcon,您可以使用 GetIconIdFromIcon Interop API 取得 IconId。 然後,您可以將IconId傳遞至 SetIcon(IconId) 方法來設定視窗圖示。m_AppWindow.SetIcon(iconId));
完全自訂
當您改為標題列完全自訂時,應用程式的工作區會延伸為涵蓋整個視窗,包括標題列區域。 您必須負責整個視窗的繪製和輸入處理,但視窗仍會提供標題按鈕。
若要隱藏系統標題列並將內容延伸至標題列區域,請將應用程式內容延伸至標題列區域的屬性設定為 true。 在 XAML 應用程式中,此屬性可以在您應用程式的 OnLaunched 方法 (App.xaml.cs),或在應用程式的第一頁中設定。
提示
請參閱完全自訂範例一節,一次查看所有程式碼。
這個範例顯示如何將 Window.ExtendsContentIntoTitleBar 屬性設定為 true。
public MainWindow()
{
    this.InitializeComponent();

    // Hide system title bar.
    ExtendsContentIntoTitleBar = true;
}
警告
ExtendsContentIntoTitleBar 會在 Window 的 XAML IntelliSense 顯示,但在 XAML 中設定它會造成錯誤。 請改為在程式碼中設定此屬性。
此範例示範如何取得 AppWindowTitleBar,並將 AppWindowTitleBar.ExtendsContentIntoTitleBar 屬性設定為 true。 此範例縣市如何使用 Interop API 來取得 AppWindow,若您的應用程式不使用 WinUI 3 1.3 或更新版本,則為必要。
using Microsoft.UI;           // Needed for WindowId.
using Microsoft.UI.Windowing; // Needed for AppWindow.
using WinRT.Interop;          // Needed for XAML/HWND interop.

private AppWindow m_AppWindow;

public MainWindow()
{
    this.InitializeComponent();

    m_AppWindow = GetAppWindowForCurrentWindow();
    var titleBar = m_AppWindow.TitleBar;
    // Hide system title bar.
    titleBar.ExtendsContentIntoTitleBar = true;
}

private AppWindow GetAppWindowForCurrentWindow()
{
    IntPtr hWnd = WindowNative.GetWindowHandle(this);
    WindowId wndId = Win32Interop.GetWindowIdFromWindow(hWnd);
    return AppWindow.GetFromWindowId(wndId);
}
標題欄內容和預設拖曳區域
當您的應用程式延伸至標題列區域時,您必須負責定義和管理標題列的 UI。 這通常至少包含指定標題文字和拖曳區域。 標題列的拖曳區域會定義使用者可以按下視窗並拖曳來移動視窗的位置。 這也是使用者可以以滑鼠右鍵按一下以顯示系統功能表的位置。
若要深入瞭解可接受的標題列內容和建議的 UI 模式,請參閱標題列設計。
此範例顯示自訂標題列 UI 的 XAML,不含互動式內容。
<Grid x:Name="AppTitleBar"
      Height="32">
    <Grid.ColumnDefinitions>
        <ColumnDefinition x:Name="LeftPaddingColumn" Width="0"/>
        <ColumnDefinition/>
        <ColumnDefinition x:Name="RightPaddingColumn" Width="0"/>
    </Grid.ColumnDefinitions>
    <Image x:Name="TitleBarIcon" Source="ms-appx:///Assets/StoreLogo.png"
           Grid.Column="1"
           HorizontalAlignment="Left"
           Width="16" Height="16"
           Margin="8,0,0,0"/>
    <TextBlock x:Name="TitleBarTextBlock"
               Text="App title"
               Style="{StaticResource CaptionTextBlockStyle}"
               Grid.Column="1"
               VerticalAlignment="Center"
               Margin="28,0,0,0"/>
</Grid>
重要
LeftPaddingColumn和 RightPaddingColumn 可用來保留標題按鈕的空間。 會在程式碼中設定這些行的 Width 值,稍後會顯示。 如需程式碼和說明,請參閱系統標題按鈕一節。
XAML 應用程式具有 Package.appxmanifest 檔案中設定的顯示名稱。 您可以取得此值,並將其用於自訂標題列中,如下所示。
TitleBarTextBlock.Text = AppInfo.Current.DisplayInfo.DisplayName;
當您將內容延伸至標題列區域時,系統會隱藏系統標題列,並建立預設的 AppWindowTitleBar,其可提供畫面寬度的標題按鈕和拖曳區域,與系統標題列相同。 如果您未在標題列中放置互動式內容,您可以依原樣保留此預設拖曳區域。 如果您在標題列中放置互動式內容,則必須指定互動式區域,我們將在下一節中討論。
警告
當您定義自訂拖曳區域時,它們不一定要位於預設標題列區域中的視窗頂端,您可以將 UI 的任何部分定義為拖曳區域。 不過,將拖曳區域放在不同位置可能會讓使用者難以找到。
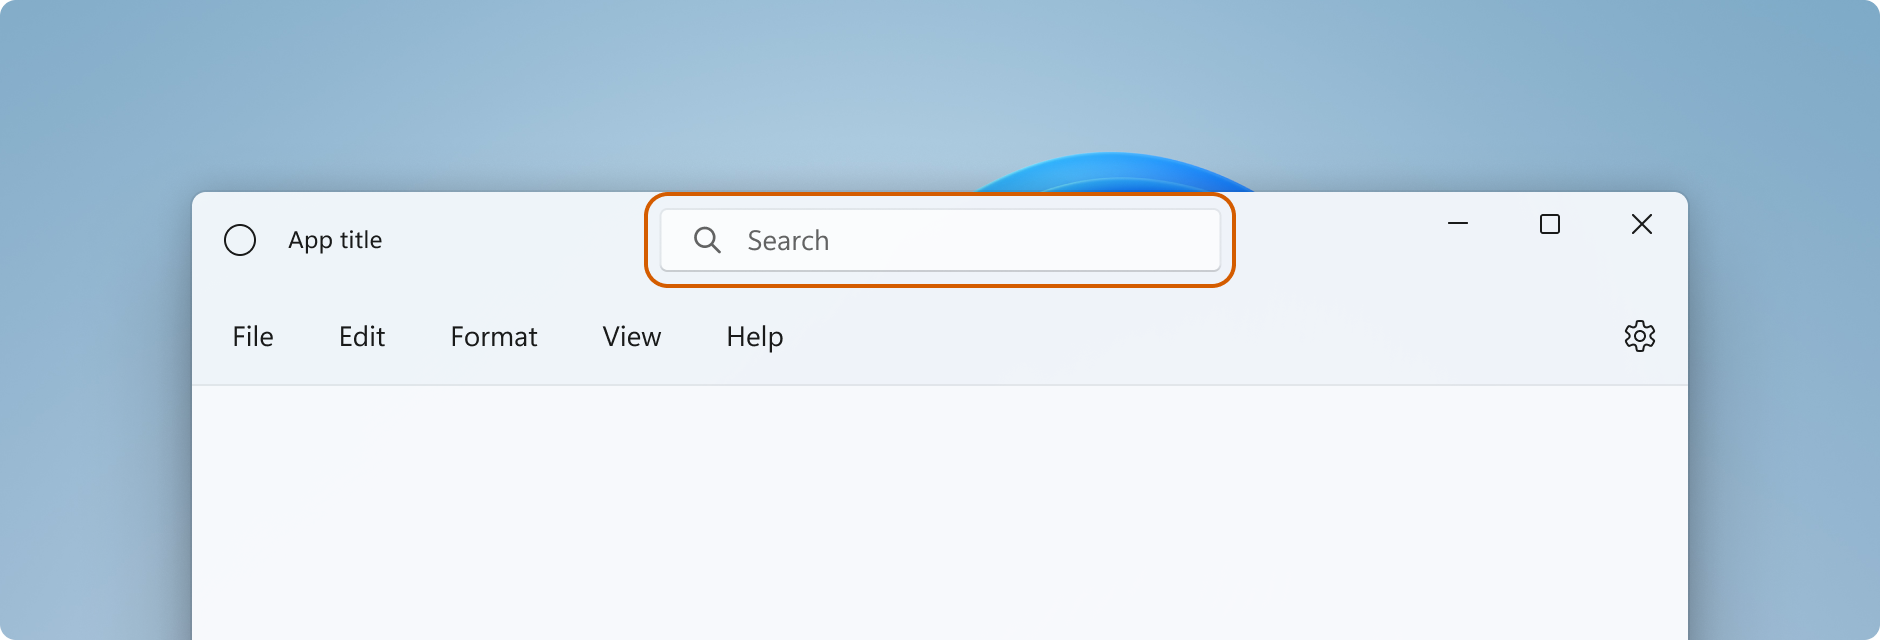
互動式內容
您可以在應用程式頂端放置互動式控制項,例如按鈕、功能表或搜尋方塊,使其出現在標題列中。 不過,您必須指定哪些區域是互動式的,以確保您的互動式元素可接收使用者輸入,同時仍允許使用者移動視窗。
當您在標題列區域中新增互動式內容時,必須使用 InputNonClientPointerSource 類別來指定輸入傳遞至互動式控制的區域,而不是由標題列處理。 若要設定互動式區域,請呼叫 InputNonClientPointerSource.SetRegionRects 方法。 這個方法會採用值來指定所設定的區域種類 (在此案例中為 Passthrough),以及矩形陣列,每個區域都會定義 Passthrough 區域。 當標題列的大小變更時,您必須重新計算互動式區域以符合新的大小,並使用新的值呼叫 SetRegionRects。
此範例顯示具有搜尋方塊和 PersonPicture 帳戶控制項的自訂標題列 UI。 它示範如何計算和設定這些控制項的互動式矩形,以便將輸入傳遞至這些控制項。
關於此程式碼,這裡有幾點重要事項要注意:
- 將
AppTitleBar網格高度設定為 48,以遵循互動式內容的標題列設計指引。 - 將 PreferredHeightOption 設定為
Tall,讓標題按鈕的高度與標題列相同。 - 若要讓調整控制項大小與計算區域變得更容易,請使用
Grid搭配多個具名資料行進行配置。 - 針對包含
AutoSuggestBox的資料行使用星號 (*) 來搭配MinWidth調整大小,讓它自動調整視窗大小。 - 設定
RightDragColumn上的MinWidth,保留一個永遠可拖曳的小型區域,即使視窗重設大小也一樣。 - 在 MainWindow 建構函式中將
ExtendsContentIntoTitleBar設定為true。 如果您在稍後呼叫的程式碼中設定它,可能會先顯示預設系統標題列,然後再隱藏。 - 在載入
AppTitleBar元素後,進行初始呼叫以計算互動式區域。 否則,不保證用於計算的元素會有其正確的值。 - 只有在
AppTitleBar元素變更大小後 (AppTitleBar_SizeChanged),才會更新互動式矩形計算。 如果您依照視窗Changed事件而定,則在某些情況下 (例如視窗最大化/最小化) 當AppTitleBar之前發生的事件會重新調整大小,而且計算會使用不正確的值。 - 只有在檢查
ExtendsContentIntoTitleBar以確認正在使用自訂標題列之後,才設定您的自訂拖曳/互動式區域。
<Grid x:Name="AppTitleBar"
      Height="48">
    <Grid.ColumnDefinitions>
        <ColumnDefinition x:Name="LeftPaddingColumn" Width="0"/>
        <ColumnDefinition x:Name="IconColumn" Width="Auto"/>
        <ColumnDefinition x:Name="TitleColumn" Width="Auto"/>
        <ColumnDefinition x:Name="LeftDragColumn" Width="*"/>
        <ColumnDefinition x:Name="SearchColumn" Width="4*" MinWidth="220"/>
        <ColumnDefinition x:Name="RightDragColumn" Width="*" MinWidth="48"/>
        <ColumnDefinition x:Name="AccountColumn" Width="Auto"/>
        <ColumnDefinition x:Name="RightPaddingColumn" Width="0"/>
    </Grid.ColumnDefinitions>
    <Image x:Name="TitleBarIcon"
           Source="ms-appx:///Assets/StoreLogo.png"
           Grid.Column="1"
           Width="16" Height="16"
           Margin="8,0,4,0"/>
    <TextBlock x:Name="TitleBarTextBlock"
               Text="App title"
               Style="{StaticResource CaptionTextBlockStyle}"
               Grid.Column="2"
               VerticalAlignment="Center">
    </TextBlock>
    <AutoSuggestBox x:Name="TitleBarSearchBox"
                    Grid.Column="4"
                    QueryIcon="Find"
                    PlaceholderText="Search"
                    VerticalAlignment="Center"
                    MaxWidth="600"/>
    <PersonPicture x:Name="PersonPic"
                   Grid.Column="6"
                   Height="32" Margin="0,0,16,0"/>
</Grid>
此程式碼顯示如何計算和設定對應至 AutoSuggestBox 和 PersonPicture 控制項的互動式區域。
public sealed partial class MainWindow : Window
{
    public MainWindow()
    {
        this.InitializeComponent();

        // Assumes "this" is a XAML Window. In projects that don't use
        // WinUI 3 1.3 or later, use interop APIs to get the AppWindow.
        m_AppWindow = this.AppWindow;
        AppTitleBar.Loaded += AppTitleBar_Loaded;
        AppTitleBar.SizeChanged += AppTitleBar_SizeChanged;
        ExtendsContentIntoTitleBar = true;
        TitleBarTextBlock.Text = AppInfo.Current.DisplayInfo.DisplayName;
    }

    private void AppTitleBar_Loaded(object sender, RoutedEventArgs e)
    {
        if (ExtendsContentIntoTitleBar == true)
        {
            // Set the initial interactive regions.
            SetRegionsForCustomTitleBar();
        }
    }

    private void AppTitleBar_SizeChanged(object sender, SizeChangedEventArgs e)
    {
        if (ExtendsContentIntoTitleBar == true)
        {
            // Update interactive regions if the size of the window changes.
            SetRegionsForCustomTitleBar();
        }
    }

    private void SetRegionsForCustomTitleBar()
    {
        // Specify the interactive regions of the title bar.

        double scaleAdjustment = AppTitleBar.XamlRoot.RasterizationScale;

        RightPaddingColumn.Width = new GridLength(m_AppWindow.TitleBar.RightInset / scaleAdjustment);
        LeftPaddingColumn.Width = new GridLength(m_AppWindow.TitleBar.LeftInset / scaleAdjustment);

        GeneralTransform transform = TitleBarSearchBox.TransformToVisual(null);
        Rect bounds = transform.TransformBounds(new Rect(0, 0,
                                                         TitleBarSearchBox.ActualWidth,
                                                         TitleBarSearchBox.ActualHeight));
        Windows.Graphics.RectInt32 SearchBoxRect = GetRect(bounds, scaleAdjustment);

        transform = PersonPic.TransformToVisual(null);
        bounds = transform.TransformBounds(new Rect(0, 0,
                                                    PersonPic.ActualWidth,
                                                    PersonPic.ActualHeight));
        Windows.Graphics.RectInt32 PersonPicRect = GetRect(bounds, scaleAdjustment);

        var rectArray = new Windows.Graphics.RectInt32[] { SearchBoxRect, PersonPicRect };

        InputNonClientPointerSource nonClientInputSrc =
            InputNonClientPointerSource.GetForWindowId(this.AppWindow.Id);
        nonClientInputSrc.SetRegionRects(NonClientRegionKind.Passthrough, rectArray);
    }

    private Windows.Graphics.RectInt32 GetRect(Rect bounds, double scale)
    {
        return new Windows.Graphics.RectInt32(
            _X: (int)Math.Round(bounds.X * scale),
            _Y: (int)Math.Round(bounds.Y * scale),
            _Width: (int)Math.Round(bounds.Width * scale),
            _Height: (int)Math.Round(bounds.Height * scale)
        );
    }
}
警告
AppWindow 使用實體像素才能與不使用邏輯座標的 UI 架構相容。 如果您使用 WPF 或 WinUI 3、RightInset、LeftInset,則用來計算區域的值必須調整 (如果顯示縮放比例不是 100%)。 在此範例中,我們會取得 scaleAdjustment 值來顯示縮放比例設定。
- 若為 WinUI 3,請使用 XamlRoot.RasterizationScale 屬性來取得縮放比例調整。
- 若為 WPF,您可以處理 Window.DpiChanged 事件,以取得 NewDpi 值並計算縮放比例調整。
系統標題按鈕
系統會保留應用程式視窗左上角或右上角供系統標題按鈕使用 (最小化、最大化/還原、關閉)。 系統會保留標題按鈕區域的控制項,以確保提供拖曳、最小化、最大化和關閉視窗的最低功能。 系統會針對由左至右的語言在右上方繪製 [關閉] 按鈕,而從右至左的語言則繪製於左上方。
您可以在標題控制項區域底下繪製內容,例如您的應用程式背景,但您不應該放置預期使用者能夠與之互動的任何 UI。 它不會收到任何輸入,因為是由系統處理標題控制項的輸入。
上一個範例中的這幾行會顯示 XAML 中定義標題列的填補資料行。 使用填補資料行而非邊界可確保背景塗滿標題控制按鈕下的區域 (適用於透明按鈕)。 同時使用左和右填補資料行可確保標題列在從右至左和從左至右的版面配置中都能正確運作。
<Grid.ColumnDefinitions>
    <ColumnDefinition x:Name="LeftPaddingColumn" Width="0"/>
    <ColumnDefinition/>
    <ColumnDefinition x:Name="RightPaddingColumn" Width="0"/>
</Grid.ColumnDefinitions>
AppWindowTitleBar 類別會傳達標題控制區域的維度和位置,讓您可以在標題列 UI 的配置中顯示。 每側保留區域的寬度是由 LeftInset 或 RightInset 屬性指定,其高度是由 Height 屬性指定。
以下是計算和設定拖曳區域時,如何指定填補資料行的寬度。
RightPaddingColumn.Width =
    new GridLength(m_AppWindow.TitleBar.RightInset / scaleAdjustment);
LeftPaddingColumn.Width =
    new GridLength(m_AppWindow.TitleBar.LeftInset / scaleAdjustment);
重要
請參閱互動式內容一節中的重要資訊,以了解顯示縮放比例如何影響這些值。
自訂標題列的高標題列支援
當您在標題列中新增互動式內容,例如搜尋方塊或人員圖片時,建議您增加標題列的高度,為這些元素提供更多空間。 較高的標題列也會讓觸控操作更容易。 AppWindowTitleBar.PreferredHeightOption 屬性可讓您選擇將標題列高度從標準高度增加到較高的高度。 當您選取 Tall 標題列模式時,系統在工作區中繪製為重疊的標題按鈕,會被轉譯成其最小值/最大值/關閉圖像置中時的較高值。 如果您尚未指定拖曳區域,系統會繪製一個延伸視窗寬度的拖曳區域,以及您設定的 PreferredHeightOption 值決定的高度。
此範例顯示如何設定 PreferredHeightOption 屬性。
// A taller title bar is only supported when drawing a fully custom title bar.
if (ExtendsContentIntoTitleBar == true)
{
    m_AppWindow.TitleBar.PreferredHeightOption = TitleBarHeightOption.Tall;
}
警告
您設定 PreferredHeightOption 屬性前,AppWindowTitleBar.ExtendsContentIntoTitleBar 屬性必須為 true。 如果您在 ExtendsContentIntoTitleBar 為 false 時嘗試設定 PreferredHeightOption,就會擲回例外狀況。
標題按鈕中的色彩和透明度
當您將應用程式內容延伸至標題列區域時,您可以讓標題按鈕的背景變成透明,讓您的應用程式背景穿透顯示。 您通常可將背景設定為 Colors.Transparent 以取得完整的透明度。 若要部分透明度,請針對您設定屬性的 Color 設定 Alpha 色板。
這些標題列屬性可以是透明的:
- ButtonBackgroundColor
- ButtonHoverBackgroundColor
- ButtonPressedBackgroundColor
- ButtonInactiveBackgroundColor
所有其他色彩屬性都會繼續忽略 Alpha 色板。 如果 ExtendsContentIntoTitleBar 設定為 false,則所有 AppWindowTitleBar 色彩屬性一律會忽略 Alpha 色板。
不會將按鈕背景色彩套用至 [關閉] 按鈕的 [暫留] 和 [已按下] 狀態。 [關閉] 按鈕一律會針對這些狀態使用系統定義的色彩。
提示
Mica 是一種亮眼的材料,有助於區分聚焦的視窗。 建議您將其作為 Windows 11 中長時間存留視窗的背景。 如果您已在視窗的工作區中套用 Mica,您可以將它延伸至標題列區域,並讓 Mica 的標題按鈕透明顯示。 如需詳細資訊,請參閱 Mica 材料。
當視窗處於非使用中狀態時,讓標題列變暗
當您的視窗處於作用中或非使用中狀態時,您應該讓其明顯可區別。 您至少應該變更標題列中文字、圖示和按鈕的色彩。
若為 XAML 應用程式,請處理 Window.Activated 事件來判斷視窗的啟用狀態,並視需要更新標題列 UI。
public MainWindow()
{
    ...
    Activated += MainWindow_Activated;
}

private void MainWindow_Activated(object sender, WindowActivatedEventArgs args)
{
    if (args.WindowActivationState == WindowActivationState.Deactivated)
    {
        TitleBarTextBlock.Foreground =
            (SolidColorBrush)App.Current.Resources["WindowCaptionForegroundDisabled"];
    }
    else
    {
        TitleBarTextBlock.Foreground =
            (SolidColorBrush)App.Current.Resources["WindowCaptionForeground"];
    }
}
若為其他 UI 架構,處理事件以判斷視窗的啟用狀態,並視需要更新標題列 UI。 判斷視窗狀態的方式取決於您用於應用程式的 UI 架構。
- Win32:接聽並回應 WM_ACTIVATE 訊息。
- WPF:處理 Window.Activated、 Window.Deactivated。
- WinForms:處理 Form.Activated、 Form.Deactivate。
重設標題列
若要在應用程式執行時重設或切換至系統標題列,您可以呼叫 AppWindowTitleBar.ResetToDefault。
m_AppWindow.TitleBar.ResetToDefault();
若為 XAML 應用程式,您也可以透過下列方式重設標題列:
- 呼叫 SetTitleBar,以在應用程式執行時切換至新的標題列元素。
- 以
null呼叫SetTitleBar做為參數來重設至預設AppWindowTitleBar拖曳區域。 - 以
null呼叫SetTitleBar做為參數並將 ExtendsContentIntoTitleBar 設定為false以還原至預設系統標題列。
顯示和隱藏標題列
如果您將全螢幕或精簡重疊模式支援新增至您的應用程式,則當您的應用程式在這些模式之間切換時,您可能需要變更標題列。 XAML 視窗未提供任何 API 來支援全螢幕模式,您可以為此使用 AppWindow API。
當您的應用程式以全螢幕模式執行時,系統會隱藏標題列和標題控制按鈕。 您可以處理 AppWindow.Changed 事件,並檢查事件引數 DidPresenterChange 屬性,以判斷是否應該顯示、隱藏或變更標題列以回應新的視窗呈現。
此範例顯示如何處理 Changed 事件,以顯示和隱藏先前範例中的 AppTitleBar 元素。 如果視窗處於精簡重疊模式,標題列會重設為預設系統標題列 (或者您可以提供針對精簡重疊最佳化的自訂標題列)。
public MainWindow()
{
    this.InitializeComponent();

    m_AppWindow = this.AppWindow;
    m_AppWindow.Changed += AppWindow_Changed;
}

private void AppWindow_Changed(AppWindow sender, AppWindowChangedEventArgs args)
{
    if (args.DidPresenterChange)
    {
        switch (sender.Presenter.Kind)
        {
            case AppWindowPresenterKind.CompactOverlay:
                // Compact overlay - hide custom title bar
                // and use the default system title bar instead.
                AppTitleBar.Visibility = Visibility.Collapsed;
                sender.TitleBar.ResetToDefault();
                break;

            case AppWindowPresenterKind.FullScreen:
                // Full screen - hide the custom title bar
                // and the default system title bar.
                AppTitleBar.Visibility = Visibility.Collapsed;
                sender.TitleBar.ExtendsContentIntoTitleBar = true;
                break;

            case AppWindowPresenterKind.Overlapped:
                // Normal - hide the system title bar
                // and use the custom title bar instead.
                AppTitleBar.Visibility = Visibility.Visible;
                sender.TitleBar.ExtendsContentIntoTitleBar = true;
                break;

            default:
                // Use the default system title bar.
                sender.TitleBar.ResetToDefault();
                break;
        }
    }
}
注意
只有您的應用程式支援,才能輸入全螢幕和精簡重疊模式。 如需詳細資訊,請參閱管理應用程式視窗、FullScreenPresenter 和 CompactOverlayPresenter。
可行與禁止事項
- 當您的視窗處於作用中或非使用中狀態時,務必確保其明顯可區別。 您至少要變更標題列中文字、圖示和按鈕的色彩。
- 務必沿著應用程式畫布頂端邊緣定義拖曳區域。 讓系統標題列的位置相符可讓使用者更容易找到。
- 務必讓定義的拖曳區域與應用程式畫布上視覺標題列 (如果有的話) 的拖曳區域相符。
完全自訂範例
此範例顯示完全自訂一節中所述的所有程式碼。
<Window
    x:Class="WinUI3_CustomTitleBar.MainWindow"
    xmlns="http://schemas.microsoft.com/winfx/2006/xaml/presentation"
    xmlns:x="http://schemas.microsoft.com/winfx/2006/xaml"
    xmlns:d="http://schemas.microsoft.com/expression/blend/2008"
    xmlns:mc="http://schemas.openxmlformats.org/markup-compatibility/2006"
    mc:Ignorable="d">

    <Grid>
        <Grid.RowDefinitions>
            <RowDefinition Height="Auto"/>
            <RowDefinition/>
        </Grid.RowDefinitions>

        <Grid x:Name="AppTitleBar"
      Height="48">
            <Grid.ColumnDefinitions>
                <ColumnDefinition x:Name="LeftPaddingColumn" Width="0"/>
                <ColumnDefinition x:Name="IconColumn" Width="Auto"/>
                <ColumnDefinition x:Name="TitleColumn" Width="Auto"/>
                <ColumnDefinition x:Name="LeftDragColumn" Width="*"/>
                <ColumnDefinition x:Name="SearchColumn" Width="4*" MinWidth="220"/>
                <ColumnDefinition x:Name="RightDragColumn" Width="*" MinWidth="48"/>
                <ColumnDefinition x:Name="AccountColumn" Width="Auto"/>
                <ColumnDefinition x:Name="RightPaddingColumn" Width="0"/>
            </Grid.ColumnDefinitions>
            <Image x:Name="TitleBarIcon"
           Source="ms-appx:///Assets/StoreLogo.png"
           Grid.Column="1"
           Width="16" Height="16"
           Margin="8,0,4,0"/>
            <TextBlock x:Name="TitleBarTextBlock"
                       Text="App title"
                       Style="{StaticResource CaptionTextBlockStyle}"
                       Grid.Column="2"
                       VerticalAlignment="Center">
            </TextBlock>
            <AutoSuggestBox x:Name="TitleBarSearchBox"
                            Grid.Column="4"
                            QueryIcon="Find"
                            PlaceholderText="Search"
                            VerticalAlignment="Center"
                            MaxWidth="600"/>
            <PersonPicture x:Name="PersonPic"
                           Grid.Column="6"
                           Height="32" Margin="0,0,16,0"/>
        </Grid>

        <NavigationView Grid.Row="1"
                        IsBackButtonVisible="Collapsed"
                        IsSettingsVisible="False">
            <StackPanel>
                <TextBlock Text="Content"
                           Style="{ThemeResource TitleTextBlockStyle}"
                           Margin="32,0,0,0"/>
                <StackPanel Grid.Row="1" VerticalAlignment="Center">
                    <Button Margin="4" x:Name="CompactoverlaytBtn"
                            Content="Enter CompactOverlay"
                            Click="SwitchPresenter"/>
                    <Button Margin="4" x:Name="FullscreenBtn"
                            Content="Enter FullScreen"
                            Click="SwitchPresenter"/>
                    <Button Margin="4" x:Name="OverlappedBtn"
                            Content="Revert to default (Overlapped)"
                            Click="SwitchPresenter"/>
                </StackPanel>
            </StackPanel>
        </NavigationView>
    </Grid>
</Window>
using Microsoft.UI.Input;
using Microsoft.UI.Windowing;
using Microsoft.UI.Xaml;
using Microsoft.UI.Xaml.Controls;
using Microsoft.UI.Xaml.Media;
using System;
using Windows.ApplicationModel;
using Rect = Windows.Foundation.Rect;

public sealed partial class MainWindow : Window
{
    private AppWindow m_AppWindow;

    public MainWindow()
    {
        this.InitializeComponent();

        // Assumes "this" is a XAML Window. In projects that don't use
        // WinUI 3 1.3 or later, use interop APIs to get the AppWindow.
        m_AppWindow = this.AppWindow;
        m_AppWindow.Changed += AppWindow_Changed;
        Activated += MainWindow_Activated;
        AppTitleBar.SizeChanged += AppTitleBar_SizeChanged;
        AppTitleBar.Loaded += AppTitleBar_Loaded;

        ExtendsContentIntoTitleBar = true;
        if (ExtendsContentIntoTitleBar == true)
        {
            m_AppWindow.TitleBar.PreferredHeightOption = TitleBarHeightOption.Tall;
        }
        TitleBarTextBlock.Text = AppInfo.Current.DisplayInfo.DisplayName;
    }

    private void AppTitleBar_Loaded(object sender, RoutedEventArgs e)
        {
            if (ExtendsContentIntoTitleBar == true)
            {
                // Set the initial interactive regions.
                SetRegionsForCustomTitleBar();
            }
        }

    private void AppTitleBar_SizeChanged(object sender, SizeChangedEventArgs e)
        {
            if (ExtendsContentIntoTitleBar == true)
            {
                // Update interactive regions if the size of the window changes.
                SetRegionsForCustomTitleBar();
            }
        }

    private void SetRegionsForCustomTitleBar()
    {
        // Specify the interactive regions of the title bar.

        double scaleAdjustment = AppTitleBar.XamlRoot.RasterizationScale;

        RightPaddingColumn.Width = new GridLength(m_AppWindow.TitleBar.RightInset / scaleAdjustment);
        LeftPaddingColumn.Width = new GridLength(m_AppWindow.TitleBar.LeftInset / scaleAdjustment);

        // Get the rectangle around the AutoSuggestBox control.
        GeneralTransform transform = TitleBarSearchBox.TransformToVisual(null);
        Rect bounds = transform.TransformBounds(new Rect(0, 0,
                                                         TitleBarSearchBox.ActualWidth,
                                                         TitleBarSearchBox.ActualHeight));
        Windows.Graphics.RectInt32 SearchBoxRect = GetRect(bounds, scaleAdjustment);

        // Get the rectangle around the PersonPicture control.
        transform = PersonPic.TransformToVisual(null);
        bounds = transform.TransformBounds(new Rect(0, 0,
                                                    PersonPic.ActualWidth,
                                                    PersonPic.ActualHeight));
        Windows.Graphics.RectInt32 PersonPicRect = GetRect(bounds, scaleAdjustment);

        var rectArray = new Windows.Graphics.RectInt32[] { SearchBoxRect, PersonPicRect };

        InputNonClientPointerSource nonClientInputSrc =
            InputNonClientPointerSource.GetForWindowId(this.AppWindow.Id);
        nonClientInputSrc.SetRegionRects(NonClientRegionKind.Passthrough, rectArray);
    }

    private Windows.Graphics.RectInt32 GetRect(Rect bounds, double scale)
    {
        return new Windows.Graphics.RectInt32(
            _X: (int)Math.Round(bounds.X * scale),
            _Y: (int)Math.Round(bounds.Y * scale),
            _Width: (int)Math.Round(bounds.Width * scale),
            _Height: (int)Math.Round(bounds.Height * scale)
        );
    }

    private void MainWindow_Activated(object sender, WindowActivatedEventArgs args)
    {
        if (args.WindowActivationState == WindowActivationState.Deactivated)
        {
            TitleBarTextBlock.Foreground =
                (SolidColorBrush)App.Current.Resources["WindowCaptionForegroundDisabled"];
        }
        else
        {
            TitleBarTextBlock.Foreground =
                (SolidColorBrush)App.Current.Resources["WindowCaptionForeground"];
        }
    }

    private void AppWindow_Changed(AppWindow sender, AppWindowChangedEventArgs args)
    {
        if (args.DidPresenterChange)
        {
            switch (sender.Presenter.Kind)
            {
                case AppWindowPresenterKind.CompactOverlay:
                    // Compact overlay - hide custom title bar
                    // and use the default system title bar instead.
                    AppTitleBar.Visibility = Visibility.Collapsed;
                    sender.TitleBar.ResetToDefault();
                    break;

                case AppWindowPresenterKind.FullScreen:
                    // Full screen - hide the custom title bar
                    // and the default system title bar.
                    AppTitleBar.Visibility = Visibility.Collapsed;
                    sender.TitleBar.ExtendsContentIntoTitleBar = true;
                    break;

                case AppWindowPresenterKind.Overlapped:
                    // Normal - hide the system title bar
                    // and use the custom title bar instead.
                    AppTitleBar.Visibility = Visibility.Visible;
                    sender.TitleBar.ExtendsContentIntoTitleBar = true;
                    break;

                default:
                    // Use the default system title bar.
                    sender.TitleBar.ResetToDefault();
                    break;
            }
        }
    }

    private void SwitchPresenter(object sender, RoutedEventArgs e)
    {
        if (AppWindow != null)
        {
            AppWindowPresenterKind newPresenterKind;
            switch ((sender as Button).Name)
            {
                case "CompactoverlaytBtn":
                    newPresenterKind = AppWindowPresenterKind.CompactOverlay;
                    break;

                case "FullscreenBtn":
                    newPresenterKind = AppWindowPresenterKind.FullScreen;
                    break;

                case "OverlappedBtn":
                    newPresenterKind = AppWindowPresenterKind.Overlapped;
                    break;

                default:
                    newPresenterKind = AppWindowPresenterKind.Default;
                    break;
            }

            // If the same presenter button was pressed as the
            // mode we're in, toggle the window back to Default.
            if (newPresenterKind == AppWindow.Presenter.Kind)
            {
                AppWindow.SetPresenter(AppWindowPresenterKind.Default);
            }
            else
            {
                // Else request a presenter of the selected kind
                // to be created and applied to the window.
                AppWindow.SetPresenter(newPresenterKind);
            }
        }
    }
}
